Dollar Tree moss bunny peeps on wood + FREE SVG

EASY SPRING CRAFT

DIY spring Easter Dollar Tree craft, easy and simple peep bunny craft made out of sheet moss. Frugal Easter craft for spring using your Cricut or vinyl cutting machine. Scrap wood craft project

DIY DOLLAR TREE SHEET MOSS BUNNIES + FREE SVG

Need an easy & inexpensive spring or Easter craft? This little moss bunny sign will fit in perfectly with your farmhouse or rustic decorations! And it won’t break the bank!

I love the Dollar Tree and I also love my Cricut machine. So when I can make projects combining the two it’s like fireworks in my craft room! Today I made little moss peep bunny cutouts using both my Dollar Tree find and the help of my never fail me Cricut machine. Be sure to check out this DOLLAR TREE BOOK STACK if you love this spring dollar store craft.

DIY spring Easter Dollar Tree craft, easy and simple peep bunny craft made out of sheet moss. Frugal Easter craft for spring using your Cricut or vinyl cutting machine. Scrap wood craft project

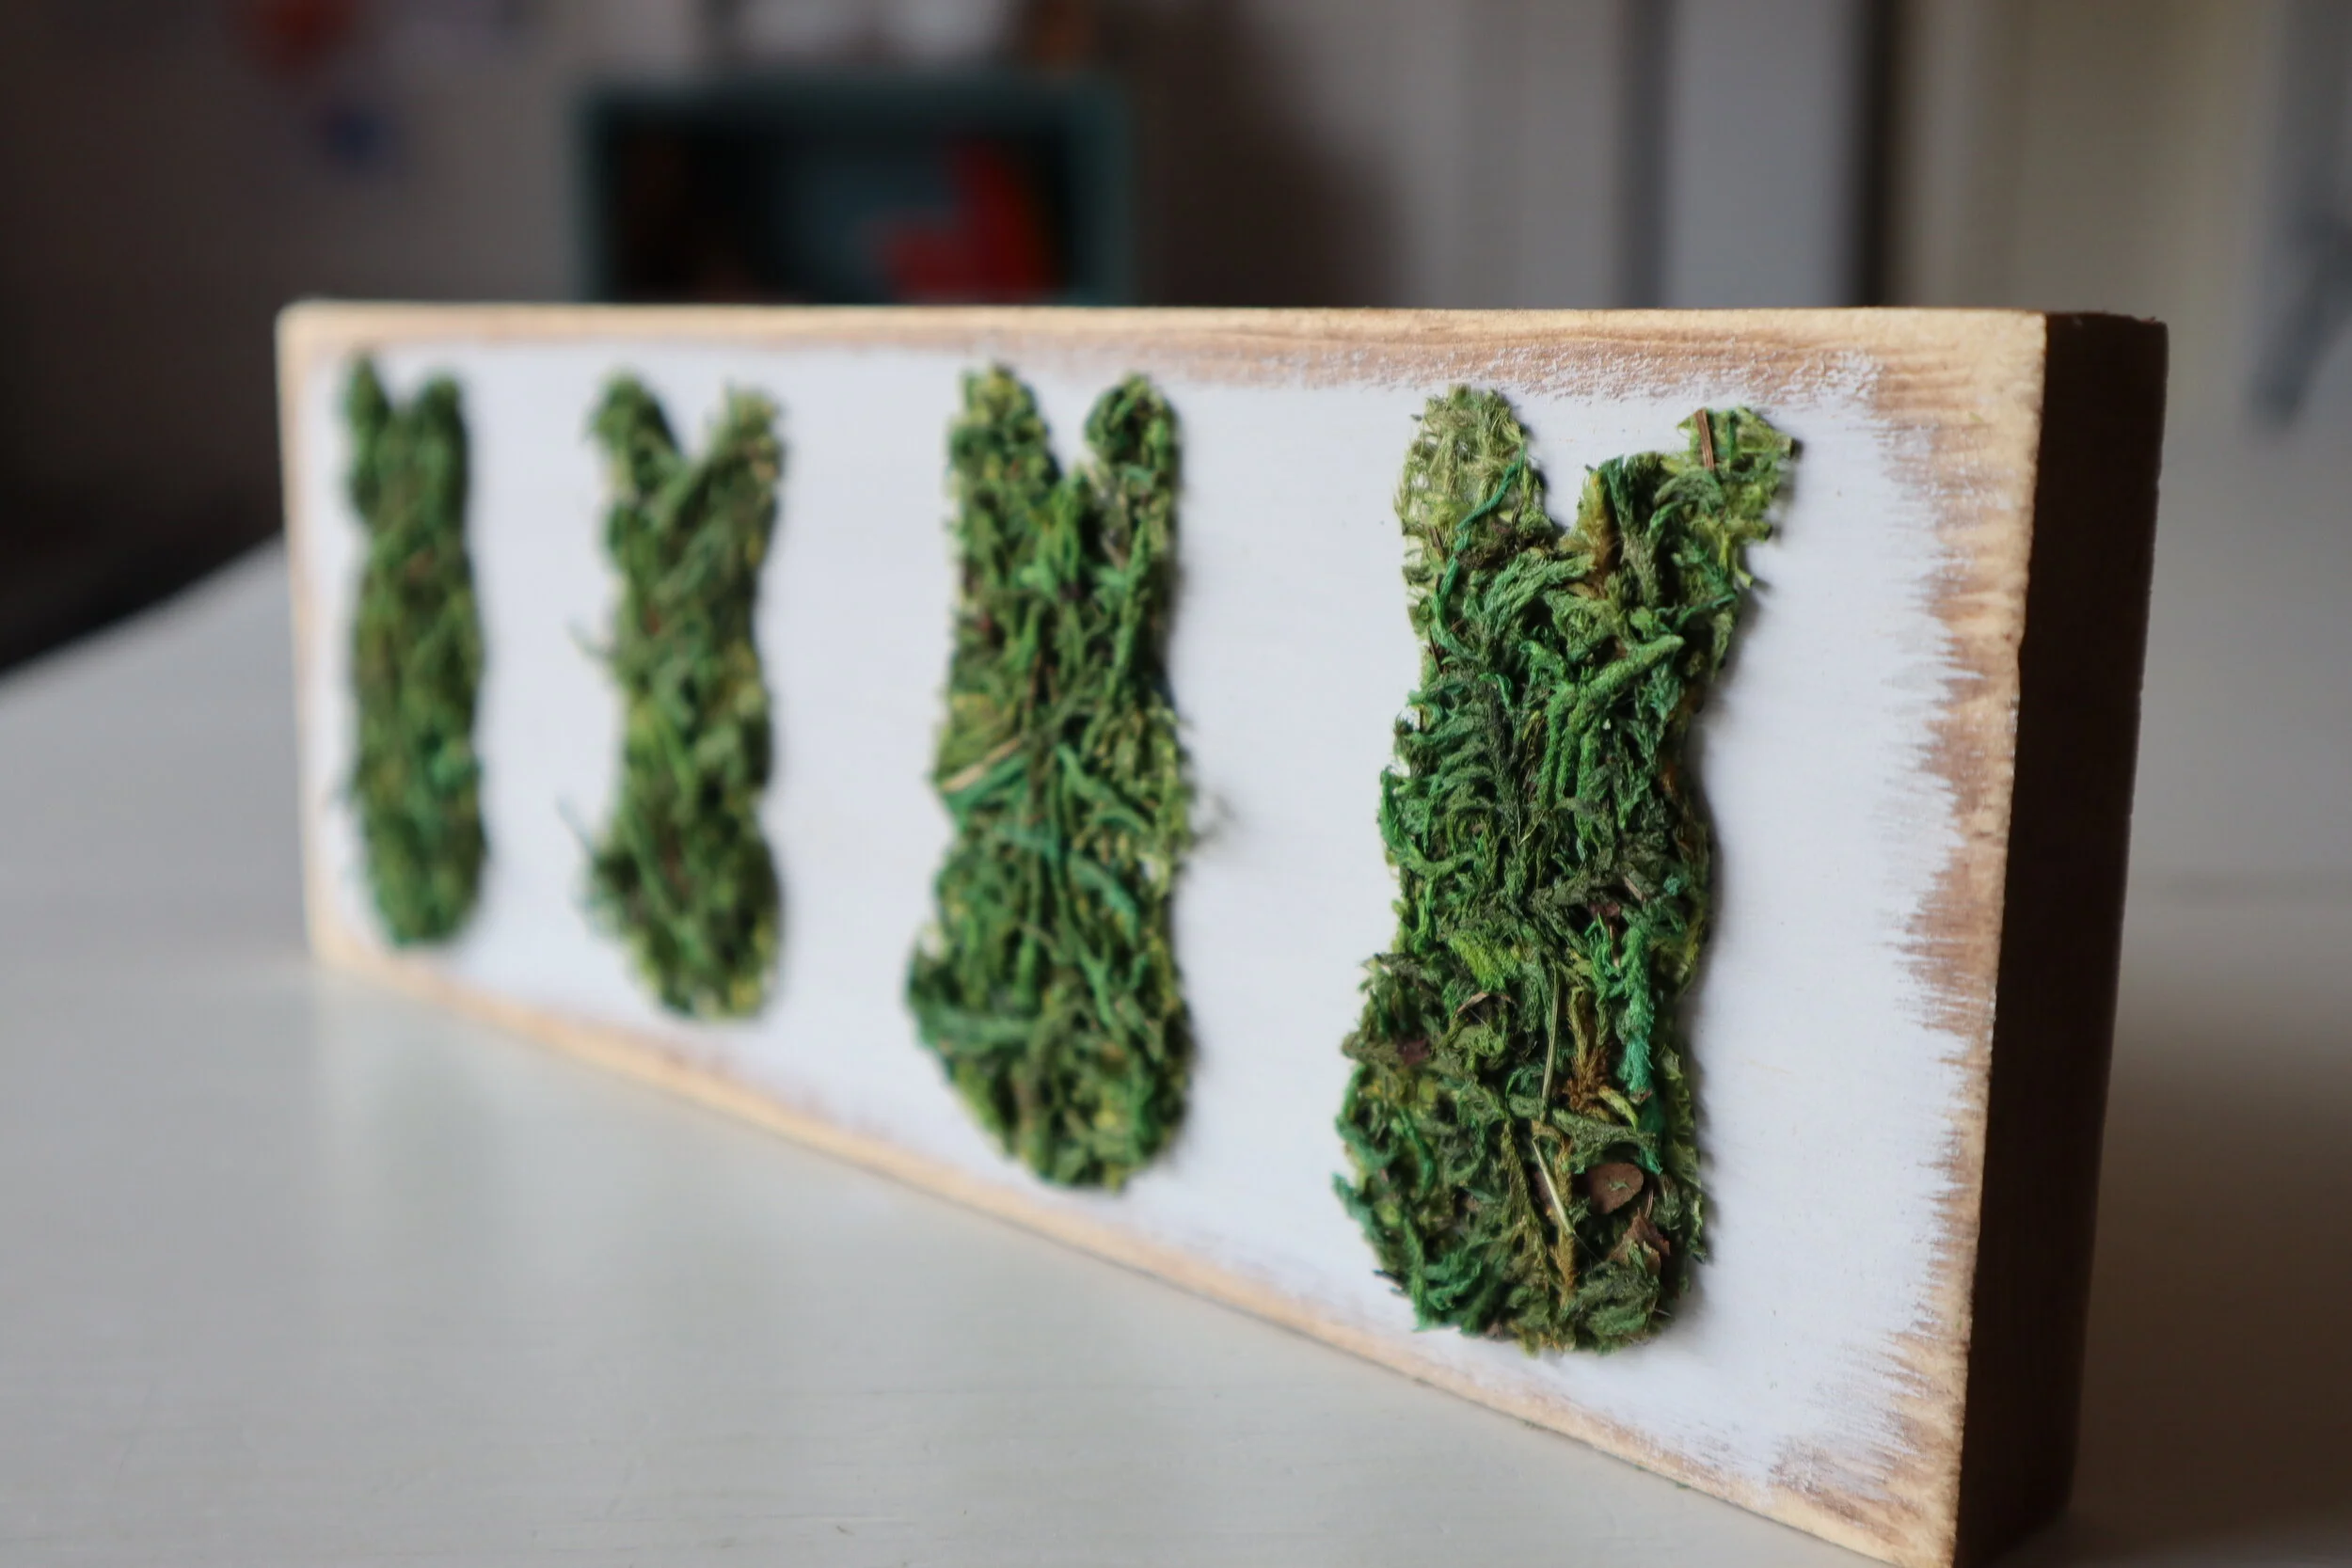
This spring Easter craft was super easy, crazy quick and it represents my gaggle of girls. I am a momma to four daughters so I wanted there to be four little moss bunny peeps to represent them <3 !! It just so happened to work out perfectly that I had a 10” piece of scrap wood I originally made for a different craft over a year ago {yes I’m one of those craft hoarder ladies} to use for this simple DIY. So there was no need to cut, paint, or stain anything today at least.

Affiliate Disclosure. Some of the links on this website are affiliate links, which means that I may earn a small commission if you click on the link or make a purchase using the link. If you make a purchase you will not be charged anything additional.

DIY spring Easter Dollar Tree craft, easy and simple peep bunny craft made out of sheet moss. Frugal Easter craft for spring using your Cricut or vinyl cutting machine. Scrap wood craft project

1. WOOD BASE

I used a piece of scrap wood from another project. It was already cut, stained, and painted so I didn’t need to do that for this project. If you want to know how to get that distressed wood look check out this DIY sign painting post.

2. CARDSTOCK BUNNY

I used my Cricut to cut out a cardstock template. You can grab the same SVG I used from my FREE RESOURCE LIBRARY. That is my personal library where I share all of my free printables, SVG cut files, and patterns. This is a much easier way for my readers to get access to my freebies rather than filtering through emails or worse deleting an email that contains a file you needed.

DIY spring Easter Dollar Tree craft, easy and simple peep bunny craft made out of sheet moss. Frugal Easter craft for spring using your Cricut or vinyl cutting machine. Scrap wood craft project

You will only need ONE cardstock bunny no matter how many bunnies you plan on cutting out of the sheet moss.

If you are new to the Cricut world be sure to check out my post on the top 10 supplies & accessories you need to get started using your Cricut cutting machine.

2. TRACE

I flipped my sheet of moss upside down on my craft surface. Then I traced around it using a dark colored permanent thick marker. I tried doing this with a pen but it didn’t work out so great so I grabbed the closest thing to me I could find that would work, a permanent marker. This was a little tricky only because the moss backing is so uneven but since I’m not a perfectionist it worked just fine.

DIY spring Easter Dollar Tree craft, easy and simple peep bunny craft made out of sheet moss. Frugal Easter craft for spring using your Cricut or vinyl cutting machine. Scrap wood craft project

I tried to fit all four bunnies on one side of the sheet so I could make the most of my $1 find lol!

3. CUT THE MOSS BUNNIES OUT

Using a pair of regular scissors I cut the peep bunnies out of the moss sheet. Some of the moss fell off in some pieces leaving it looking a little bare in spots but don’t worry if that happens to you. You can fix that at the very end.

DIY spring Easter Dollar Tree craft, easy and simple peep bunny craft made out of sheet moss. Frugal Easter craft for spring using your Cricut or vinyl cutting machine. Scrap wood craft project

4. GLUE

Before I glued my moss bunnies down I placed them on my piece of wood so I could make adjustments before they were glued down.

DIY spring Easter Dollar Tree craft, easy and simple peep bunny craft made out of sheet moss. Frugal Easter craft for spring using your Cricut or vinyl cutting machine. Scrap wood craft project

Then I used my fine tipped hot glue gun to glue them in place.

DIY spring Easter Dollar Tree craft, easy and simple peep bunny craft made out of sheet moss. Frugal Easter craft for spring using your Cricut or vinyl cutting machine. Scrap wood craft project

For the little areas that were bare I glue some leftover moss in those spots. You couldn’t even tell once I was finished that I had to add moss.

DIY spring Easter Dollar Tree craft, easy and simple peep bunny craft made out of sheet moss. Frugal Easter craft for spring using your Cricut or vinyl cutting machine. Scrap wood craft project

That’s it! So quick and easy. Click here for more DIY DOLLAR TREE CRAFTS.

DIY spring Easter Dollar Tree craft, easy and simple peep bunny craft made out of sheet moss. Frugal Easter craft for spring using your Cricut or vinyl cutting machine. Scrap wood craft project

Let me know if you have any questions in the comments below.

DIY mini Easter wooden tags

DIY mini wood tags for Easter. How to use your Cricut to make wood signs for Easter. Make your own farmhouse tray mini signs for spring.

MAKE YOUR OWN RUSTIC WOOD TAGS FOR EASTER

DIY mini wood tags for Easter. How to use your Cricut to make wood signs for Easter. Make your own farmhouse tray mini signs for spring.

I can’t believe how popular these little wood tags for Easter are! I keep selling out of this spring DIY craft kit almost daily. Since the entire country is basically on lockdown this kit is giving people a much needed creative outlet. I am SO happy to be able to provide this joy to so many around our nation, especially at a time like this.

Affiliate Disclosure. Some of the links on this website are affiliate links, which means that I may earn a small commission if you click on the link or make a purchase using the link. If you make a purchase you will not be charged anything additional.

In this crafty tutorial I’m going to show you how to stencil these wood tags for Easter. If you’re wanting a tutorial on how to cut wood tags you’ll want to go here. I share the measurements, angles, and even the drill bit size to make the twine hole in the middle.

DIY RUSTIC WOOD TAGS FOR EASTER

Here’s what you’ll need


Other helpful tools I used

If you love these rustic wood spring tags be sure to check out this super easy Dollar Tree moss bunny craft.

Cutting your wood pieces

  1. First you want to cut out your wood tags. I used my Ryobi miter saw to do this. Cut a 1x4 in to 3 5” long pieces. On the top of each 5” piece measure in 1” and make a mark. Set your miter saw to 45 degrees, line it up with your 1” mark and cut. Flip your tag over and do the same to the other side. 

  2. Now drill a hole in the middle of the top of each piece. This is for your twine holder to go through.

  3. After you have that done give each piece a quick sanding. You don’t have to get crazy with this, it’s not a fine piece of furniture. I use 120 grit sandpaper for this and that’s it. Just enough to take off that shine it has when you get it from the lumberyard.

    WATCH THE VIDEO OF HOW I MADE THESE USING MY MITER SAW

Stencils

You can use any cutting machine to create your Easter themed stencils. I use my Cricut Explore to make all of mine. If you have and are using a Cricut you can get the HANGIN’ WITH MY PEEPS image to use here. You can use my FREE SVG’s for the bunny image & happy Easter cutting files here. I use Oramask stenciling film to make my stencils. While it is a little more expensive than other materials I have found it works the absolute best for stenciling.

Painting (the fun part!)

First a thin layer of gray paint on each wood tag. Be sure it is a thin layer, you will still be able to see the wood grain through the paint. After the first thin layer is dry you can paint a second thin layer. You don’t want more than two layers of base paint on your wooden tags, or any painted wood sign. Too much paint will cause issues when stenciling with base paint peel up, which can be impossible to fix sometimes and honestly it just plain sucks to have to go back and fix.

DIY mini wood tags for Easter. How to use your Cricut to make wood signs for Easter. Make your own farmhouse tray mini signs for spring. Fun rustic Easter and spring craft for adults.

2. After your base paint is completely dry you can apply your stencils to all three wood blanks. Apply your transfer tape to your stencils (if you bought my DIY CRAFT KIT this step has already been done for you). Peel the paper backing from your stencil/transfer tape. Go slow.  Place your stencils sticky side down on the front of your painted wood tag. The front is just whichever side you prefer best ;). Using your vinyl squeegee, if you don’t have one you can use a plastic store rewards card, and rub the stencil to that it adheres to the wood. Slowly peel the transfer tape away from the wood leaving your stencil attached to the wood. I find that it works best when I roll the transfer tape away, check out this DIY PAINTED WOOD SIGN TUTORIAL for  a closer look at how to do this.

3. Use masking tape to tape off the edges of your stencil so you don’t get paint on areas of the wood tags that you don’t want paint on.

DIY mini wood tags for Easter. How to use your Cricut to make wood signs for Easter. Make your own farmhouse tray mini signs for spring. Fun rustic Easter and spring craft for adults.

4. Using one end of one of the sponges dip it in the white paint. You need very little paint, the more paint you use the more paint bleed you will likely have. Dab your sponge onto the exposed areas of your stencil. The coverage should be VERY faint. Let that dry and repeat up to three times. You don’t want to apply more than three coats as this could cause issues with paint peel up where you just stenciled. If you want the cute little bunnies to be different colors paint them white first then finish them with two layers of your preferred paint color. I painted mine in pink, blue, and yellow. Giving them a white base first will allow the colors to really pop if you are painting on a dark base.

DIY mini wood tags for Easter. How to use your Cricut to make wood signs for Easter. Make your own farmhouse tray mini signs for spring. Fun rustic Easter and spring craft for adults.

5. Peel up your stencils and tape. Using an xacto knife helps to remove the middle piece of the stencils.

DIY mini wood tags for Easter. How to use your Cricut to make wood signs for Easter. Make your own farmhouse tray mini signs for spring. Fun rustic Easter and spring craft for adults.

Distressing

After your paint completely dries from stenciling you can start distressing your wood Easter tags. I LOVE this technique because it’s super easy and quick. Using sand paper or your sander give a quick sanding to the edges, corners, and lightly on the front of each wooden tag. Wipe off and dust.

DIY mini wood tags for Easter. How to use your Cricut to make wood signs for Easter. Make your own farmhouse tray mini signs for spring. Fun rustic Easter and spring craft for adults.

Adding twine

Probably the easiest step is adding the twine. Decide how long you would like your twine hangers to be. I think I measured mine at 12” or so. You’ll need 3 pieces, one for each wood tag. Feed one piece of twine through the hole in one of the wood tags then tie it in a knot.

DIY mini wood tags for Easter. How to use your Cricut to make wood signs for Easter. Make your own farmhouse tray mini signs for spring. Fun rustic Easter and spring craft for adults.

You’re ready to display your Easter wood tags in your home. I know it may seem like a lot of steps written out but really these are super easy and quick to DIY once you get going on them.

DIY mini wood tags for Easter. How to use your Cricut to make wood signs for Easter. Make your own farmhouse tray mini signs for spring. Fun rustic Easter and spring craft for adults.

Like with all of my DIY tutorials if you have any questions please reach out. Leave a comment below or send me a message on one of my social media pages. You can find my links at the top.

Happy Crafting!

How to make your own corsage with faux flowers

DIY corsage made with faux flowers. How to make a corsage for little girls with fake flowers from Walmart. Silk flower easy corsage for spring, prom, weddings, father daughter dance.

DIY YOUR OWN CORSAGE WITH FAKE FLOWERS

Real corsages are gorgeous! But they can be a little pricey, especially for being a small part of the fancy attire. Our small town held a father daughter dance and I really wanted my girls to feel extra special and wear a corsage. Since my husband was taking three of our four daughters I figured it would be more cost effective if I ordered them from a big chain grocery florist. I looked online and they were $20+ per corsage plus $20 for my husbands boutonniere. A total of $80 for accent flowers…that was not in the budget. What I did instead was take a trip to our local Walmart and picked out some inexpensive flowers, hair ties, and floral tape. I spent a total of $13 and everyone got a beautiful corsage/boutonniere to wear to the fancy daddy daughter dance.

Affiliate Disclosure. Some of the links on this website are affiliate links, which means that I may earn a small commission if you click on the link or make a purchase using the link. If you make a purchase you will not be charged anything additional. This is just a way I can help add to our family finances to raise our four daughters. Please know I would never recommend a product or service I do not totally stand behind.

I’ll be honest, I tried to make one for the oldest of the four daughters when she was in the first grade and it turned out awful! I used a real flower that was WAY too big and it seriously looked like a Pinterest fail! This time around I extra crossed my fingers they would turn out as a win and thank goodness they did! The girls got SO MANY C0MPLIMENTS on them at the dance.

How to make your own corsage using faux flowers. DIY fake flower wrist corsage tutorial using spring florals. Father daughter dance flowers.

DIY FLOWER CORSAGE

Here’s what I used

  • faux round roses

  • faux babies breath

  • faux spring flower bunch

  • green floral tape

  • felt

  • scissors

  • wire cutters

  • black hair tie (pony tail holder)

  • hot glue gun

  • gorilla glue hot glue sticks

Make this DIY even more inexpensive by visiting your local DOLLAR TREE. They have a great floral selection depending on the season.

How to make your own faux flower corsage. Pony tail holder wrist corsage DIY using fake flowers, super inexpensive to make. Spring flower corsage to make for weddings, father daughter dance, or prom.

I found everything I needed at Walmart. I already had the glue, glue gun, and felt on hand so I didn’t need to pick those up. I also had a ton of supplies left over. I used some in their hair for little accents and then still had some left over. I couldn’t believe it cost around $3 per corsage to make. That beats $20/ wrist corsage any day!

1. I cut a rectangle that was smaller than the width of one of my daughter’s wrist. This is what I glued my flowers to. Then, I cut a second rectangle that was a little smaller than the first rectangle.

DIY corsage made with faux flowers. How to make a corsage for little girls with fake flowers from Walmart. Silk flower easy corsage for spring, prom, weddings, father daughter dance.

2. I picked out 2 main flowers for the corsages. I used these gorgeous round roses I found at my local Walmart that were about $3 per stem. I used 2 per corsage and 1 for my husband’s boutonniere. I made these round roses the focal point and added the other flowers as accents. I pulled the round rose flower heads off of their stems then I cut them flush at the bottom of the flower so that the bottom side of the flower was flat.

DIY corsage made with faux flowers. How to make a corsage for little girls with fake flowers from Walmart. Silk flower easy corsage for spring, prom, weddings, father daughter dance.

3. I started layering the flowers that surrounded the main flowers. This took me a little while to get the flowers where I wanted them to go. I used a combination of baby’s breath, lavender, and a spring flower bunch. I had to trim them up here and there, so don’t be afraid to do that too. This will keep your corsage from being gigantic. See the picture below, I had to trim down the lavender stems so that they wouldn’t be so long. I did this carefully making sure I wasn’t removing too much.

DIY corsage made with faux flowers. How to make a corsage for little girls with fake flowers from Walmart. Silk flower easy corsage for spring, prom, weddings, father daughter dance.

4. I attached the accent flower stems together. Basically I made double ended floral stems. I tried to make them somewhat similar in size in both length and width so that the corsage wasn’t lopsided. I didn’t make them identical, I used different accent flowers on each end but was sure to incorporate baby’s breath on each end. Then I wrapped the middle of the double ended floral stem in green floral tape to keep them together.

DIY corsage made with faux flowers. How to make a corsage for little girls with fake flowers from Walmart. Silk flower easy corsage for spring, prom, weddings, father daughter dance.

5. I placed them on the bigger rectangle to see where exactly I wanted to place them before I started gluing anything down. This is the time to trim your felt down if you need to.

DIY corsage made with faux flowers. How to make a corsage for little girls with fake flowers from Walmart. Silk flower easy corsage for spring, prom, weddings, father daughter dance.

6. Then I used my glue gun to glue everything down to the felt. I first glued down the double ended floral stem I made. Let that dry so that it gets secure. Then I glued down the main focal point flowers, the round roses.

DIY corsage made with faux flowers. How to make a corsage for little girls with fake flowers from Walmart. Silk flower easy corsage for spring, prom, weddings, father daughter dance.

7. Fill in the gaps. After I got the roses glued down and the glue dried I added in more accent flowers where I thought the corsage was bare. I even cut off single leaves, this spring bunch I picked up had the most beautiful soft lambs ear like leaves. I added in several of those leaves where I thought they would look good. I attached some to the sides of the roses. I also did this with the baby’s breath. Before I glued them down I was sure to double check I liked that placement. A tiny dab of glue is all you need for these little pieces.

DIY corsage made with faux flowers. How to make a corsage for little girls with fake flowers from Walmart. Silk flower easy corsage for spring, prom, weddings, father daughter dance.

8. Once I was happy with how it look and the glue was dry I flipped it over and added a thick hair tie. While recording this tutorial I actually attached my hair tie the wrong way. For the most comfort I suggest gluing on the hair tie so that the corsage lays vertically against the wrist. So you would want to attach your hair tie so that it would sit on the rectangle horizontally. Once that glue dries glue the second rectangle on top of the hair tie so that the hair tie is sandwiched in-between the two pieces of felt. This will make it really secure and will be difficult for the elastic to come off.

DIY corsage made with faux flowers. How to make a corsage for little girls with fake flowers from Walmart. Silk flower easy corsage for spring, prom, weddings, father daughter dance.

I hope you enjoyed this inexpensive tutorial. Like with all of my posts, if you have any questions at all please don’t hesitate to ask.

DIY corsage made with faux flowers. How to make a corsage for little girls with fake flowers from Walmart. Silk flower easy corsage for spring, prom, weddings, father daughter dance.

Happy crafting!

DIY Dollar Tree St. Patrick's Day rag wreath

DIY Dollar Tree rag wreath for St. Patrick's Day. How to make an easy rag wreath using a Dollar Tree wire wreath form and scraps of fabric or fat quarters.

How to make a rag wreath using a Dollar Tree wire wreath form

I LOVE shopping at the Dollar Tree. When they put one in our small town my girls and I were EX-CI-TED! It’s not that we lived too far away from the next Dollar Tree but it is so nice to have one that is just a couple minutes away vs having to get on the highway and drive 25+ minutes, we are loving this convenience! I don’t buy everything from the Dollar Tree though, but there are several things I do prefer to pick up from here like wire wreath forms. Here’s my list of the top 15 craft supplies I buy from the Dollar Tree.

Affiliate Disclosure. Some of the links on this website are affiliate links, which means that I may earn a small commission if you click on the link or make a purchase using the link. If you make a purchase you will not be charged anything additional.

There are so many different types of wreaths you can make with the wire wreath forms but my absolute favorite are the rag wreaths. They are so beautifully imperfect and they tie in nicely with my rustic/inexpensive style lol! This is my third rag wreath I’ve posted here on my blog. My first one was this super country cottage chic spring wreath. I really wanted to put it up for Valentine’s day this year but decided against it since it has bunnies for one of the prints. My second rag wreath was this rustic but patriotic red, white, and blue one.

For my St. Patrick’s Day rag wreath, or tied fabric wreath as some call it, I wanted to add a little sign that said welcome. I admit I took the easy way out and didn’t stencil the sign, I made a vinyl decal instead. It is far easier to make these they just don’t last as long as the fully painted signs I create and ship world wide in my handmade business. Check out my handmade signs here. If you’ve been dreaming of making your own hand painted wooden signs but you keep running into problems my sign painters e-course is for you!

Check out the rag wreath video tutorial or keep scrolling for written/picture instructions.

Here’s what you’ll need to make your own St. Patrick’s Day rag wreath

Helpful tools

DIY Dollar Tree rag wreath for St. Patrick's Day. How to make an easy rag wreath using a Dollar Tree wire wreath form and scraps of fabric or fat quarters.

DIY rag wreath for ST. Patrick’s Day

One-

Unfold your fabric. Then about ever 1” or so cut a small slit on one side of the fabric. Now rip those 1” sections so that you have a bunch of strips of fabric. Repeat this step for all of your pieces of fabric. I’ve found fat quarters that you get from Walmart work really well for these wreaths.

DIY Dollar Tree rag wreath for St. Patrick's Day. How to make an easy rag wreath using a Dollar Tree wire wreath form and scraps of fabric or fat quarters.

Two-

Cut your ripped fabric strips into 3-4 inch pieces. These don’t have to be perfect, mine are never the exact same size.

DIY Dollar Tree rag wreath for St. Patrick's Day. How to make an easy rag wreath using a Dollar Tree wire wreath form and scraps of fabric or fat quarters.

Three-

Tie your pieces in a single knot onto your wire wreath form. This took me about 45 minutes to complete.

DIY Dollar Tree rag wreath for St. Patrick's Day. How to make an easy rag wreath using a Dollar Tree wire wreath form and scraps of fabric or fat quarters.

Four-

Once you have all of your fabric pieces tied onto your wire wreath form you flip your wreath over. Then push any long fabric pieces back on to the front.

DIY Dollar Tree rag wreath for St. Patrick's Day. How to make an easy rag wreath using a Dollar Tree wire wreath form and scraps of fabric or fat quarters.

Five-

Set your wreath to the side so you can start on your welcome sign that is going to attach to the front. I used a piece of scrap wood I had in the garage from a previous project. Paint the base white, I used two coats of paint to get a good coverage. Be sure you let both coats dry completely before moving on to step 6.

DIY Dollar Tree rag wreath for St. Patrick's Day. How to make an easy rag wreath using a Dollar Tree wire wreath form and scraps of fabric or fat quarters.

Six-

Instead of stenciling this sign I applied a vinyl decal. I used my Cricut to cut out my vinyl decal. You can get my WELCOME Cricut cut file here.

DIY Dollar Tree rag wreath for St. Patrick's Day. How to make an easy rag wreath using a Dollar Tree wire wreath form and scraps of fabric or fat quarters.

Seven-

I bought a package of foam green clovers at my local Dollar Tree last year and thought these would be super cute to add to one side of my welcome sign. They were the same size so I trimmed down the shamrock I wanted to place on the top so that you could see a little bit the bottom shamrock showing through the edge. I did this same technique on this Rae Dunn inspired fall burlap leaf garland. Then I glued the two together and glued them down to the end of the sign.

DIY Dollar Tree rag wreath for St. Patrick's Day. How to make an easy rag wreath using a Dollar Tree wire wreath form and scraps of fabric or fat quarters.

Eight-

Attach your sign to your wreath. To do this I used a soft wire but I have no idea where I got it from. I would also recommend a floral wire for this step. I drilled holes in the top corners of my sign and used a small piece of wire to attach it to the wreath. Make a U shape to your wire, place one end of the wire in the hole of the sign and feed it to the back then twist the two ends together on the back side so you can’t see them once your wreath is hanging. Do this for both sides of your welcome sign to attach it to your wreath.

DIY Dollar Tree rag wreath for St. Patrick's Day. How to make an easy rag wreath using a Dollar Tree wire wreath form and scraps of fabric or fat quarters.

Nine-

I finished my wreath off with a 4” wide piece of burlap so I could hang it up. I didn’t really like the knot I made in the burlap so I wanted to hide it lol. I just took another piece of wire and secured the knot to the back of the wreath.

DIY Dollar Tree rag wreath for St. Patrick's Day. How to make an easy rag wreath using a Dollar Tree wire wreath form and scraps of fabric or fat quarters.

Now you're ready to hang your wreath for St. Patrick’s Day. I hope you enjoyed this crafty DIY. If you did and make your own St. Patty’s Day wreath I’d love to see pictures of it. As always with all of my tutorials, if you have any questions please don’t hesitate to ask:)!

DIY Dollar Tree rag wreath for St. Patrick's Day. How to make an easy rag wreath using a Dollar Tree wire wreath form and scraps of fabric or fat quarters.

Happy crafting!

Want instant access to my FREE RESOURCE LIBRARY? This is where I share my freebies of cut files, printables, checklists and more. Leave your info below and I will send you the password and link to get instant access into my library.

DIY mini St. Patrick's Day wood tags

DIY St. Patrick's Day wood tags, how to paint mini wood signs. Using Ryobi tools and a Cricut  to create handmade wood signs

DIY MINI WOOD TAGS FOR ST. PATRICK’S DAY

If you’ve been reading my blog you might know that my four daughters have been asking me to decorate more for the holidays…including St. Patrick’s Day decorations. Yes, that is a holiday they think I should decorate for too lol! So they win. I’ve truly been making an effort to have a more festive home even though daughter #4 totally rearranges everything.

Affiliate Disclosure. Some of the links on this website are affiliate links, which means that I may earn a small commission if you click on the link or make a purchase using the link. If you make a purchase you will not be charged anything additional.

I have been eyeing these adorable mini wood tags on Pinterest for forever now. They are CUTE! They tie in with pretty much anything. You can add these wood tags to a wreath, to a welcome sign, on the mantle (I really wish we had one but I’ll just have to make a faux mantle one of these days) or my favorite- to a tiered tray. Those trays are seriously rustic home décor overload! I love them!! I need to add one to my coffee bar soon.

If you’re looking for fun green holiday themed to make with the kiddos try this easy St. Patrick’s Day suncatcher.

To make this completely from scratch at home you’ll need a few power tools. But, if you don’t have power tools to DIY this craft from start to finish you can grab a DIY CRAFT KIT here. I haven’t always been super comfortable using power tools, actually I was deathly afraid of them not too long ago. Now that I’m over my power tool phobia here’s what I recommend for DIY crafters.

DIY St. Patrick’s Day Wood Tags

Here’s what you’ll need

If you’d like the same file I used to create this set of 3 mini wood St. Patrick’s Day tags you can get my Cricut file here. It’s in my FREE resource library. It’s where I keep all of my FREEBIES like files, printables, patterns, and more. You’ll need the password because I like to keep it a little bit secret but no worries it’s super easy to get. Jut fill out the prompt and you'll get instant access.

DIY craft kit for adults. How to make mini wood tags for St. Patrick's Day using your Cricut. How to stenicil wood signs for spring.

Watch the video or keep scrolling for step by step written/photo instructions for these wood St. Patrick’s Day tags.

Cutting your wood pieces

  1. First you want to cut out your wood tags. I used my Ryobi miter saw to do this. Cut a 1x4 in to 3 5” long pieces. On the top of each 5” piece measure in 1” and make a mark. Set your miter saw to 45 degrees, line it up with your 1” mark and cut. Flip your tag over and do the same to the other side.

  2. Now drill a hole in the middle of the top of each piece. This is for your twine holder to go through.

  3. After you have that done give each piece a quick sanding. You don’t have to get crazy with this, it’s not a fine piece of furniture. I use 120 grit sandpaper for this and that’s it. Just enough to take off that shine it has when you get it from the lumberyard.

    WATCH THE VIDEO OF HOW I MADE THESE USING MY MITER SAW

Stencils

You can use any cutting machine to create your stencils. I use my Cricut Explore to make all of mine. If you use a Cricut you can get my cutting file here. I use Oramask stenciling film to make my stencils. While it is a little more expensive than other materials I have found it works the absolute best for stenciling.

Painting (the fun part!)

  1. First a thin layer of white paint on each wood tag. Be sure it is a thin layer, you will still be able to see the wood grain through the paint. After the first thin layer is dry you can paint a second thin layer. You don’t want more than two layer of base paint on your wooden tags, or any painted wood sign. Too much paint will cause issues when stenciling with base paint peel up, which can be impossible to fix sometimes and honestly it just plain sucks to have to go back and fix.

DIY craft kit for adults. How to make mini wood tags for St. Patrick's Day using your Cricut. How to stenicil wood signs for spring.

2. After your base paint is completely dry you can apply your stencils to all three wood blanks. Apply your transfer tape to your stencils (if you bought my DIY CRAFT KIT this step has already been done for you). Peel the paper backing from your stencil/transfer tape. Go slow. Place your stencils sticky side down on the front of your painted wood tag. The front is just whichever side you prefer best ;). Using your vinyl squeegee, if you don’t have one you can use a plastic store rewards card, and rub the stencil to that it adheres to the wood. Slowly peel the transfer tape away from the wood leaving your stencil attached to the wood. I find that it works best when I roll the transfer tape away, check out this DIY PAINTED WOOD SIGN TUTORIAL for a closer look at how to do this.

DIY craft kit for adults. How to make mini wood tags for St. Patrick's Day using your Cricut. How to stenicil wood signs for spring.

3. Use masking tape to tape off the edges of your stencil so you don’t get paint on areas of the wood tags that you don’t want paint on.

DIY craft kit for adults. How to make mini wood tags for St. Patrick's Day using your Cricut. How to stenicil wood signs for spring.


4. Cut your stenciling sponge in half so you can use it in all three paint colors without mixing the colors.

DIY craft kit for adults. How to make mini wood tags for St. Patrick's Day using your Cricut. How to stenicil wood signs for spring.

5. Using one end of one of the sponges dip it in the lightest color of green. You need very little paint, the more paint you use the more paint bleed you will likely have. Dab your sponge onto one of your wood blocks where the clover is exposed on the wood. The coverage should be VERY faint. Let that dry and repeat up to three times. You don’t want to apply more than three coats as this could cause issues with paint peel up where you just stenciled.

DIY craft kit for adults. How to make mini wood tags for St. Patrick's Day using your Cricut. How to stenicil wood signs for spring.

6. Peel up your stencil and tape. Using an xacto knife helps to remove the middle piece of the clover.

DIY craft kit for adults. How to make mini wood tags for St. Patrick's Day using your Cricut. How to stenicil wood signs for spring.

7. Repeat steps 5 & 6 for your other two wood tag bases.

8. Let them dry.

How to make mini wood tags for St. Patrick's Day. Easy tutorial to make mini wooden tags for spring using your Cricut.

Distressing

After your paint completely dries from stenciling you can start distressing your wood St. Patrick’s Day tags. I LOVE using antiquing wax for this process. Antiquing wax comes in a several different colors but my favorite its definitely the regular antiquing wax. Learn more about how to transform your DIY farmhouse style crafts with antiquing wax.

  1. Using sand paper or your sander give a quick sanding to the edges, corners, and lightly on the front of each wooden tag. Wipe off and dust.

DIY craft kit for adults. How to make mini wood tags for St. Patrick's Day using your Cricut. How to stenicil wood signs for spring. How to distress handpainted wood signs using sandpaper.

2. Take your chip brush and lightly dip it into your antiquing wax. Dab off the excess, a little wax goes a very long way. Much like you did with the sandpaper, focus on brushing the wax on the edges, corners, and lightly on the front of your wooden tags.

DIY craft kit for adults. How to make mini wood tags for St. Patrick's Day using your Cricut. How to stenicil wood signs for spring. How to apply antiquing wax to wood.

Adding twine

Probably the easiest step is adding the twine. Decide how long you would like your twine hangers to be. I think I measured mine at 12” or so. You’ll need 3 pieces, one for each wood tag. Feed one piece of twine through the hole in one of the wood tags then tie it in a knot.

DIY craft kit for adults. How to make mini wood tags for St. Patrick's Day using your Cricut. How to stenicil wood signs for spring.

You’re ready to display your St. Patrick’s Day wood tags in your home. I know it may seem like a lot of steps written out but really these are super easy and quick to DIY once you get going on them.

Like with all of my DIY tutorials if you have any questions please reach out. Leave a comment below or send me a message on one of my social media pages. You can find my links at the top.

Happy Crafting!

Do you love freebies? Don’t forget to check out my FREE RESOURCE LIBRARY. It’s where I keep all of my FREE printables, files, and more. Go here to get instant access to my library