Interchangeable Christmas pallet sign

DIY twig stars for Christmas pallet sign. Interchangeable Christmas home decor on a budget. How to make easy and simple reversible home décor for the holidays. Make a sign from twigs.

INTERCHANGEABLE WINTER PALLET SIGN

I love decorating for the holidays. Especially Christmas. Now that I have a bigger home to decorate I’m finding it a little challenging to do AND keep it in budget. I have always had the heart of a frugal women so spending an arm and a leg to put up Christmas décor just wasn’t happening.

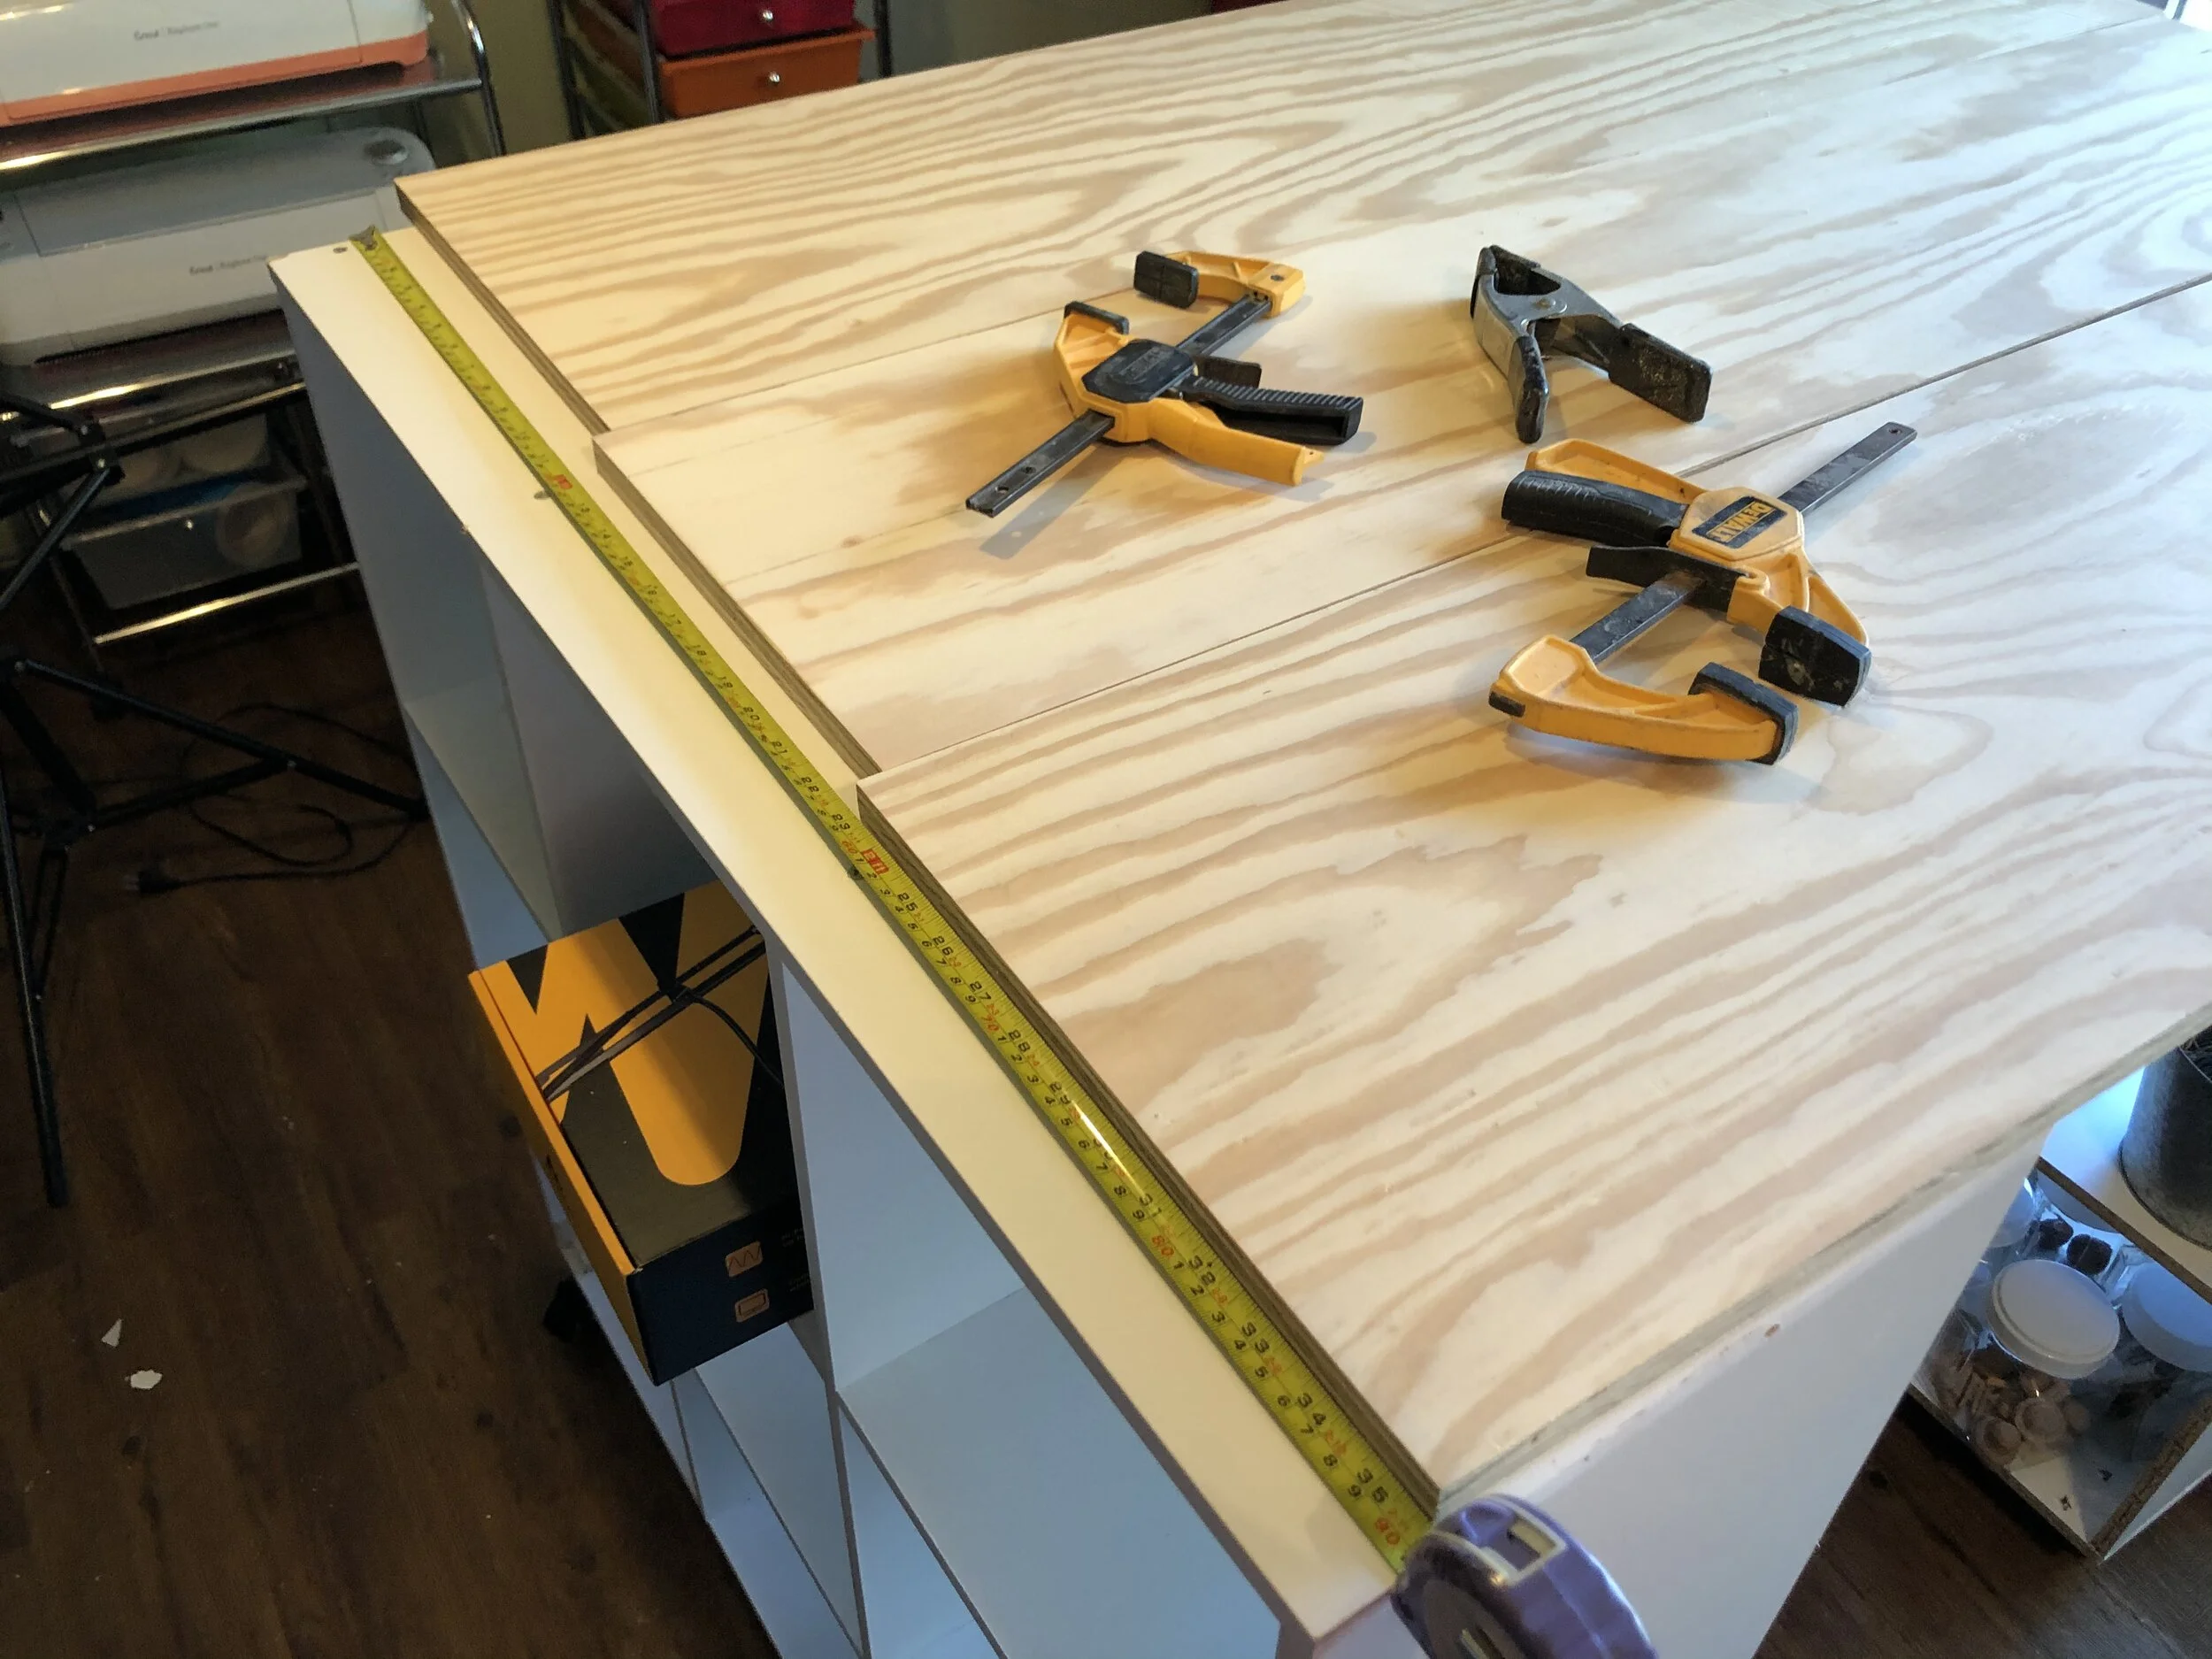
That’s why in the fall I made this lightweight faux pallet sign. It’s a blank pallet style sign that I can change out with the seasons. It’s a big statement type piece that I prop up on my dining room hutch. I love this so much. Best of all the planks I used to make this sign were left over from this plank wall project.

I really tried hard to spend minimal funds for Christmas decorating. So, for Christmas I had this great idea to make stars from twigs I had in the backyard. And they turned out so cute! I want to make more!!

Affiliate Disclosure. Some of the links on this website are affiliate links, which means that I may earn a small commission if you click on the link or make a purchase using the link. If you make a purchase you will not be charged anything additional.

DIY twig stars for Christmas pallet sign. Interchangeable Christmas home decor on a budget. How to make easy and simple reversible home décor for the holidays. Make a sign from twigs.

I made 2 smaller twig stars and 1 medium sized star. You can see how I made my twig stars click here.

I was so glad I snagged up a package of silver bells from the Dollar Tree prior to making this craft because without them I don’t think it would have turned out so cute or looked as festive for Christmas.

DIY twig stars for Christmas pallet sign. Interchangeable Christmas home decor on a budget. How to make easy and simple reversible home décor for the holidays. Make a sign from twigs.

Here’s what I used

1. PLACE THE DECORATIONS

The first thing I did was place my twig stars and bells on my pallet sign to see where I wanted them.

DIY twig stars for Christmas pallet sign. Interchangeable Christmas home decor on a budget. How to make easy and simple reversible home décor for the holidays. Make a sign from twigs.

2. MEASURE

Next I measured out how much jute I would need to hang my decorations from the backside of my sign. I doubled the amount of jute since I was looping it and hanging it from the backside.

DIY twig stars for Christmas pallet sign. Interchangeable Christmas home decor on a budget. How to make easy and simple reversible home décor for the holidays. Make a sign from twigs.

3. ADD THE JUTE

The stars were easy to add the jute to. I just fed the jute through the top of each twig star. The bells were a little more difficult. I wanted to see the snowflakes that were on the bottom side of the bells so I had to hang them sideways.

DIY twig stars for Christmas pallet sign. Interchangeable Christmas home decor on a budget. How to make easy and simple reversible home décor for the holidays. Make a sign from twigs.

I fed the jute through one side of the bell and then out the other side and tied the two ends of the jute together.

DIY twig stars for Christmas pallet sign. Interchangeable Christmas home decor on a budget. How to make easy and simple reversible home décor for the holidays. Make a sign from twigs.

4. HANG

I hung my twig stars and silver bells from the backside of my pallet sign. I just kina eyeballed where I wanted them to be. Placed a pushpin there and pushed it in as far as I could get it.

DIY twig stars for Christmas pallet sign. Interchangeable Christmas home decor on a budget. How to make easy and simple reversible home décor for the holidays. Make a sign from twigs.

Then I looped where I had tied the jute ends together around the pushpin and draped it over to the front side of the pallet sign.

DIY twig stars for Christmas pallet sign. Interchangeable Christmas home decor on a budget. How to make easy and simple reversible home décor for the holidays. Make a sign from twigs.

I prop my pallet sign up on my dining room hutch, which one day I need to make time to give a makeover and I will most definitely post the before and after for you to see on here:)!!

DIY twig stars for Christmas pallet sign. Interchangeable Christmas home decor on a budget. How to make easy and simple reversible home décor for the holidays. Make a sign from twigs.

Happy crafting!

Check out more below

Easy Christmas stars from twigs

How to make stars from twigs for Christmas. Make cheap and frugal Christmas decor using sticks from your yard. Twine/jute twig stars easy craft tutorial for simple rustic looking farmhouse home decor.

CHRISTMAS STARS MADE FROM TWIGS- EASY TUTORIAL

Have you made stars from twigs? This Christmas decoration was super quick, easy, and best of all basically FREE!

If you’ve read any of my content you know how I love a good frugal DIY craft. Especially during the holidays when finances can be a little tighter. Like this easy and incredibly inexpensive Christmas tree I spruced up. I fits in perfectly with my rustic décor.

If you have access to twigs, a glue gun, and some jute/bakers twine you can make this twig star Christmas craft.

Affiliate Disclosure. Some of the links on this website are affiliate links, which means that I may earn a small commission if you click on the link or make a purchase using the link. If you make a purchase you will not be charged anything additional.

HOW TO MAKE CHRISTMAS STARS FROM TWIGS

Here’s what you need

How to make stars from twigs for Christmas. Make cheap and frugal Christmas decor using sticks from your yard. Twine/jute twig stars easy craft tutorial for simple rustic looking farmhouse home decor.

1. GATHER TWIGS

If you don’t have a yard to gather twigs from, or if you don’t have trees in your yard, take a stroll through the local park and you will most definitely find enough twigs to use.

For these mini stars you’ll want to find twigs that are thin, not thick.

2. CUT

I used wire cutters for this step but garden snips will work too.

How to make stars from twigs for Christmas. Make cheap and frugal Christmas decor using sticks from your yard. Twine/jute twig stars easy craft tutorial for simple rustic looking farmhouse home decor.

I cut 4 pieces of twigs that were the same size and 1 piece that was about 2/3 or so the size of longer twigs. I just eyeballed this, it doesn’t have to be exact.

How to make stars from twigs for Christmas. Make cheap and frugal Christmas decor using sticks from your yard. Twine/jute twig stars easy craft tutorial for simple rustic looking farmhouse home decor.

3. MAKE A STAR

Just like when you were a kid making stars that’s exactly how you are going to make these stars.

Make an upside-down V.

How to make stars from twigs for Christmas. Make cheap and frugal Christmas decor using sticks from your yard. Twine/jute twig stars easy craft tutorial for simple rustic looking farmhouse home decor.

Then make an X with the other two long pieces.

How to make stars from twigs for Christmas. Make cheap and frugal Christmas decor using sticks from your yard. Twine/jute twig stars easy craft tutorial for simple rustic looking farmhouse home decor.

Then put the smallest twig going across the top.

How to make stars from twigs for Christmas. Make cheap and frugal Christmas decor using sticks from your yard. Twine/jute twig stars easy craft tutorial for simple rustic looking farmhouse home decor.

I had to carefully move them around till I was happy with the placement of my twig star.

4. GLUE

I had already preheated my glue gun prior to this step so it would be ready when I was. I added a SMALL DAB of hot glue wherever the twigs touched. You don’t want a ton of glue, just enough to keep it in place for now.

How to make stars from twigs for Christmas. Make cheap and frugal Christmas decor using sticks from your yard. Twine/jute twig stars easy craft tutorial for simple rustic looking farmhouse home decor.

5. WRAP

After my glue was dry I wrapped each star point in a silver and white bakers twine. I added a tiny drop of glue then put the end of my bakers twine on it till it was dry.

How to make stars from twigs for Christmas. Make cheap and frugal Christmas decor using sticks from your yard. Twine/jute twig stars easy craft tutorial for simple rustic looking farmhouse home decor.

Then I wrapped the end till I was happy with how it looked.

How to make stars from twigs for Christmas. Make cheap and frugal Christmas decor using sticks from your yard. Twine/jute twig stars easy craft tutorial for simple rustic looking farmhouse home decor.

Then I cut the bakers twine and added another tiny drop of glue to hold it in place.

How to make stars from twigs for Christmas. Make cheap and frugal Christmas decor using sticks from your yard. Twine/jute twig stars easy craft tutorial for simple rustic looking farmhouse home decor.

That’s it. Nothing crazy complicated. I will warn ya, it can get a little frustrating if your kiddos are yelling at one another in the other room and your twigs keep moving out of place from the slightest touch lol! That totally happened a few times to me when I was making these stars for my frugal Christmas décor.

How to make stars from twigs for Christmas. Make cheap and frugal Christmas decor using sticks from your yard. Twine/jute twig stars easy craft tutorial for simple rustic looking farmhouse home decor.

I hope you enjoyed this crafty tutorial. If you have any questions please leave them in the comments below.

Happy Crafting!

Check out more DIY crafts below

Making leaf art with your kids

Leaf art with kids. Fun and easy leaf people and leaf turkeys for kids to make with their parents. Fun outdoor fall craft project to do with kids of all ages.

MAKING LEAF ART WITH YOUR KIDDOS

Whoa what a school year this has turned out to be for all of our kiddos. I know that virtual learning can be a lot of screen time but it also means that we get to have a lot of creative fun time with our kids too.

While we are learning at home I’m trying to plan fun things to do for the older kids and also things that will keep daughter #4 busy too since we are doing pre-k at home instead of the traditional pre-k we’ve always done. Today we made art. And not just any art, we made people and animals with leaves and other nature items.

Affiliate Disclosure. Some of the links on this website are affiliate links, which means that I may earn a small commission if you click on the link or make a purchase using the link. If you make a purchase you will not be charged anything additional.

Leaf art with kids. Fun and easy leaf people and leaf turkeys for kids to make with their parents. Fun outdoor fall craft project to do with kids of all ages.

CLICK HERE for more KIDS PROJECTS

And it was SO FUN!

We’ve done something similar before, painting with nature click here to see how fun that turned out. But today we didn’t break out any paints. We just used the colors (and the option for markers for faces) that we found in the things that God gave to our backyard.

The older girls actually enjoyed it way more than my pre-k girl did which completely surprised me. I figured they would think it was “baby-ish” but they fully enjoyed this crafty project.

Making leaf art with your kids

STEP 1

Gather pieces of nature. We took a small basket outside and filled it with all kind of things (I purposefully didn’t take a big basket out there because I knew they would fill it FULL lol! The small one was more than enough materials for them to create with)

  • colorful leaves

  • twigs

  • some pine cone looking things

  • blades of grass

  • berries

  • vines

  • and whatever else the kiddos want to grab

STEP 2

Bring it inside and set up a place where the kids can get messy. We used our dining room table and since we weren’t painting I didn’t mess with putting a drop cloth down.

I brought out our metal bin of glues, squeeze glue bottles and glue sticks, washable markers for if they wanted to add faces or anything their imaginations could think of, kid friendly scissors, and copy paper.

Leaf art with kids. Fun and easy leaf people and leaf turkeys for kids to make with their parents. Fun outdoor fall craft project to do with kids of all ages.

STEP 3

I helped my preschooler at first, showing her how we could create a Thanksgiving Day turkey out of the leaves and although she thought that was really cool she just wanted to glue whatever, and most importantly wherever to her piece of paper.

We took a round leaf and glued it down first

Then we took longer more oblong looking leaves and glued them behind the round leaf for the Turkey feathers.

Leaf art with kids. Fun and easy leaf people and leaf turkeys for kids to make with their parents. Fun outdoor fall craft project to do with kids of all ages.

My pre-k girl wanted to use a piece of bark for the head so that’s what we used.

Leaf art with kids. Fun and easy leaf people and leaf turkeys for kids to make with their parents. Fun outdoor fall craft project to do with kids of all ages.

For the gobble we glued a small skinny leaf like thing down and pushed it up so it was under the bark head.

Leaf art with kids. Fun and easy leaf people and leaf turkeys for kids to make with their parents. Fun outdoor fall craft project to do with kids of all ages.

For the legs we just added a second stem from another leaf and glue it in place using a glue stick.

The most important step of all though is to just enjoy this crafty art time with your kids. Let them make a mess. Let them create. Let them make mistakes and not feel like they have to be perfect.

Here are a few finished leaf art pictures my girls made. I LOVE them! They were so creative and really took time to enjoy the whole process of this leaf art project. I can’t wait to do the next just for fun creative activity with them.

Leaf art with kids. Fun and easy leaf people and leaf turkeys for kids to make with their parents. Fun outdoor fall craft project to do with kids of all ages.

If you enjoy this craft with your kiddos be sure to check out this post on painting with nature.

Leaf art with kids. Fun and easy leaf people and leaf turkeys for kids to make with their parents. Fun outdoor fall craft project to do with kids of all ages.

Rustic It's Halloween Witches framed leaning porch sign + FREE SVG

DIY Halloween framed leaning porch sign for your fall rustic farmhouse home decor. How to paint a Halloween front porch sign. It's Halloween witches large Halloween sign

Rustic It's Halloween Witches framed leaning porch sign + FREE SVG

Make your own vertical rustic farmhouse leaning porch sign for Halloween. Bonus: grab the It’s Halloween Witches FREE SVG in my free to use resource library

It’s Halloween Witches! YES! I can’t believe how amazing this painted sign turned out. It has all the gorgeous elements of farmhouse basics but a not so common (on a porch sign) Halloween saying…which makes me extra love it! I could have went with a basic cutesy saying like “boo” or “trick or treat” but I wanted my porch sign to have just a bit of sass to it! And it totally does and fits my family SO well. We are a bit sarcastic and sassy lol!

DIY Halloween framed leaning porch sign for your fall rustic farmhouse home decor. How to paint a Halloween front porch sign. It's Halloween witches large Halloween sign

Affiliate Disclosure. Some of the links on this website are affiliate links, which means that I may earn a small commission if you click on the link or make a purchase using the link. If you make a purchase you will not be charged anything additional.

And I kept the back of it blank, well I went ahead and painted it white, so I could make it a reversible fall leaning sign later on. I’m all about getting double use out of my décor. I’m a momma of 4, double sided or dual purpose décor is wonderful in my world. Less to store and less to change out when the seasons change.

I have actually had this piece of 1x10 pine hanging around forever! I stained it when I stained this round wood base for this last name sign a couple years ago and am just now getting around to creating on them. Life of a mom and entrepreneur! Here’s what it looked like before I smothered it in creativity. Just a blank stained piece of wood. You can’t see it in this pic but it had a ton of scratches and some gouges on it from being moved around so much in my craft room over the last couple of years.

DIY Halloween framed leaning porch sign for your fall rustic farmhouse home decor. How to paint a Halloween front porch sign. It's Halloween witches large Halloween sign

If you don’t already have a Cricut I HIGHLY recommend getting one. I still create on my old Cricut Explore and create some pretty awesome projects to share with the world ;) Cricut newbie? Read this post on 10 supplies and accessories you need to get started with your cutting machine.

Side note… If you need the checkered rug that’s on my porch get this one. I looked for hours trying to find the exact one and this one is perfect. I don’t have OCD but I really specifically wanted one that had the same stripe on the top and bottom so that it looked even and this one was the only one I came across that that did in the size that I needed it.

How to make a rustic farmhouse leaning Halloween porch sign you will love

Here’s what you’ll need

1.PAINT THE BASE

I chose to use a board that was already stained. This is not a must but I do like that the stain peaks through the sanded bits of my sign. I painted my wood sign with two coats of white wall paint. You can use acrylic paint too. I didn’t have white acrylic to use so I used the wall paint instead and it works just as great.

DIY Halloween framed leaning porch sign for your fall rustic farmhouse home decor. How to paint a Halloween front porch sign. It's Halloween witches large Halloween sign

After my first coat was dry I applied a second coat of white paint then let that completely dry.

DIY Halloween framed leaning porch sign for your fall rustic farmhouse home decor. How to paint a Halloween front porch sign. It's Halloween witches large Halloween sign

2. APPLY THE STENCIL

I cut my stencils out on my Cricut then weeded the letters out with a sewing pin. If you want to know how to make a reverse stencil sign be sure to check out this laundry sign tutorial.

DIY Halloween framed leaning porch sign for your fall rustic farmhouse home decor. How to paint a Halloween front porch sign. It's Halloween witches large Halloween sign

Because this sign was so large I had to break it up into three separate pieces in Design Space.

DIY Halloween framed leaning porch sign for your fall rustic farmhouse home decor. How to paint a Halloween front porch sign. It's Halloween witches large Halloween sign

I added masking tape to the sides and the seams where the stencils touch just in case I got paint a little too far outside of the stencil I wouldn’t have a big mess to clean up.

3.PAINT THE STENCIL

I used acrylic paint to paint the lettering of my stencil. The first thing I did was seal my stencil so that I would get minimal to no paint bleed. This isn’t a must but it does help to get super crisp lines.

DIY Halloween framed leaning porch sign for your fall rustic farmhouse home decor. How to paint a Halloween front porch sign. It's Halloween witches large Halloween sign

I just painted of paint on the lettering. I painted IT’S and WITCHES with black acrylic paint and HALLOWEEN with orange acrylic paint.

DIY Halloween framed leaning porch sign for your fall rustic farmhouse home decor. How to paint a Halloween front porch sign. It's Halloween witches large Halloween sign

4. PEEL UP THE STENCIL

I always peel up my stencils while my paint is wet. I started with the small lettering first then worked my way down the wood sign.

DIY Halloween framed leaning porch sign for your fall rustic farmhouse home decor. How to paint a Halloween front porch sign. It's Halloween witches large Halloween sign

I used a sewing pin to lift out all the little middle pieces

DIY Halloween framed leaning porch sign for your fall rustic farmhouse home decor. How to paint a Halloween front porch sign. It's Halloween witches large Halloween sign

If you love this tutorial be sure to check out how to make these super cute Halloween wood tags

5.CUT & STAIN THE FRAME

After my sign was dry I measured a 1x2 and cut pieces for my frame. Here’s what it looked like once I got my pieces cut and stained.

I had 2 pieces that were cut at 52” and 2 pieces that were cut at 10.75”.

DIY Halloween framed leaning porch sign for your fall rustic farmhouse home decor. How to paint a Halloween front porch sign. It's Halloween witches large Halloween sign

Before I attached my framed pieces to my Halloween sign I distressed the 1x2’s with my sander and 120 grit sandpaper

DIY Halloween framed leaning porch sign for your fall rustic farmhouse home decor. How to paint a Halloween front porch sign. It's Halloween witches large Halloween sign

7. ATTACH THE FRAME

I attached the two long side pieces first. I used a little bit of wood glue then used my Ryobi brad nailer to attach them to the sign.

DIY Halloween framed leaning porch sign for your fall rustic farmhouse home decor. How to paint a Halloween front porch sign. It's Halloween witches large Halloween sign

Don’t worry if you miss cut your wood frame pieces. I do this ALL the time. Just use your miter saw to square it up after you get them attached.

DIY Halloween framed leaning porch sign for your fall rustic farmhouse home decor. How to paint a Halloween front porch sign. It's Halloween witches large Halloween sign

Here’s what my sign looked like once I got the side frame pieces attached. I framed the sign so that the sign would be in the middle of the framed pieces instead of flush with the back. You can also see where I used my miter saw to cut off the uneven parts.

DIY Halloween framed leaning porch sign for your fall rustic farmhouse home decor. How to paint a Halloween front porch sign. It's Halloween witches large Halloween sign

I did the same thing for the top and bottom pieces. Added the wood glue, my husband says to apply it in a squiggle line, idk if this is really how you’re supposed to do it or if he’s just messing with me lol but whatever it is this seems to work.

DIY Halloween framed leaning porch sign for your fall rustic farmhouse home decor. How to paint a Halloween front porch sign. It's Halloween witches large Halloween sign

8.SEAL THE FINISHED SIGN

If you want to protect your sign from the elements I recommend sealing it with an outdoor sealant like this one. I did not do this step because I plan to paint a fall themed stencil on the other side of this Halloween porch sign. But after I finish the other side I’ll seal it with the outdoor spray.

DIY Halloween framed leaning porch sign for your fall rustic farmhouse home decor. How to paint a Halloween front porch sign. It's Halloween witches large Halloween sign

Then you’re all done. I hope you enjoyed this DIY craft tutorial :)! If you have any questions please ask them in the comments below.

Happy crafting!

Replacing outdated porch lights

REPLACING OUTDATED OUTDOOR PORCH LIGHTS ON A BUDGET

DIY porch light makeover. How to replace outdated and ugly porch fixtures on a budget.

Outdated porch lights are such an eyesore. My husband and I bought a super old house, it was built in 1900, that we have been slowly updating. Our first project was putting up a faux plank wall in one of the bedrooms. Even though we’ve only been here right at one month we have accomplished quite a bit, including updating our front porch lights. The old lighting was not so pretty but we were able to fix that easily and super inexpensively.

Affiliate Disclosure. Some of the links on this website are affiliate links, which means that I may earn a small commission if you click on the link or make a purchase using the link. If you make a purchase you will not be charged anything additional.

DIY porch light makeover. How to replace outdated and ugly porch fixtures on a budget.

The old lights were these pointy brassy things that were just not for us. One of the old porch lights worked great and the other one flickered constantly even with new bulbs. But that’s not why we want to replace them, we just thought they were just plain ugly.

On our trip to the city, that’s what we call it since we live an hour away from the major shopping areas, we stopped by Home Depot and browsed the porch light aisle. I had no idea it would be so hard to choose a pair of front porch lights. There were so many beautiful lights to pick from. I finally settled on lights that had vintage looking bulbs and old looking glass.

Don’t get me wrong they had some gorgeous lights that I loved even more than these but they were way out of budget.

DIY porch light makeover. How to replace outdated and ugly porch fixtures on a budget.

We were looking for fixtures that were under $50 and these were I believe $39 in our local store. What a STEAL! Of course we both loved the price! My husband really liked them because they are LED and they are dusk lights so they turn off by themselves every morning.

DIY porch light makeover. How to replace outdated and ugly porch fixtures on a budget.

Due to liability reasons I won’t go into detail about how he rewired the new porch lights. There are SO many great tutorials out there if you need more guidance on that.

The first thing he did was turn off the breaker and then remove the old lighting.

DIY porch light makeover. How to replace outdated and ugly porch fixtures on a budget.

The new porch fixtures came with mounting brackets. He used a level to make sure everything was straight.

DIY porch light makeover. How to replace outdated and ugly porch fixtures on a budget.

He wired them in and attached the lights to the house.

DIY porch light makeover. How to replace outdated and ugly porch fixtures on a budget.

These lights also came with light bulbs which was a selling point for me! I LOVE these vintage looking Edison style light bulbs.

DIY porch light makeover. How to replace outdated and ugly porch fixtures on a budget.

Then he attached the old looking glass bulb to the porch light fixture.

DIY porch light makeover. How to replace outdated and ugly porch fixtures on a budget.

I can’t believe the difference the porch lights make on our house. They are SO pretty!

DIY porch light makeover. How to replace outdated and ugly porch fixtures on a budget.

I can’t wait to start decorating our new front porch. Especially now since we have fancy new lights hung.

DIY porch light makeover. How to replace outdated and ugly porch fixtures on a budget.

Painting with nature, a creative and fun experience to enjoy with your kids

Painting with nature, have you tried this with your kids? If not you are totally missing out on a ton of fun and creativity! I’m a momma to four girls and I LOVE that my almost preschooler loved it just as much as my middle schooler. So this craft is truly one for all ages.

What made this even more fun was that the girls gathered their own materials. They each went hunting in the yard and selected some really cool pieces of nature to paint with. Some of the nature items they found were dandelions, tree leaves, clovers, broken acorn shells, seeds from inside of pods, tree bark, and I know there’s more I’m forgetting. They really enjoyed this part. Watching them pick up the different materials that nature was offering and thinking how that would look on their paint canvas was too cool to see.

If you want to paint with nature but you need a mess free option be sure to check out my post on how we painted with pine cones. I don’t think my girls got a drop of paint on them for that project.

After you read this kid friendly DIY craft be sure to check out my other fun projects that are kid approved. Click here to go to my kids craft projects.

How to paint with nature. Use twings, leaves, cloves, flowers, anythgin you find in nature to make a painted canvas masterpiece. Use food coloring or acrylic paint and let your kids explore the power of painting with items that aren't the normal pai…

 Affiliate Disclosure. Some of the links on this website are affiliate links, which means that I may earn a small commission if you click on the link or make a purchase using the link. If you make a purchase you will not be charged anything additional.

This is such a great activity to do outside if you can. If you can’t no worries I promise it will be just as fun! We gathered our nature painting pieces from our backyard but if you don’t have a backyard you can take a stroll around the park or even just down the sidewalk. The kids are sure to find some useful nature pieces there, even just a twig and a dandelion are perfect for this craft.

HOW TO PAINT WITH NATURE, AN EASY AND FUN CRAFT FOR KIDS

Here’s what you’ll need

How to paint with nature, a fun outdoor craft to do with your kids. Paint on a dollar tree canvas with nature using food coloring, flowers, twigs, leaves.

Let the kids get messy! Getting messy is all part of the creative process. We kept our nature painting outside. I put a drop cloth over our patio table and had my girls wear aprons. The older three daughters wear adult aprons like these that we tie up on the neck and the youngest daughter wears a kids apron. With all the crafting we’ve done over the years these aprons have held up really well.

We used a combination of food coloring and acrylic paint to paint our nature canvases. I thought a watercolor look to these would be really pretty but we didn’t have any watercolors paints to use. Food coloring on the canvases turned out AMAZING! They looked just like watercolors, well they did at first but then the girls kept painting over their masterpieces to get them just right lol! We also used food coloring during our TIE DYE experiment and those turned out way better than I thought they were going to. Read about how to TIE DYE with food coloring here.

Painting with nature process is overall pretty simple, here’s how-

ONE- Gather your pieces of nature, canvas, paint and other materials and prep your work area

How to paint with nature, a fun outdoor craft to do with your kids. Paint on a dollar tree canvas with nature using food coloring, flowers, twigs, leaves.

TWO- If you’re using food coloring you can mix that in your paint wells on your paint tray. I used a medical syringe, like the kind you get from the pharmacy, to squirt water into the paint well, this way I didn’t overfill them, then added drops of food coloring. I used a paintbrush to mix the water and food coloring together and that worked great.

How to paint with nature, a fun outdoor craft to do with your kids. Paint on a dollar tree canvas with nature using food coloring, flowers, twigs, leaves.

THREE- Get creative and start painting with nature. I just let my girls paint with whatever and however they wanted. The only rule I had was to not argue lol! Let’s be real here, crafting with multiple kids, especially preteens, isn’t always the most enjoyable when the bickering starts. My girls know that if they start arguing with one another there's a good chance momma will make them pick up and put everything away. It’s a wonderful way to keep the peace.

We found that painting on the leaves worked really great for making prints of them. The key was to not apply too much of the food coloring mixture/paint.

How to paint with nature, a fun outdoor craft to do with your kids. Paint on a dollar tree canvas with nature using food coloring, flowers, twigs, leaves.

Then press the leaves, or other nature items, onto the canvas.

How to paint with nature, a fun outdoor craft to do with your kids. Paint on a dollar tree canvas with nature using food coloring, flowers, twigs, leaves.

If you want a good print of it press gently, don’t push it around this will cause the paint/food coloring to smear and will not give a good crisp print.

How to paint with nature, a fun outdoor craft to do with your kids. Paint on a dollar tree canvas with nature using food coloring, flowers, twigs, leaves.

Here’s a leaf print my oldest daughter, who’s in middle school, made. I was actually surprised at how much she enjoyed this nature painting craft. She took her time and carefully picked her nature pieces, colors, and placement of all the things.

How to paint with nature, a fun outdoor craft to do with your kids. Paint on a dollar tree canvas with nature using food coloring, flowers, twigs, leaves.

Just remember, if their projects turn out to be a crazy dark blog looking painting embrace it! Tell them they did a BEAUTIFUL job and enjoy the time you spend together creating. These are special memories you’ll look back on <3!

Let me know if you have any questions about painting with nature. Happy crafting!

DIY cute ghost yard stake

DIY Halloween ghost yard decoration. How to make a cute wood ghost easy with your scroll saw.

How to make a super cute ghost for your outdoor Halloween decorations

Between my online business and being a mom to four little girls I seriously don’t know where I find the time to make things for myself but I do lol! Like this cute outdoor ghost stake I HAD to make for our front yard. I had been slacking the last couple years with holiday decorating. Usually I go all out but lately I just hadn’t been up to it. So for this fall I decided I was getting back in my holiday décor groove! And this adorable little ghost is just one small part of my DIY fall/Halloween decorations. Check out this DIY PALLET SIGN I made, it’s actually a school spirit sign but with our school colors it ties in perfectly with our fall décor!

Affiliate Disclosure. Some of the links on this website are affiliate links, which means that I may earn a small commission if you click on the link or make a purchase using the link. If you make a purchase you will not be charged anything additional. This is just a way I can help add to our family finances to raise our four daughters. Please know I would never recommend a product or service I do not totally stand behind.

And this fun witch’s brew coffee mug I made using my Cricut and some vinyl. And just one more… this rusty pumpkin I made from mason jar lids. So cute!


Real quick…if you have ever wanted to learn how to paint wood signs, the way the PROs do, you don’t want to miss my COMPLETE GUIDE TO SIGN PAINTING. It is a whole course that you complete on your time. I am teaching you EVERYTHING I know without you having to go through the headache and expense of trial and error. If you’ve struggled with paint bleed, designs not lining up, paint peel up, sticky residue left behind you are in for a treat! Click on the image below or go here for more info.


DIY CUTE WOOD GHOST CUTOUT

If you don’t want to read the tutorial you can scroll to the bottom to watch the video tutorial or go here to watch it on my crafty YouTube channel.

Here’s what you’ll need

Fist you want to draw the outline of your ghost onto the wood you’re using. We had some leftover OSB so that’s what I used. I also used this same OSB wood to make this pallet sign on the letter cutouts. We had made triple loft beds for the older three girls and WAY overbought for the project lol! So now we have a full sheet and a half still left over.

DIY cute Halloween ghost decoration for your yard. How to make an adorable wooden ghost for fall

Then cut out your design on your scroll saw. Honestly this probably would have been much easier if I used a jig saw BUT this is what I had to use and it still worked pretty good to get the job done.

DIY cute Halloween ghost decoration for your yard. How to make an adorable wooden ghost for fall

Once you have it all cut out give it a quick sanding to knock down the rough edges. I used a 120 grit sandpaper on my Ryobi sander.

DIY cute Halloween ghost decoration for your yard. How to make an adorable wooden ghost for fall

Then paint your ghost cutout all white. I didn’t paint the back of mine and I really wish I would have. I used a leftover paint we had in our garage but you can use acrylic for yours if that’s what you have.

DIY cute Halloween ghost decoration for your yard. How to make an adorable wooden ghost for fall

After your white base coat is dry on your wood ghost you can start doing the artsy stuff :)! I like to sketch out my design before I start painting. This way if I make a mistake it’s much easier to fix it vs painting it, messing up big time, then wanting to throw it across the floor lol! I sketched out eyes, eyebrows, eyelashes, mouth, and then I used an off brand K-cup to draw my circles for the large polk-a-dots. {actually I painted the cheeks before I traced the circles but if I was thinking I would have traced those first}

DIY cute Halloween ghost decoration for your yard. How to make an adorable wooden ghost for fall

To paint the cheeks you need pink and white paint and I also used a stencil brush but you can use a round brush for this step. Dip your brush into the pink paint then dip one side into the white, but just a little bit of white. Then swirl it around in a circle at the corner of each side of the mouth. Add more white if you need just a little more highlight in there.

DIY cute Halloween ghost decoration for your yard. How to make an adorable wooden ghost for fall

Then paint the other facial details, except for the mouth. Somehow I forgot to paint the eyelashes so I did mine later but you can go ahead and paint those now too. I used a round brush for the eye painting and a fine flat brush for the finer details.

DIY cute Halloween ghost decoration for your yard. How to make an adorable wooden ghost for fall

Now paint all the polk-a-dots. I used orange and black for my dots. I painted the large ones in with a paint brush. I used a medium sized round sponge brush {black dots}, a small sponge brush {orange dots}, and the wood end of the small brush for even smaller dots . I didn’t plan any of these out too much, just kind of scattered them wherever they looked best.

DIY cute Halloween ghost decoration for your yard. How to make an adorable wooden ghost for fall

When the cheeks are dry you can paint the mouth of your wood ghost using black paint and a fine paint brush.

DIY cute Halloween ghost decoration for your yard. How to make an adorable wooden ghost for fall

Add the white features to the eyes. I used a white paint pen and made a curved line on one side of each eye {be sure you are making them on the same side of each eye} and I added a dot towards the outside of the other side of the eye then a little accent dot right above that dot.

DIY cute Halloween ghost decoration for your yard. How to make an adorable wooden ghost for fall

Using a paint pen I made a long dash line all the way around my ghost and I also added dashes on each circle. For the outline and all of the orange circles I used a black paint pen. For all the black circles I used a white paint pen. Btw….isn’t my little helper just the cutest?!! This is daughter #4 <3

DIY cute Halloween ghost decoration for your yard. How to make an adorable wooden ghost for fall

Since this will be outside I sprayed mine with this indoor/outdoor clear satin Krylon sealant.

DIY cute Halloween ghost decoration for your yard. How to make an adorable wooden ghost for fall

Attach your stake part to the back of your ghost using Gorilla wood glue and a brad nailer. I really like this Ryobi one I use. My husband has one that I would use before I got my own and omg what a world of difference. You can read more about why I chose to go with Ryobi power tools here for my crafty business.

DIY cute Halloween ghost decoration for your yard. How to make an adorable wooden ghost for fall

I made a super simple pinwheel bow to make my wood ghost a little more girly. These are also super adorable bows to make for your little girls to wear in their hair. We have tons of these that I’ve made over the years for my own four little girls. Then attach the bow with hot glue.

DIY cute Halloween ghost decoration for your yard. How to make an adorable wooden ghost for fall

Once the hot glue is totally dry you can stick your wood ghost in the yard. I absolutely LOVE the way this little cutie turned out! Even when our girls got off the bus they got so excited because she is just sooooooo darn adorable!

I have a few more of these wood yard decorations to make so be on the look out for a DIY CANDY CORN and a DIY FRANKENSTEIN wood stakes.

Let me know below what you think of this DIY HALLOWEEN CRAFT.

DIY cute Halloween ghost decoration for your yard. How to make an adorable wooden ghost for fall

Watch the full crafty tutorial below

Stress free backyard camping

Fun and stress free backyard camping

Affiliate Disclosure. Some of the links on this website are affiliate links, which means that I may earn a small commission if you click on the link or make a purchase using the link. If you make a purchase you will not be charged anything additional.

Camping is such a fun experience that every family should have at least once. Our family tries to go every year but this spring it has been a little difficult to plan a trip. With flooding, tornadoes, and the temperature not making up it’s mind if it wants to stay cold or move on to warmer weather…oh the good ole Midwest lol!

Since our girls have been asking for months to go on our camping trip we decided to bring the camping trip to us. And I have to say I can’t believe we haven’t done this sooner! The girls loved it because it was something new and we loved it because we didn’t have to pack half our house up for an over night trip. And a bonus because our toddler has been super cranky lately she spent a lot of the time watching Disney Junior, thank you home wifi {no judgements please, we all parent in different ways and if Disney Junior will keep her happy then so be it}.

We wanted to keep our camping stress free so we didn’t plan any fun games or fancy Pinterest worthy foods. We put up our massive 10 person tent {we are a big family and this tent is sized perfectly for us}, added some tiki torches, moved the fire pit, and started the fun!

Stress free backyard camping

I guess you could say we got a tad bit fancy. My husband grilled up something different than the typical burgers and hotdogs that we would have had if we were camping on a campground. He is the grilling king and made us all the most delicious grilled chicken sandwiches.

My tips for stress free backyard camping

  • Keep it simple, don’t over plan.

  • Make sure you have all the pieces to your tent before you tell the kids. The last thing you want are sad little faces looking at you when you realize you don’t have everything there to put their tent up.

  • Let your kids dig and really explore the backyard. Our girls pretended they were lost in the wilderness and the tent was their new home.

  • Air mattresses, they may not be a must but I completely enjoy a good nights sleep even when I’m sleeping in a tent. These are the exact ones we use and trust me, if they can withstand our rowdy chaotic bunch they must be good!

  • Fresh batteries for all the things

  • Bug spray

  • Fire wood

  • Comfy clothes you can get messy for everyone

  • Let loose and have fun with your family.

Stree free backyard camping


And the best part…if you forget something it’s ok! Your home is just a few steps away. Our whole family, aside from our toddler, had a great time! Being a family of 6 with 3 of the 4 daughters within 4 years of one another, we tend to have bickering. I think because we were in our own element we didn’t have any of that, which also made it stress free!

I hope these tips help you to create your own stress free backyard camping with your own family.