Building a tall craft desk on a budget

How to make a rolling craft desk on a budget. DIY Amazon 9 cube organizer standing tall craft desk. Non ikea craft desk craft.

AMAZON CRAFT DESK HACK ON A BUDGET

If you’re in the market to DIY your own tall craft desk you’ve likely seen all the GORGEOUS Ikea tall craft tables that are on Pinterest. Oh boy are they so pretty and clean looking! I have found myself almost drooling over them the last few months.

The thing is my current craft space is just temporary. We moved into a beautiful old home a few months back so until we get my she shed up outside I have taken over a way too beautiful to craft in sitting room. Everything I put up in there is just a for now thing, not permanent.

I just needed a space to create all of my craft tutorials to share with you all here on my blog.

Affiliate Disclosure. Some of the links on this website are affiliate links, which means that I may earn a small commission if you click on the link or make a purchase using the link. If you make a purchase you will not be charged anything additional.

Of course this frugal momma didn’t want to spend too much money on a craft table that may or may not fit into the she shed once it’s done.

How to make a rolling craft desk on a budget. DIY Amazon 9 cube organizer standing tall craft desk. Non ikea craft desk craft.

That’s a pic of daughter #2 making the first project after the rolling craft desk was complete. She approved! This is a real view of what my craft space will look like and what you don’t see in my crafty DIY tutorials. The lights, microphone, and all the cords.

Here’s how I made a SUPER BUDGET friendly tall craft table

What I used to make my roll away craft table

Tools I used

1.ASSMEBLE THE 9 CUBE ORGANIZERS

My tips for this step. When I purchased mine they were around $40 per organizer. I don’t have pictures of this step. I was so excited to get them built I completely spaced taking pics.

  • read the instructions completely prior to assembling, but if you’re anything like me you probably won’t lol!

  • use an impact (it looks like a drill but it’s a little different, it has screwdriver bits that fit into it instead of drill bits) to get the screw in properly, a screwdriver really sucks for this

  • enjoy a glass of wine while you build these, again trust me you will need one lol!!

This next step is only necessary if you want to have a moveable craft desk. This is something that was a must for me as I’m always needing space to work on bigger projects.

2. ATTACH THE CASTOR WHEELS

Again, I didn’t take pictures because I was SO darn excited to get them done. You want to attach 4 castor wheels onto each 9 cube organizer, two on each end of the organizers. When I purchased mine they were about $14 per set of 4 castor wheels. And they are GREAT QUALITY. I was very impressed.

I HIGHLY suggest attaching a piece of wood to the inside of the cubby on the bottom shelf of each end so that your castor screws will have something to grab. I didn’t do this for the first cubby and I really wish I would have. The screws poked through the bottom cubbies and it’s kind of ugly now. I didn’t make the same mistake on the second one though.

I recommend shooting a brad nail through the wood just to keep it from moving when you start screwing the castor wheels on. This worked great for me when I attached the second set of castors.

3.CUT YOUR PLYWOOD

Measure out how big of a work space you want. Keep in mind that if it’s too wide you’ll need something to brace it on the underneath side of your craft table.

I used some leftover 3/4” plywood my husband brought home off of a jobsite. I cut 3 pieces to 47.5” in length and it seemed to work out perfectly. Almost like it was meant to go on my rolling craft table. I used my miter saw to cut these to length.

If you want to know what power tools I recommend for crafters check out this post.

4.SAND

I used my Ryobi orbit sander and just lightly went over the plywood. Just enough to give it a smooth surface.

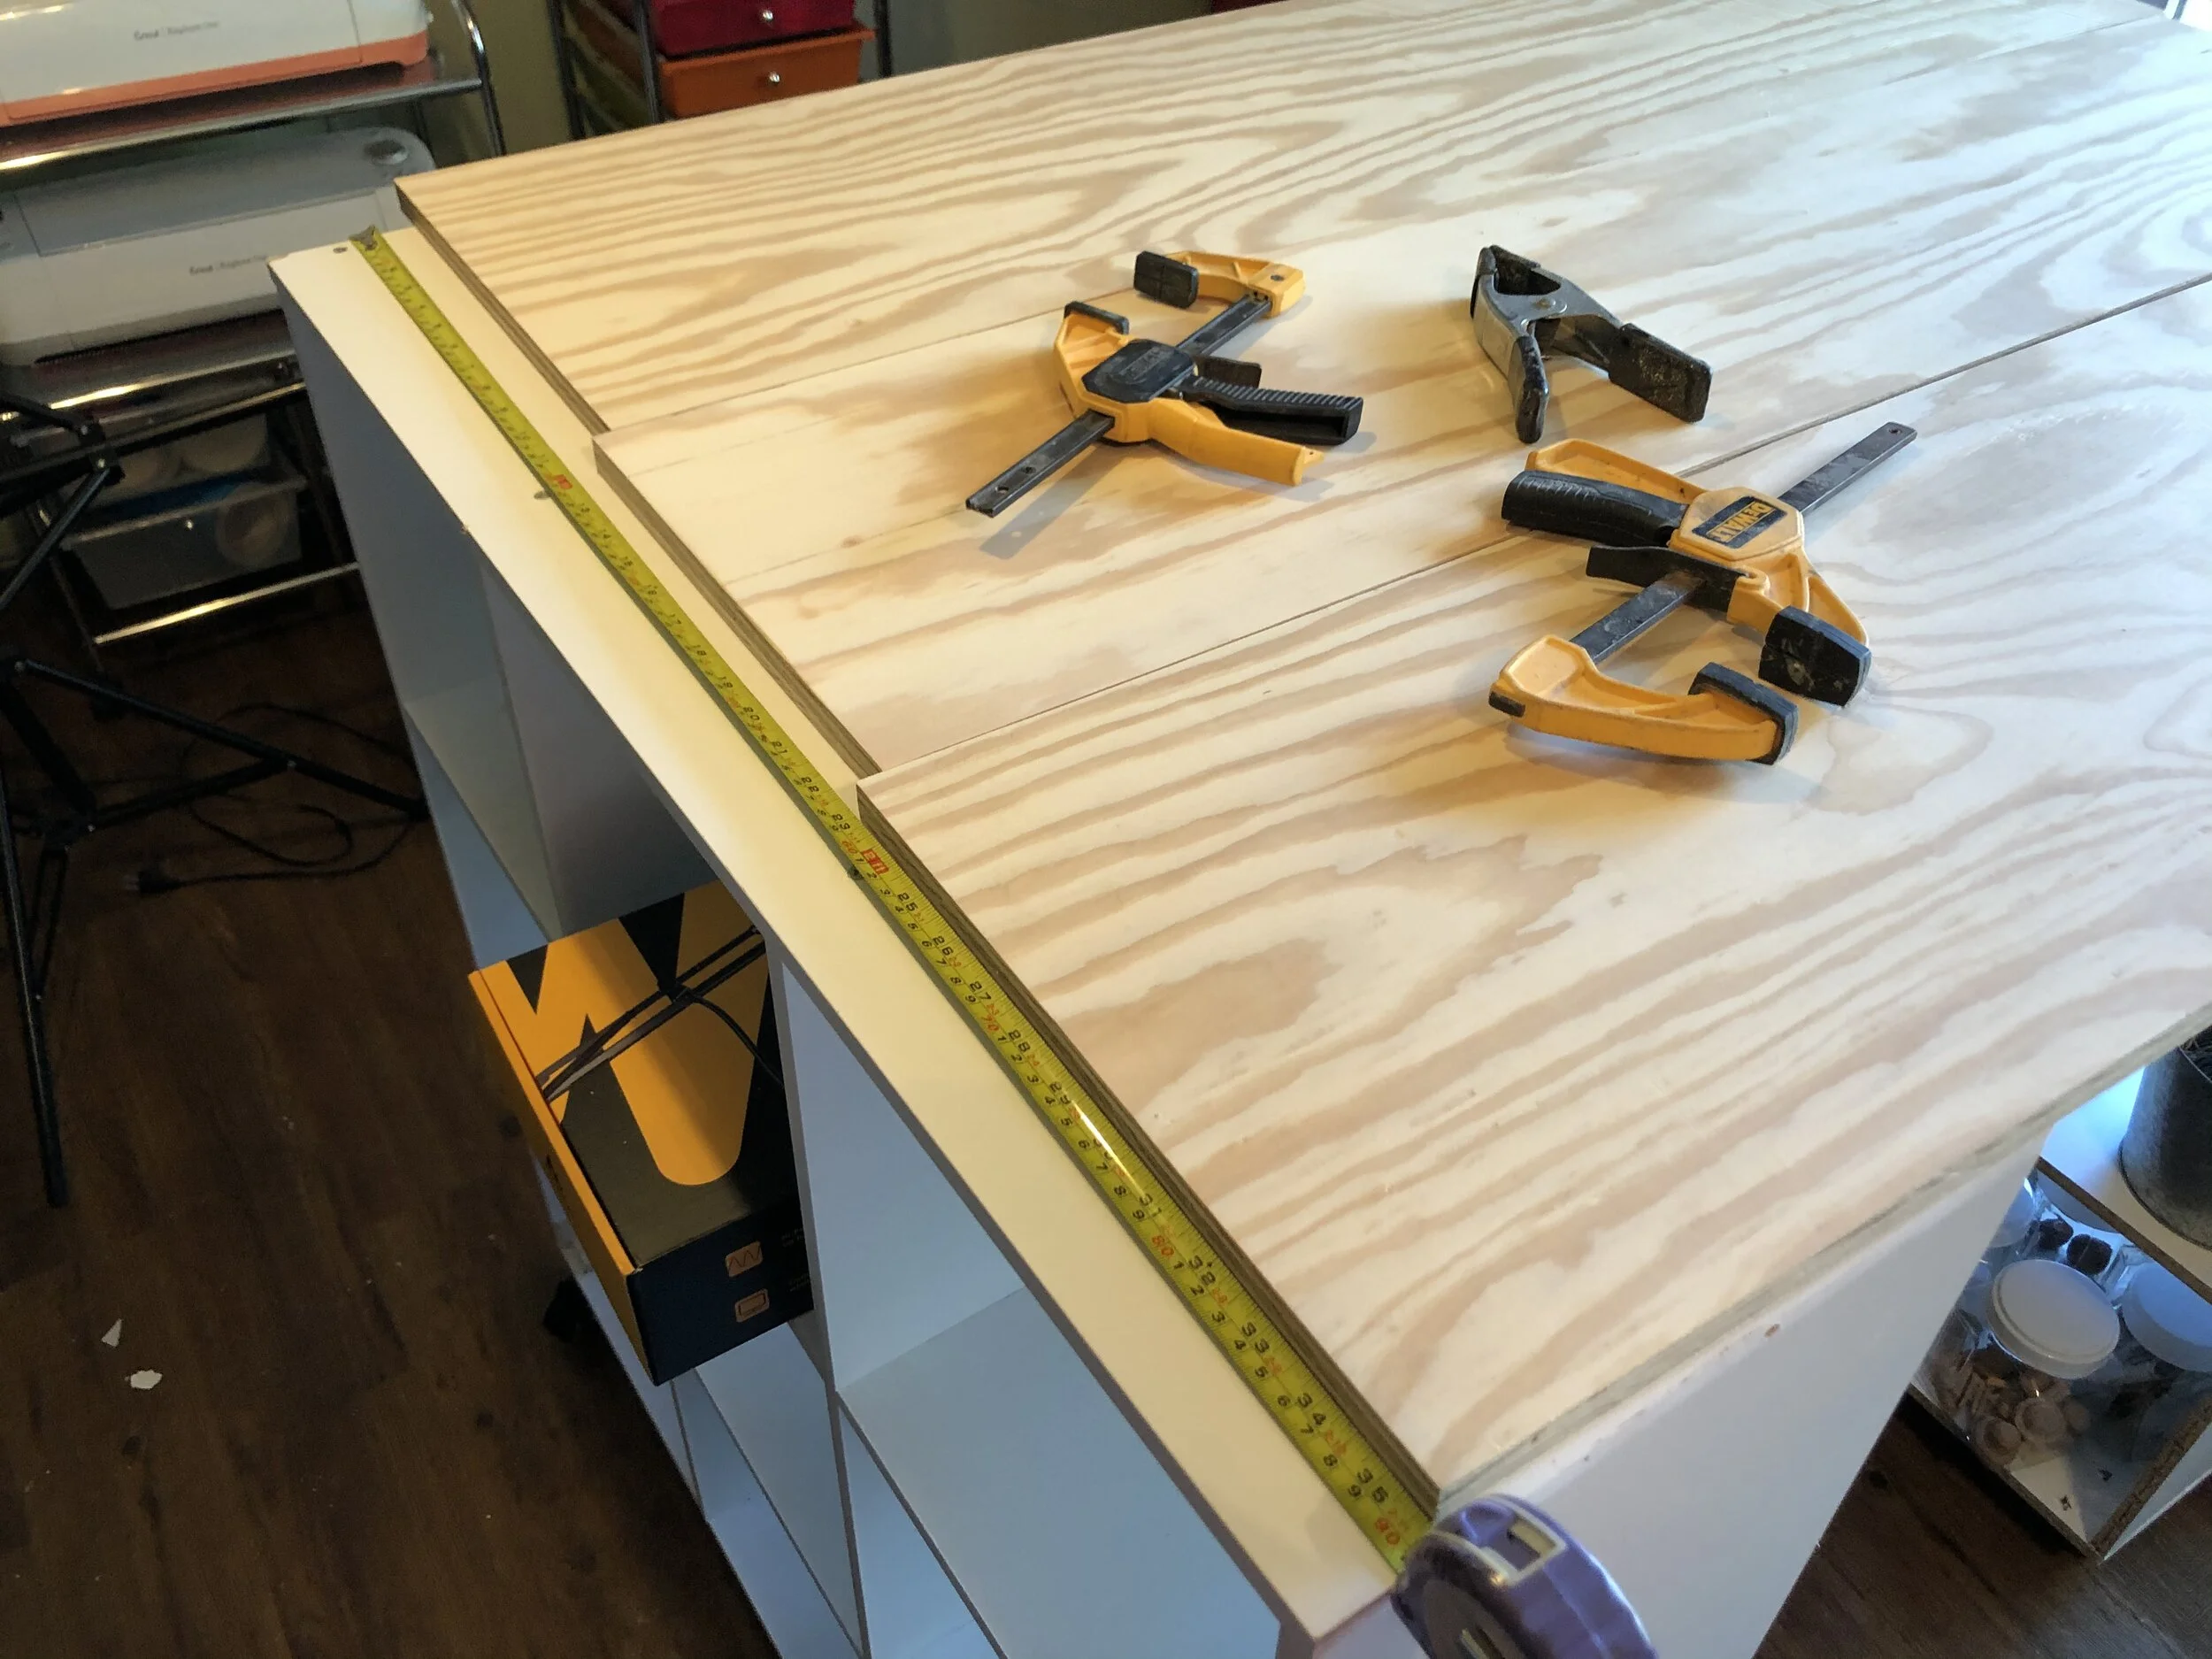
5. ATTACH THE PLYWOOD

I know there are a lot of different ways to do this step but this is what I did and it worked great for me.

I was sure to lock the castor wheel before starting this step. Then I measured to find the middle of one of my 9 cube organizers.

How to make a rolling craft desk on a budget. DIY Amazon 9 cube organizer standing tall craft desk. Non ikea craft desk craft.

Using my brad nailer I attached the ends of my skinniest board to the edge. This is basically just to tack down the plywood so it doesn’t go anywhere till you can get the screws in.

How to make a rolling craft desk on a budget. DIY Amazon 9 cube organizer standing tall craft desk. Non ikea craft desk craft.

Then I lined up the other 9 cube organizer and did the same thing. Once those were down I attached the wider pieces, one on each side of the skinniest piece.

I used a drill to make small pilot holes, those are holes that help you get your screw into the wood easier. I just used whatever screws I had on had that were long enough to go through the plywood and into the 9 cube organizer. Ignore how not straight the screw and drill are. It was incredibly difficult to take this pic myself so I said ‘good enough pic for me’ lol!

How to make a rolling craft desk on a budget. DIY Amazon 9 cube organizer standing tall craft desk. Non ikea craft desk craft.

5.PAINT

I used a leftover white paint we used in the house to paint the top of my rolling craft desk. I applied two coats, letting them dry in between coats.

How to make a rolling craft desk on a budget. DIY Amazon 9 cube organizer standing tall craft desk. Non ikea craft desk craft.

6.SEAL

It’s a good idea to apply a sealant to the top of your workspace. I just used whatever I had on hand mainly because this isn’t a long term desk for my craft space. If I were to buy a sealant I don’t think I would use this specific one because it did yellow the white a little bit but it does work for sealing the paint and keeping the surface of the craft table wipeable and cleanup-able.

How to make a rolling craft desk on a budget. DIY Amazon 9 cube organizer standing tall craft desk. Non ikea craft desk craft.

All and all I spent around $110 to make this. I’m not factoring in the materials I already had on hand. I know technically money was spent on those somewhere down the line but it’s hard telling when, where, and how much was spent so I just left out.

How to make a rolling craft desk on a budget. DIY Amazon 9 cube organizer standing tall craft desk. Non ikea craft desk craft.

It’s far from perfect but it certainly works for my crafty space.

I hope you enjoyed this tutorial and if you have any questions please leave them in the comments below

Happy Crafting!

Replacing outdated porch lights

REPLACING OUTDATED OUTDOOR PORCH LIGHTS ON A BUDGET

DIY porch light makeover. How to replace outdated and ugly porch fixtures on a budget.

Outdated porch lights are such an eyesore. My husband and I bought a super old house, it was built in 1900, that we have been slowly updating. Our first project was putting up a faux plank wall in one of the bedrooms. Even though we’ve only been here right at one month we have accomplished quite a bit, including updating our front porch lights. The old lighting was not so pretty but we were able to fix that easily and super inexpensively.

Affiliate Disclosure. Some of the links on this website are affiliate links, which means that I may earn a small commission if you click on the link or make a purchase using the link. If you make a purchase you will not be charged anything additional.

DIY porch light makeover. How to replace outdated and ugly porch fixtures on a budget.

The old lights were these pointy brassy things that were just not for us. One of the old porch lights worked great and the other one flickered constantly even with new bulbs. But that’s not why we want to replace them, we just thought they were just plain ugly.

On our trip to the city, that’s what we call it since we live an hour away from the major shopping areas, we stopped by Home Depot and browsed the porch light aisle. I had no idea it would be so hard to choose a pair of front porch lights. There were so many beautiful lights to pick from. I finally settled on lights that had vintage looking bulbs and old looking glass.

Don’t get me wrong they had some gorgeous lights that I loved even more than these but they were way out of budget.

DIY porch light makeover. How to replace outdated and ugly porch fixtures on a budget.

We were looking for fixtures that were under $50 and these were I believe $39 in our local store. What a STEAL! Of course we both loved the price! My husband really liked them because they are LED and they are dusk lights so they turn off by themselves every morning.

DIY porch light makeover. How to replace outdated and ugly porch fixtures on a budget.

Due to liability reasons I won’t go into detail about how he rewired the new porch lights. There are SO many great tutorials out there if you need more guidance on that.

The first thing he did was turn off the breaker and then remove the old lighting.

DIY porch light makeover. How to replace outdated and ugly porch fixtures on a budget.

The new porch fixtures came with mounting brackets. He used a level to make sure everything was straight.

DIY porch light makeover. How to replace outdated and ugly porch fixtures on a budget.

He wired them in and attached the lights to the house.

DIY porch light makeover. How to replace outdated and ugly porch fixtures on a budget.

These lights also came with light bulbs which was a selling point for me! I LOVE these vintage looking Edison style light bulbs.

DIY porch light makeover. How to replace outdated and ugly porch fixtures on a budget.

Then he attached the old looking glass bulb to the porch light fixture.

DIY porch light makeover. How to replace outdated and ugly porch fixtures on a budget.

I can’t believe the difference the porch lights make on our house. They are SO pretty!

DIY porch light makeover. How to replace outdated and ugly porch fixtures on a budget.

I can’t wait to start decorating our new front porch. Especially now since we have fancy new lights hung.

DIY porch light makeover. How to replace outdated and ugly porch fixtures on a budget.

Plank wall on a budget

DIY plank wall, how to make your own plank wall on a budget. How we made a faux plank wall for less than $50, shoe string budget bedroom remodel. Plywood panel planked wall for your home.

FAUX PLANKED WALL DIY USING PLYWOOD

Are you planning a new planked wall project? Want to know how to DIY A faux plank wall on a TIGHT budget? See how we spent less than $50 to plank a bedroom wall and learn what not to do so you don’t make the same mistakes we did our first time around.

Recently my husband and I bought a gorgeous old home that was built in the year 1900. Of course we got an inspection on it before we bought it to make sure it was sound and the house wasn’t in need of any major repairs before we made an offer. To our surprise it was totally sound! The house was mainly in need of cosmetic repairs and since we got such a great deal on it we snatched it up decided we could tackle those on our own one project at a time. Our first project being a room that had 6 DIFFERENT prints of wallpaper on the walls. Because the house is so old, 120 years to be exact at the time I’m writing this post, nothing in the house aligns perfectly. We love the house but it drives my construction worker husband absolutely bat shit crazy that nothing is even. He likes walls that are square and I love all that old character!

Affiliate Disclosure. Some of the links on this website are affiliate links, which means that I may earn a small commission if you click on the link or make a purchase using the link. If you make a purchase you will not be charged anything additional.

See how I easily removed the old wallpaper using just my steamer

Once we started pulling off the wallpaper we realized the true reason why there was so much wallpaper and so many different prints. The wallpaper was just a band aid for the big cracks in the walls and it looked like they just put any scrap piece they could find to cover the walls. Honestly we expected the walls to be in rough shape because it’s such an old house but we weren’t expecting it to be that bad. Really we needed to replace all of the walls in the room with drywall but we were on a time crunch and opted instead to replace 2 walls completely for now and apply a bigger band aid than wallpaper to the other two walls. We thought making faux plank walls would be the perfect thing to use on the other two walls for right now.

Love freebies? Click HERE to get instant access to all of my free printables, SVG files, and more

One wall finish we chose was a faux plank wall. Working with a limited budget we knew we couldn’t opt for the premade planks you can buy at any home remodeling store or even this peel and stick wooden wall option. Instead we opted to buy a thin plywood and cut it ourselves.

We definitely made mistakes on this one but my hope is to share those with you so that you don’t make the same mistakes if you decide to do a faux plank wall too. Really it was because we didn’t fully prepare for this remodel. I honestly was just planning on taking off the wallpaper and before we knew it two walls were totally gone lol! So we had to finish what we started before my husband had to got out of town in two days for a job. Yeah…we were completely unprepared for this big project! But the good new is if we decide we want to change it later we can easily pop the planks off the wall and do something different.

Here’s how we made our affordable faux plank wall

First, I need to start off by saying this requires the use of power tools. If you are not comfortable with using power tools this project may not be for you. But it is a fairly simple project to tackle if you are just starting out using power tools. If you can cut a straight line and use a brad nailer you shouldn’t have too much trouble DIYing your own plank wood wall.

Like I said above we were working with a super short time frame. We had a weekend to get the bulk of this bedroom done and were working our butts off to meet that deadline. So we didn’t do things exactly perfect but at the end of the day we are overall happy with the outcome. And nothing is ever perfect so there’s that lol!

Here’s what we used to make our faux plank wall

This is not the way it really should be done but to save time my husband stacked the plywood and cut them into strips that way. I wanted thicker planks so he cut them at 5” wide.

DIY plank wall, how to make your own plank wall on a budget. How we made a faux plank wall for less than $50, shoe string budget bedroom remodel. Plywood panel planked wall for your home.

After he cut the strips I cut them down using my miter saw into smaller sections. I measured them anywhere from 6”-24” and looking back I would not have cut anything less than 12”. After I got them on the wall I realized the smaller ones just looked awful so I had to remove those sections and replace them.

DIY plank wall, how to make your own plank wall on a budget. How we made a faux plank wall for less than $50, shoe string budget bedroom remodel. Plywood panel planked wall for your home.

Then I started attaching them to the wall starting from the bottom and working my way up. I used pennies as my spacers between my plank pieces. I have to say that worked out GREAT! You use the pennies just like you would any other spacer. Place them in between the wood planks so that you get the same even spacing between the planks.

DIY plank wall, how to make your own plank wall on a budget. How we made a faux plank wall for less than $50, shoe string budget bedroom remodel. Plywood panel planked wall for your home.

I used my Ryobi brad nailer to nail the planks to the wall. We chose to use 2” brad nails so that it would hit the wood underneath from the lathe and plaster so they wouldn’t just fall off. And since the brad nails are not like a regular nail they come out of the wall easily if you decide you want to remove them later. This is also why we opted not to use any glue like I’ve seen on other tutorials. We didn’t want this to be a permanent fixture in the room, just a fun accent wall for now to cover the lather and plaster wall. Years down the road we will replace it with drywall but for now the faux plank wall is a perfect temporary fix.

DIY plank wall, how to make your own plank wall on a budget. How we made a faux plank wall for less than $50, shoe string budget bedroom remodel. Plywood panel planked wall for your home.

Around the windows I had to cut custom pieces and I used my jigsaw for that. I am not a measuring kind of girl lol! It killed me to have to be exact with this and to use real measurements so that the pieces would come out right. Usually I eyeball my cuts and that’s that, it drives my husband nuts that I do this but it is what it is, I’m not a perfectionist lol!

Making our own faux plank wall saved us so much money! When we bought our plywood we paid $17 a sheet, a lot cheaper than any premade version. We bought 5 sheets total to redo 2 walls in this room and 5 plywood sheets covered it! Less than $100 to redo them. Granted we did have a lot more work to do but when you’re on a budget hard work is worth it to not have that extra money going out!

plank+wall8.jpgDIY plank wall, how to make your own plank wall on a budget. How we made a faux plank wall for less than $50, shoe string budget bedroom remodel. Plywood panel planked wall for your home.

This was such a great option for us right now. It’s not as much work as drywall and definitely not as hideous as the wallpaper that had been on the walls. While it’s still technically a band aid it’s a much prettier band aid!

I hope this post helps you to DIY your own plank wall and learned what not to do with some of the mistakes we made DIYing our own plank wall.

Love freebies? Click HERE to get instant access to all of my free printables, SVG files, and more

How to remove wallpaper, NO chemicals needed just steam

How to remove wallpaper easily without any chemicals or cleaners. Easiest way to take wall paper off the walls using a steamer for garments. No mess way to get wallpaper off of the walls.

HOW TO EASILY REMOVE WALLPAPER WITHOUT A GIANT MESS OR CHEMICALS

Wallpaper…you either love it or hate it. If you aren’t too hip on wallpaper and need to remove it from your home like we did then you have stumbled on the right post!

My husband and I just bought our very first home! After looking for what felt like forever and getting discouraged when everything we found seemed way out of our budget we finally found our home. Built in 1900 this home has everything we were looking for and more! Seriously so exciting, and we did it without having a credit score! I plan to write a post about the process we went through to help other people just like us but for now I want to share with you how to remove unsightly wallpaper. When we did our initial walk through we noticed the current owner at the time had a bit of an obsession for wallpaper. She had it everywhere! We are talking wallpaper on wallpaper on wallpaper in some cases. Cut outs of wallpaper in random places on the walls, almost like she was decoupaging wallpaper flowers to the wall here and there. And my favorite, well not really lol, is the room that had 6, yes SIX, different patters of wallpaper on the walls! And even wallpaper on the paneling that was on the wall. And it all had to come down.

Affiliate Disclosure. Some of the links on this website are affiliate links, which means that I may earn a small commission if you click on the link or make a purchase using the link. If you make a purchase you will not be charged anything additional.

For being a super old home it is actually in great shape and only needs cosmetic updates thank goodness! We decided we were going to tackle these updates one room at a time and we took on the 6 wallpaper room as our first overhaul.

I had been thinking about how on earth we were going to take down all the wallpaper throughout the house. Was it going to be a pain in the butt? Were we going to have to spend a ton of money on a bunch of products? I had this theory that maybe if I used my garment steamer that maybe that would help…maybe. To my surprise the second I started taking the floral, brick, and teddy bear printed papers it actually came off the walls so seamlessly! I rarely ran into an issue peeling it off the wall. I don’t know if it was the type of wallpaper or the way the previous owners had applied it but it was almost effortless taking it off of the wall.

I didn’t even use any chemicals just STEAM!

I couldn’t find the exact handheld garment steamer I used but here is one that is pretty similar.

Here is what the wall I used for this tutorial looked like before. I feel like I need to say again, this is how we bought our house with all this lovely wallpaper lol!

How to easily remove wallpaper from walls using a steamer. DIY remove your own wallpaper  without chemicals or special products.

And here’s what it looked like once I started steaming the wallpaper off. A million times better! Because the house is so old we did find some issues which honestly we were expecting there to be something hidden behind all that glorious wallpaper. Those walls will be getting a lot more tlc and we ended up taking out two of the walls completely and gutted them back to the studs. Which in 120 year old homes they used REAL 2x4’s unlike the 2x4’s they produce today that don’t actually measure 2”x4”.

How to easily remove wallpaper from walls using a steamer. DIY remove your own wallpaper  without chemicals or special products.

Here’s how I removed 6 different wallpaper prints from my 120 year old walls.

1. PREP

When I started removing the hideous wallpaper it was more of a spur of the moment kind of thing. I had just unpacked my handheld garment steamer then ran upstairs to test out if my theory would work. Once I got going on the removal process I didn’t want to stop. So nope, I didn’t prep or cover a darn thing when removing the wallpaper but if you’re worried about your flooring or any furniture I recommend covering it up just to be on the safe side.

2. WARM UP

I filled my inexpensive steamer with water, plugged it in and let it heat up. When the steam starts rolling out of the holes then you know it’s ready to start using.

3. STEAM THE WALL

I stood on my step ladder and started working from a top corner, placed my steamer against the wallpaper and held it there till the wallpaper was wet but not overly wet if that makes sense. The steam loosens the glue on the back of the wallpaper allowing it to release from the wall.

How to easily remove wallpaper from walls using a steamer. DIY remove your own wallpaper  without chemicals or special products.

4. PEEL

Once the wallpaper was loosened up I started to peel it off. Then pulled the paper while steaming at the same time working my way down the wall.

How to easily remove wallpaper from walls using a steamer. DIY remove your own wallpaper  without chemicals or special products.

5. REFILL

Because my handheld steamer is small it doesn’t hold much water so I did have to refill it often. But honestly I wouldn’t buy a giant steamer just to remove wallpaper in my house. I like that the steamer is the size of an iron so I can put it away easily and it doesn’t take up much space.

If you run into any issues with stubborn spots you can use a putty knife to help remove those areas. Or you can do what I did and use a spatula! Yes, I totally used that on my wall since I couldn’t find a professional tool so the kitchen utensil worked great instead! I placed my steamer over those stubborn areas, made sure the were good and steamed then they peel right off with the spatula.

wallpaper5.jpg

I hope you found this tutorial helpful in removing old wallpaper in your home. If you have any questions please ask below in the comments.