Painting with nature, a creative and fun experience to enjoy with your kids

Painting with nature, have you tried this with your kids? If not you are totally missing out on a ton of fun and creativity! I’m a momma to four girls and I LOVE that my almost preschooler loved it just as much as my middle schooler. So this craft is truly one for all ages.

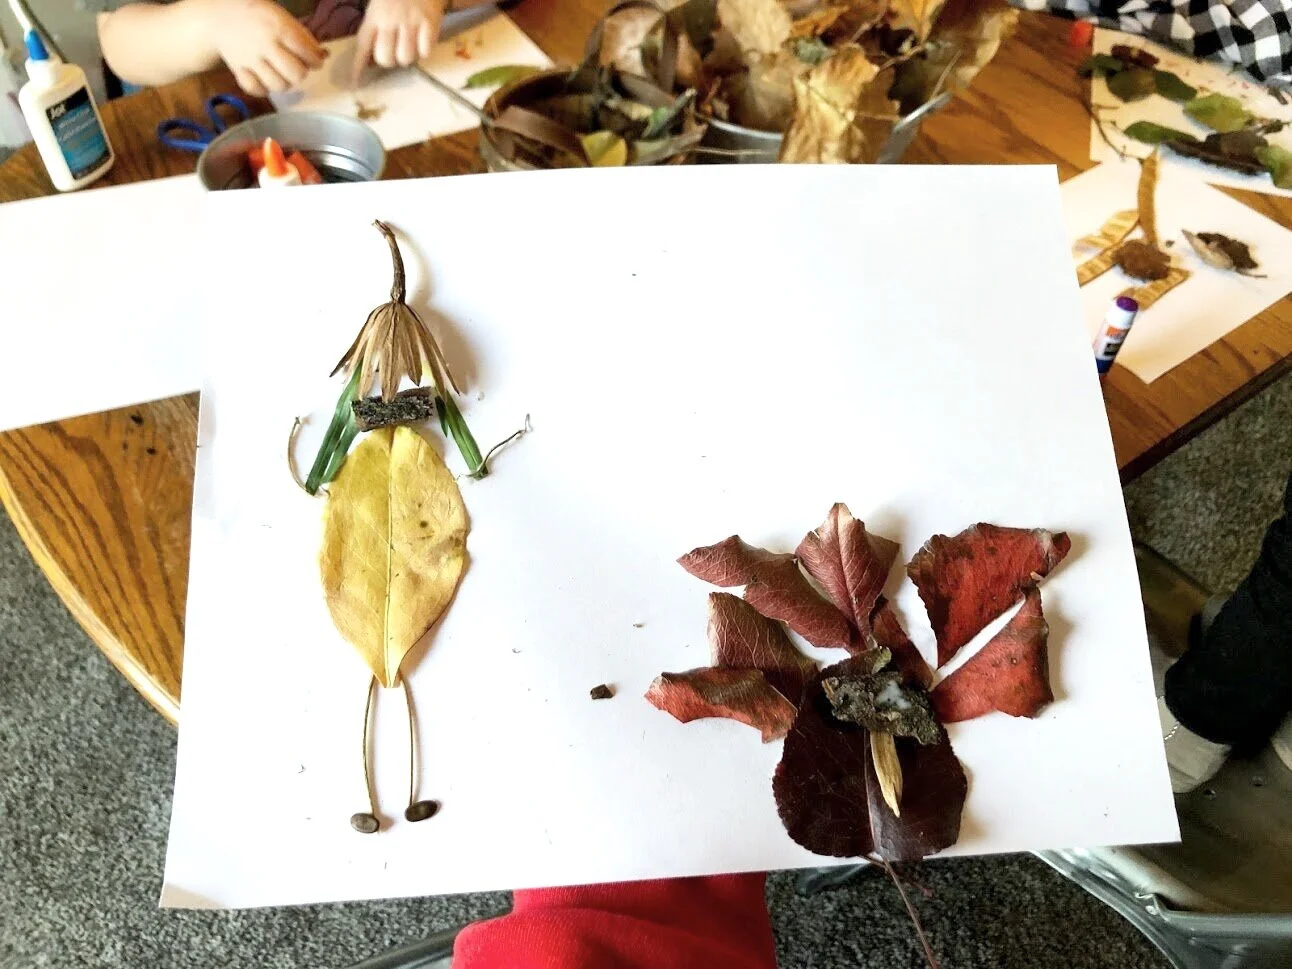
What made this even more fun was that the girls gathered their own materials. They each went hunting in the yard and selected some really cool pieces of nature to paint with. Some of the nature items they found were dandelions, tree leaves, clovers, broken acorn shells, seeds from inside of pods, tree bark, and I know there’s more I’m forgetting. They really enjoyed this part. Watching them pick up the different materials that nature was offering and thinking how that would look on their paint canvas was too cool to see.

If you want to paint with nature but you need a mess free option be sure to check out my post on how we painted with pine cones. I don’t think my girls got a drop of paint on them for that project.

After you read this kid friendly DIY craft be sure to check out my other fun projects that are kid approved. Click here to go to my kids craft projects.

How to paint with nature. Use twings, leaves, cloves, flowers, anythgin you find in nature to make a painted canvas masterpiece. Use food coloring or acrylic paint and let your kids explore the power of painting with items that aren't the normal pai…

 Affiliate Disclosure. Some of the links on this website are affiliate links, which means that I may earn a small commission if you click on the link or make a purchase using the link. If you make a purchase you will not be charged anything additional.

This is such a great activity to do outside if you can. If you can’t no worries I promise it will be just as fun! We gathered our nature painting pieces from our backyard but if you don’t have a backyard you can take a stroll around the park or even just down the sidewalk. The kids are sure to find some useful nature pieces there, even just a twig and a dandelion are perfect for this craft.

HOW TO PAINT WITH NATURE, AN EASY AND FUN CRAFT FOR KIDS

Here’s what you’ll need

How to paint with nature, a fun outdoor craft to do with your kids. Paint on a dollar tree canvas with nature using food coloring, flowers, twigs, leaves.

Let the kids get messy! Getting messy is all part of the creative process. We kept our nature painting outside. I put a drop cloth over our patio table and had my girls wear aprons. The older three daughters wear adult aprons like these that we tie up on the neck and the youngest daughter wears a kids apron. With all the crafting we’ve done over the years these aprons have held up really well.

We used a combination of food coloring and acrylic paint to paint our nature canvases. I thought a watercolor look to these would be really pretty but we didn’t have any watercolors paints to use. Food coloring on the canvases turned out AMAZING! They looked just like watercolors, well they did at first but then the girls kept painting over their masterpieces to get them just right lol! We also used food coloring during our TIE DYE experiment and those turned out way better than I thought they were going to. Read about how to TIE DYE with food coloring here.

Painting with nature process is overall pretty simple, here’s how-

ONE- Gather your pieces of nature, canvas, paint and other materials and prep your work area

How to paint with nature, a fun outdoor craft to do with your kids. Paint on a dollar tree canvas with nature using food coloring, flowers, twigs, leaves.

TWO- If you’re using food coloring you can mix that in your paint wells on your paint tray. I used a medical syringe, like the kind you get from the pharmacy, to squirt water into the paint well, this way I didn’t overfill them, then added drops of food coloring. I used a paintbrush to mix the water and food coloring together and that worked great.

How to paint with nature, a fun outdoor craft to do with your kids. Paint on a dollar tree canvas with nature using food coloring, flowers, twigs, leaves.

THREE- Get creative and start painting with nature. I just let my girls paint with whatever and however they wanted. The only rule I had was to not argue lol! Let’s be real here, crafting with multiple kids, especially preteens, isn’t always the most enjoyable when the bickering starts. My girls know that if they start arguing with one another there's a good chance momma will make them pick up and put everything away. It’s a wonderful way to keep the peace.

We found that painting on the leaves worked really great for making prints of them. The key was to not apply too much of the food coloring mixture/paint.

How to paint with nature, a fun outdoor craft to do with your kids. Paint on a dollar tree canvas with nature using food coloring, flowers, twigs, leaves.

Then press the leaves, or other nature items, onto the canvas.

How to paint with nature, a fun outdoor craft to do with your kids. Paint on a dollar tree canvas with nature using food coloring, flowers, twigs, leaves.

If you want a good print of it press gently, don’t push it around this will cause the paint/food coloring to smear and will not give a good crisp print.

How to paint with nature, a fun outdoor craft to do with your kids. Paint on a dollar tree canvas with nature using food coloring, flowers, twigs, leaves.

Here’s a leaf print my oldest daughter, who’s in middle school, made. I was actually surprised at how much she enjoyed this nature painting craft. She took her time and carefully picked her nature pieces, colors, and placement of all the things.

How to paint with nature, a fun outdoor craft to do with your kids. Paint on a dollar tree canvas with nature using food coloring, flowers, twigs, leaves.

Just remember, if their projects turn out to be a crazy dark blog looking painting embrace it! Tell them they did a BEAUTIFUL job and enjoy the time you spend together creating. These are special memories you’ll look back on <3!

Let me know if you have any questions about painting with nature. Happy crafting!

Ultimate Dollar Tree birthday gift idea

Ultimate kid's birthday gift from the Dollar Tree

The best kid’s birthday gift idea when you’re on a budget

It’s no secret that my girls and I LOVE the dollar tree. Seriously, we were just there today and when we got home my oldest couldn’t believe that we spent and entire HOUR in there and it literally felt like only 20 minutes had past lol! Yep…raising those girls right!

Our sole purpose of the trip was to find a couple gifts for the oldest daughter’s friends for their birthday parties. Raising a family of 6 isn’t a cheap task. So, things like friend’s birthday parties typically have a pretty small budget of $10 per kiddo. At Walmart $10 doesn’t get you much from the toy aisle or any aisle that a kid would be interested in anyway. But, I have to say over the years we have gotten really good at whipping up some amazing birthday gifts on the $10 budget. And I can’t wait to share the latest gift that comes in WAY under budget! Under budget meaning 70% lower than what we typically budget for friend’s birthdays.

Affiliate Disclosure. Some of the links on this website are affiliate links, which means that I may earn a small commission if you click on the link or make a purchase using the link. If you make a purchase you will not be charged anything additional.

How was I able to create two gifts for kids for under $6?

Well, first the Dollar Tree. It is FULL of really amazing things that on their own may not be all that amazing but when paired with something else, like let’s say a personalized wood letter cut out, can be one of the best gifts ever! And second, I just purchased a scroll saw last weekend with the money that comes in from my handmade business so I used that to create the customized gifts for her friends.

The ultimate Dollar Tree birthday gift idea for under $5

My only regret is not buying a scroll saw sooner. If you’re curious about the one I purchased you can see more about the Ryobi scroll saw here. And if you wanna know about the other tools I have in my shop I’ve written a break down of which tools every crafter needs.

I used my Cricut Explore to cut out the letter E and the dog from cardstock. Then I outlined them with a pencil on a scrap piece of 1x8 that had been sitting on the wood shelf in the garage. Using my new handy scroll saw I cut out the shapes. Gave them a light sanding and they were ready to add to the items we picked up at the dollar tree.

Here’s what we picked up from the dollar tree

  • 1 package of purple/pink 6 pk glitter

  • 1 package of blue/green 6 pk glitter

  • 1 package of purple/pink sequence

  • 1 package of small containers

  • 2 paint pots

We bought the small containers to fill with white paint and glue {which we have a TON of at home} . Since the paint pots don’t come with white paint and sequence doesn’t stick well to paint we thought those additions to the birthday gifts would be a good idea. I wrote on the outside of the containers which one was glue and which one was paint so there wasn’t any confusion when the birthday girl goes to use her new craft kit.

The glitters and sequence were individually wrapped so we pulled them off of the original packaging {they were just taped to the thin cardboard} and gave each birthday girl 4 glitters and 2 sequence.

The ultimate DOLLAR TREE birthday gift idea

To keep the birthday crafts looking somewhat professional I packaged the craft supplies in a clear goody bag {the party favor kind} that we already had left over at home.

I am so excited about this new DIY birthday craft idea! It’s absolutely perfect for the crafty kiddo in your life and it costs just a few dollars to create! I can honestly say that our girls loved this idea so much they each want their own.

———> Want more crafty gift giving ideas? Check out my post on these top selling kid approved DIY CRAFT KITS FOR KIDS

——> Also, you don’t want to miss this a great list of the PRE TEEN CRAFT IDEAS, because they can be so hard to buy for sometime

How to stencil on a canvas bag

How to stencil on a canvas bag. Faux screen printing on a canvas bag

Learn how to stencil on a canvas bag

Have you been wanting to learn how to stencil on a canvas tote? It’s actually super easy! Make it an even more fun with a DIY CANVAS TOTE PAINT PARTY. I’ve put together this DIY canvas bag craft kit to make it even easier. There’s no guess work for you. Just choose your stencil and I’ll send you everything you need to make your party a hit!

If you love this tutorial you’ll probably love this other stenciling project I did a tutorial on. I show you how to make a custom name canvas and it is one of my most popular posts on my blog AND one of the most popular craft kits I sell in my Etsy shop.

Affiliate Disclosure. Some of the links on this website are affiliate links, which means that I may earn a small commission if you click on the link or make a purchase using the link. If you make a purchase you will not be charged anything additional.

What’s included in the DIY canvas tote craft kit?

If you don’t purchase the kit here’s what you’ll need

How to stencil on a canvas bag tote. Paint on a canvas bag to personalize it.

A tip before you start… to get the best outcome you will want to use a contrasting paint color so that your colors really pop.

Ok, let’s get started painting on this canvas bag.

1. Flip your stencil over so that the white paper backing is facing up.  Then using your vinyl squeegee {burnishing tool} rub the stencil  backing.

How to stencil on a canvas bag. Learn how to faux screen print to personalize your canvas totes.

2. Slowly peel the paper backing away from the stencil and transfer  tape {the blue & clear pieces}. GO SLOW and work from one corner  across to the corner diagonal from it. Another tip is to peel it away  at a very sharp angle, it helps to glide it across itself.

How to stencil on a canvas bag. Learn how to faux screen print to personalize your canvas totes.

3. Flip you stencil over so that the sticky side is facing down. Now  place it on your bag. Use your vinyl squeegee to help press it to the  bag.

How to stencil on a canvas bag. Learn how to faux screen print to personalize your canvas totes.

4. Slowly peel off the clear transfer tape. Use the same technique that  you did when taking off the paper backing. GO SLOW and peel  from corner to corner at a very sharp angle

How to stencil on a canvas bag. Learn how to faux screen print to personalize your canvas totes.

5. Run your finger along all the exposed areas of your stencil. This will  help control the paint bleed and keep it minimal. If there are any air  pockets just press them out with our finger or squeegee.

How to stencil on a canvas bag. Learn how to faux screen print to personalize your canvas totes.

6. Before you start painting you need a barrier between the two layers  of your bag so you don’t have paint bleeding onto the other side.  You can do this by placing a plastic bag inside your canvas bag,  making sure it is in the same place as the stenciled area.

How to stencil on a canvas bag. Learn how to faux screen print to personalize your canvas totes.

7. Put a small amount of your paint colors on your paper plate. Using  a stenciling sponge LIGHTLY dip the bottom of the sponge into  your paint. Dab it off. You want VERY LITTLE paint on your sponge.  Too much paint will cause paint bleed.

How to stencil on a canvas bag. Learn how to faux screen print to personal your canvas totes.

8. Using an up and down pouncing motion apply the paint with the  stenciling sponge onto the exposed areas of the stencil. You do not  want to rub or make a back and forth motion. This will force the  paint up and under your stencil. Repeat this step until you have  painted all the exposed areas inside your stencil.

How to stencil on a canvas bag. Learn how to faux screen print to personalize your canvas totes.

9. After you have your entire stencil painted it’s time to peel it up. You  do not need to wait for your paint to dry for this step. Just like you  peeled the paper backing and transfer tape, start in one corner and  peel to the opposite corner. Be sure not to drop your stencil  material on your bag as you peel. Use your xacto knife to take up all  the middles out of your design. THIS STEP MUST BE DONE BY AN  ADULT.

How to stencil on a canvas bag. Learn how to faux screen print so you can personalize your canvas totes.

10. After your design dries REMOVE the plastic bag. It is best to seal  your design with heat prior to washing it. You can do this by simply  ironing it, do not iron directly on the painted area always use a  pillow case or tea towel between the iron and your design.

How to stencil on a canvas bag. Learn how to faux screen print to personalize all your canvas totes.

10 fun crafts for preteens...from a preteen

10 fun crafts for preteens, by a preteen

FUN CRAFTS YOUR PRETEEN & TEENS WILL LOVE

I don’t know about you but our three older girls love Pinterest. They always ask to pin on there and honestly I don’t mind because it gives me a little insight into what they are into. What sparks their interest. And I love to see the varied levels of interest from each daughter. Some days they are all about pinning slime recipes and others they are decorating their dream house lol! But I especially love it because it helps me to see what craft projects they might be into so I can buy supplies when I see it go on sale.

So I thought I’d share on here 10 crafty projects that PRETEENS are into, from a preteen’s point of view. These are all projects they have either done and LOVED or projects they’ve seen on Pinterest that they have pinned…more than once {this happens a lot with these three}.

Affiliate Disclosure. Some of the links on this website are affiliate links, which means that I may earn a small commission if you click on the link or make a purchase using the link. If you make a purchase you will not be charged anything additional.

I think it’s important that I also share I have not collaborated in any way with the other crafty sites I’m sharing. These are all pins our preteens found on Pinterest and I want to give credit where credit is due. So please check them out. Just click on either the highlighted link or the pictures themselves and it will link back to their websites.

If your preteen / teen is into DIY lotions, bath bombs, lotions, lip balms, basically DIY SPA products for teens —-> click here.

1.Treasure Boxes

First up are these wonderful little treasure chest boxes. We made these for our oldest daughter’s birthday party. She had a scavenger hunt themed party so we thought why not have the treasure be mini treasure boxes! The kids loved them, even the boys which totally surprised me. We don’t have boys so it’s always super difficult for me to plan things that are gender neutral like that.

10 fun crafts for preteens, from a preteen

2. Fairy Houses

I don’t care how old you are fairies are fun! And these recycled fairy houses are sooooo adorable! Be sure to stop by Crafts By Amanda

3. Painted Feathers

These are gorgeous! Preteens could do so much with these painted feathers and they would be so easy to make. Check out BLD 25 and the rest of their DIY projects.

4. Sharpie Tie Dye

This looks like so much fun! Traditional tye dye can be messy but Natural Beach Living makes this craft look easy peasy!

5. Light Up Fairy Jar

I have watched LOTS of preteens make this craft and they love it so much! Fairies are so fun no matter your age! Our girls have made several of these over the years and each time they get more and more creative with it.

6. DIY Bath Bombs

So this has been on our older girl’s list of things to do for awhile and I’ll be honest I have no idea why we haven’t tried these yet. Chelsey from Buggy & Buddy has a great tutorial the girls and I will have to make over this summer!

7. Cracked Glass Jewelry

OMG this looks like a lot of fun! This project from Color Made Happy will require adult supervision but what a fun thing to make. I can’t wait to do this one with our girls.


8. DIY Constellation Jar : Glowing Science Fun

These look like a TON of fun! Your preteen could even upcycle an old sauce or pickle jar for this craft. Stephanie from Mom Dot did a great job with this creative project.

9. Polymer Clay Owl Necklace

Our girls got a ton of clay for Christmas last year so they are pinning like crazy all the different things they can make out of it. Probably one of the best gifts we’ve ever given them lol! They stay busy for hours with this stuff! Check out Angela from Projects With Kids and her polymer clay necklace tutorial

10. Wall Mobile

This is a must do craft for your tween. Especially if they are wanting to learn how to sew. I’ve taught all my older girls how to sew, the youngest will learn as soon as she’s ready, and they LOVE to explore what they can make with their learned skills. Sew Yeah has lots of great projects to check out including this heart wall mobile.

Be sure to check out all the amazing craft tutorials that our sweet girls found on Pinterest. I’d love to hear from you. What crafts does your preteen like?

Here are more kid themed crafts your kiddos may enjoy

One fish two fish, perfect Dr. Seuss keepsake craft to make with your kids

One fish two fish, perfect Dr. Seuss keepsake craft to make with your kids

A person’s a person no matter how small

-Dr. Seuss

Our family loves Dr. Seuss so naturally every year on his birthday, March 2nd, we celebrate him in some way. Usually we read his books and make a fun snack or just for fun craft in honor of him.

But this year we went a little extra with it. Our oldest daughter is getting older, about to hit middle school next year {I have no idea where that time went} so I know that the days of doing fun keepsake projects with her handprints are numbered. I fully took advantage of the opportunity to make this adorable ONE FISH TWO FISH craft with all four of my sweet daughters handprints.

Affiliate Disclosure. Some of the links on this website are affiliate links, which means that I may earn a small commission if you click on the link or make a purchase using the link. If you make a purchase you will not be charged anything additional.

Here’s how you can make your own at home

supplies you’ll need:

1. CUT OUT DECALS

Using my Cricut cutting machine I cut all the lettering out first. My projects usually go much smoother if I have all of the decals and accents cut out before I start staining and painting. If you don’t have a cutting machine you can always write the lettering with a chalk pen or permanent marker. My hand writing isn’t so neat but my Cricut does a great job ;)!

2. CUT & STAIN WOOD

One fish two fish, perfect Dr. Seuss keepsake craft to make with your kids

First give your board a light sanding, then stain. Be sure to watch my HOW TO STAIN WOOD video if you’ve never done this before. Let your board dry for 24 hours before the next step.

3. DISTRESS EDGES

One fish two fish, perfect Dr. Seuss keepsake craft to make with your kids

After your board has dried you’ll want to give it a quick sanding on all surfaces of the board. I always focus more on the edges and corners. Using a RYOBI cordless sander works great for this but you can use regular sandpaper if you need to. Wipe with a lint free cloth to get all the dust off, you don’t want this on there when you go to paint.

4. PAINT

One fish two fish, perfect Dr. Seuss keepsake craft to make with your kids

You’ll need RED, BLUE, GREEN, and YELLOW for this next step. I went ahead and made pencil marks for where I wanted the girl’s hands to hit. That way I could map out where they would be and I wouldn’t have either too much space or not enough space left.

One fish two fish, perfect Dr. Seuss keepsake craft to make with your kids

You’ll want to do one handprint at a time. Coat the hand in a fairly good amount of paint but not too much, you don’t want a glob of paint to be left on the board.

Gently guide their hands down on the board and press them lightly.

One fish two fish, perfect Dr. Seuss keepsake craft to make with your kids

Before you add any facial features/gills you want their handprints to totally dry. If you don’t let them dry you will smudge the colors together.

5. APPLY VINYL DECALS

One fish two fish, perfect Dr. Seuss keepsake craft to make with your kids

After all the paint is dry, totally 100% dry, add your vinyl decals. If your paint is not completely dry the vinyl will not stick to the board. I use a vinyl squeegee to help get the decals down really good. Then peel the transfer tape off.

Now it’s ready for you to hang and enjoy in your home.

One fish two fish, perfect Dr. Seuss keepsake craft to make with your kids

Click here for more crafty kid posts

Check out the latest posts on the blog

DIY St. Patrick's Day suncatcher, easy tutorial to make your own with your kiddos

DIY St. Patrick's Day suncatcher, easy tutorial to make your own with your kiddos

St. Patrick’s Day isn’t a super big deal around our house but we do enjoy the holiday. We always wear green and we try to make tasty green foods {that doesn’t always happen}. But this year we did get around to making some fun green crafts for the occasion!

Each week we host a toddler day in our CRAFT STUDIO called TOTS IN THE SHOP and I needed to plan for the events for the upcoming months. I try to coincide our weeks with the holidays when they come up and St. Patrick’s Day is coming up so I scoured Pinterest to see what I could find. I came across this adorable suncatcher by Julie from Director Jewels and I knew we had to make one too! I did change up ours a bit to make it easier/simpler for the tots to make.

Before we host our workshops our four daughters and I create mockups for them. I have to say our girls LOVED making this one. I was actually pretty surprised though. I thought for sure the older girls would be too “grown up” for this one but they loved making it more than our three year old. Woohoo!

This craft was so super easy to make too. I didn’t really do much except show them how to do it and they took it from there.

DIY St. Patrick's Day suncatcher, easy tutorial to make your own with your kiddos

Here’s what you’ll need

  • contact paper

  • green crepe paper

  • a shamrock with a hollow middle {I cut mine out using my cricut}

  • scissors

I used my trusty Cricut to cut out my shamrock. I found the image in design space and adjusted it to be approx. 7” wide. You can always print your own and use scissors to cut out the middle. Julie has a printable linked on her website if you click her link above.

Then you need to measure out your contact paper. You want it to be larger than your shamrock.

DIY St. Patrick's Day suncatcher, easy tutorial to make your own with your kiddos

You’ll need to cut TWO pieces of contact paper that are larger than your shamrock.

DIY St. Patrick's Day suncatcher, easy tutorial to make your own with your kiddos

Remove the paper backing from your contact paper and place your shamrock in the middle. Then start tearing pieces of the crepe paper off and sticking them inside of the shamrock.

DIY St. Patrick's Day suncatcher, easy tutorial to make your own with your kiddos

Once your shamrock is covered remove the paper from the second piece of contact paper and lay it sticky side down onto the shamrock, essentially you are making a shamrock sandwich with the contact paper. Then trim off the extra leaving a 1/4 of and inch of contact paper all the way around the paper shamrock.

DIY St. Patrick's Day suncatcher, easy tutorial to make your own with your kiddos

And you’re done! SO EASY!!

St. Patrick's Day suncatcher, easy how to make this fun DIY

DIY Valentine's Caterpillar, easy simple step by step tutorial

DIY Valentine's Caterpillar, easy simple step by step tutorial

Quick and simple crafts…I love them! Especially when they are quick crafts for the kiddos. Let’s face it their attention span isn’t always the longest and usually half way through the craft they’ve already found something shiny to play with on the other side of the room.

This project won’t take up a ton of their time and will most definitely be a sweet keepsake for you for years to come.

Some links may contain affiliate content meaning if you click the link and make a purchase I will get a small commission from this, at no extra cost to you. Please know that I would never endorse anything I don’t believe in or use in my own life.

DIY Valentine's Caterpillar, easy simple step by step tutorial

Here’s what you’ll need

  • piece of paper, we used cardstock

  • black marker

  • googly eyes

  • glue stick

  • valentine themed stickers

  • heart cut outs,. I used my Cricut to make ours but you can make your own by hand

DIY Valentine's Caterpillar, easy simple step by step tutorial

Start by cutting out your hearts. I used my Cricut Explore to do this task. I absolutely LOVE my Cricut machines, and have been using one for MANY years.

DIY Valentine's Caterpillar, easy simple step by step tutorial

Next, using your marker, draw a line horizontally on your paper. I did this to keep the hearts straight on the paper.

DIY Valentine's Caterpillar, easy simple step by step tutorial

Starting on the left glue several hearts one after the other on to the paper till you’ve reached the end of your line.

DIY Valentine's Caterpillar, easy simple step by step tutorial

Using a slightly larger heart for the head of the caterpillar, glue that under the first heart on the left and slightly tilted like above.

DIY Valentine's Caterpillar, easy simple step by step tutorial

Draw two lines going out of the top for the antennas.

DIY Valentine's Caterpillar, easy simple step by step tutorial

Glue on the eyes then draw on the smile with the marker.

DIY Valentine's Caterpillar, easy simple step by step tutorial

Add a couple tiny hearts {I cut these from larger ones} to the antennas, draw on some feet, and add any other little accents to your page and your done.

See I told you that would be sooooo super easy!! Your kiddos can even do this one all by themselves.

How to make your own CUSTOM canvas name art at home

How to make your own CUSTOM canvas name art at home

I love canvas art! There are so many different things you can create on these wonderful little blank pieces. The possibilities are endless with a blank canvas! You can free hand paint, make adorable handprint keepsakes, explore the fun of melting crayons and so much more! If you haven’t checked out our letter canvas art DIY you must after you read this tutorial.

Affiliate Disclosure. Some of the links on this website are affiliate links, which means that I may earn a small commission if you click on the link or make a purchase using the link. If you make a purchase you will not be charged anything additional.

How to make your own CUSTOM canvas name art at home

I’ve put together this CRAFT KIT to make this DIY so super easy for you. Everything you need in one little box shipped right to your door. You child’s name comes already attached and sealed to the canvas, which makes it even better! Get your personalized kit here. But if you want to go solo on this one here’s what you’ll need…

How to make your own CUSTOM canvas name art at home

The first steps aren’t pictured. First, cut your name in vinyl using your Cricut or other cutting machine. I always use oracal 651 but you can use any brand/strength. The color does not matter because you will be removing it once the painting is done. Now using transfer tape, attach your vinyl name to the canvas. This can be super tricky to get it to stick to the canvas so go slow when peeling the transfer tape off. After your vinyl name is attached and you are sure all the air bubbles are out of it you’ll want to seal it with SUPER THIN layer of MATTE finish mod podge. This is really easy. Just brush over the letters focusing on where the vinyl and the canvas meet. Essentially you are filling in any areas where paint might get in under the stencil with clear mod podge.

Check out the video below to see how to apply AND seal your canvas stencil ❤️.

After the mod podge is dry you can start painting away!!

How to make your own CUSTOM canvas name art at home

Be sure your kiddo is covering the entire area around the vinyl. If there are areas that don’t get painted the letter might not look like a letter when you are finished.

They can get super creative with it. I just LOVE how these turn out. All the kids do something different some do one solid color while others want the whole rainbow, then some make fun galaxy super gorgeous pieces and others use the shaped sponge brushes we have at the studio all over their canvas. The possibilities are endless.

How to make your own CUSTOM canvas name art at home

I recommend if your kiddo wants to add any glitter to their canvas to do so while their paint is still wet.

After they are done with their masterpiece you’ll peel the vinyl lettering up and toss it in the trash {this is why the color of the vinyl doesn’t matter ;) }. I use a sharp xacto knife to do this but a sewing pin works great too. Be careful not to drop it onto their freshly painted art work.

How to make your own CUSTOM canvas name art at home

You can add a ribbon on the back to make a fun hanger to hang it on the wall. We use our stapler for this {not a paper one but a home improvement one}. Your kiddo will admire this for years to come!

How to make your own CUSTOM canvas name art at home

I hope you enjoy this crafty tutorial and that it inspires you to create your own masterpieces and memories with your own kiddos.

Check out more craft kid posts below

PINE CONE ART, easy and mess free. Make your own with these simple steps.

PINE CONE ART, easy and mess free. Make your own with these simple steps.

If your kids are anything like mine they are ALWAYS wanting to make something. They don’t care what it is they just NEED to create. Either in our craft studio or the kitchen they just have that itch to make all the things.

So, naturally, I am always trying to find ways to be resourceful. Reusing old items, things that we would normally recycle or toss out, or things we find in nature…like pine cones!

We gathered some pine cones and had a mission to use them to create a really cool piece of art.

PINE CONE ART, easy and mess free. Make your own with these simple steps.

Here’s what you’ll need

  • pine cones

  • box {we used an old usps box}

  • tape

  • cardstock {we used white but you can use whatever color you’d like}

  • acrylic paint


Start by taping a boarder around your paper. We only had 3/4” tape so that’s what we used.

This next step isn’t picture, now tape the piece of paper down to your box. We taped ours all the way around so that the pine cone didn’t get snagged on the paper if it wasn’t secured down all the way.

PINE CONE ART, easy and mess free. Make your own with these simple steps.

Now decide what colors you want your art to be. We used lighter colors but you can use any that you’d like. You want to put your paint on something you can easily dip a pine cone into. We used the middles of our paint trays.

PINE CONE ART, easy and mess free. Make your own with these simple steps.

Dip your pine cone into your paint. You can do one color or several at a time. At first we did just one at a time then she got brave and started dipping all the colors in different spots.

PINE CONE ART, easy and mess free. Make your own with these simple steps.

Now drop it in your box and SHAKE it up! Take care not to shake it too fast or rough because your pine cone will go flying…we may or may not know this first hand. Keep repeating this step till you’re satisfied with the coverage.

PINE CONE ART, easy and mess free. Make your own with these simple steps.

This is what ours looked like before we removed the paper from the box. All the mess contained inside the box…woohoo!!

PINE CONE ART, easy and mess free. Make your own with these simple steps.

We let our dry for a few minutes before we peeled the paper out of the box and peeled the tape away from the outside edges. She was VERY impressed at how clean the lines came out. I have to say I am too!

PINE CONE ART, easy and mess free. Make your own with these simple steps.

This is such an inexpensive {literally cost pennies to make} and one that doesn’t require a ton of prep or clean up. I hope you enjoy this craft with your kiddos as much as I did with our girls!

Apple Stamping, how to make a precious Autumn keepsake art project with your toddler

apple stamping, how to make a precious Autumn keepsake art project with your toddler

DIY keepsake apple stamping canvas art for your toddler

I LOVE fall! I love the colors, the smell, the oversized clothing to keep you warm on the cool Midwest days….I love it all.

This fall I took our four girls to a small off the beaten path apple orchard. Seriously these are the best kind of farms! The people are always so nice and the atmosphere is just so welcoming.

We had all these apples {literally 30lbs of apples, I know it sounds crazy but at $1/lb I thought if nothing else it was cheap educational entertainment for our girls} and I thought, why not do a fun little craft with them at our CRAFT STUDIO for our TOTS IN THE SHOP day. So we did! Boy did all the toddlers have the best time making a mess and painting with apples.

If your tot is anything like ours you’ll end up with a gorgeous blend of fall colors…but she had so much fun and that makes my heart happy!

Seriously, look how proud that girl is! Smiling from ear to ear with her artwork!

Affiliate Disclosure. Some of the links on this website are affiliate links, which means that I may earn a small commission if you click on the link or make a purchase using the link. If you make a purchase you will not be charged anything additional.

Here’s what you need to make your own at home


Start by tracing your toddler’s hand and the upper part of the forearm on the canvas with a pencil. Do this lightly so you can easily hide the pencil mark with your paint.

Apple Stamping, how to make a precious Autumn keepsake art project with your toddler

Next you want to paint the inside of where you traced with brown. This will be the trunk of your tree. Some moms in our class painted this for their tots but our sweet girl wanted to paint hers all by herself. I think she did a pretty great job {go Millie!}

Apple Stamping, how to make a precious Autumn keepsake art project with your toddler

Once the brown is dry you can start stamping away. We stuck forks in our apples so the kiddos could hold onto the apple a little better but you can just pick the apple up with your hand if you’d like.

We used discarded pieces of cardboard to squirt our paint on. Put some paint on there, dip the half apple in, smear it around a bit so it gets a good coat, then stamp it right on the canvas. This is going to be messy, embrace it! This is how your little one learns and explores.

Apple Stamping, how to make a precious Autumn keepsake art project with your toddler

Keep stamping till your tot is satisfied with their little work of art.

Apple Stamping, how to make a precious Autumn keepsake art project with your toddler

Be sure to check out more crafty kids projects below.