family water tracker + FREE PRINTABLE

FREE PRIBTABLE family water tracker. Download this free water tracking print to use as a family. Help and encourage your kids to keep hydrated with the modern print to put in your home. Place in a picture frame and use a dry erase marker to check th…

FAMILY WATER TRACKER + FREE EDIT FRIENDLY PRINTABLE

Do you struggle with getting your kiddos to drink water throughout the day? Yes, same momma! I am right there with ya. I feel like a broken record always reminding my girls to drink more water on a daily basis.

So much so that I created a printable {that I’m giving to you for FREE;) } so that my girls can start tracking their own water intake. I’m hopeful that this works and that it makes us all more aware of how important it is to keep our bodies properly hydrated.

Affiliate Disclosure. Some of the links on this website are affiliate links, which means that I may earn a small commission if you click on the link or make a purchase using the link. If you make a purchase you will not be charged anything additional.

FREE PRIBTABLE family water tracker. Download this free water tracking print to use as a family. Help and encourage your kids to keep hydrated with the modern print to put in your home. Place in a picture frame and use a dry erase marker to check th…

I made my custom water tracker in Canva. If you’ve never used that site before you are missing out. The version I use is totally free but if you want to upgrade to their paid for version you can do that too.

This water tracking printable is completely EDITABLE! Click here to get access to the link in my FREE RESOURCE LIBRARY.

After you open the link it will take you to editable version in Canva. There you can completely customize this print to fit the needs for you own household. I just used letters for my girls but you can add your kiddo’s names, and change up the size of the font too.

FREE PRIBTABLE family water tracker. Download this free water tracking print to use as a family. Help and encourage your kids to keep hydrated with the modern print to put in your home. Place in a picture frame and use a dry erase marker to check th…

When you are all done click the download button to save it to your computer, open the document then send it to your printer. If you need to adjust the size of yours you can do that there. I printed mine at 83% on my print settings. I used a simple HP printer and regular copy paper to print out my family water tracker.

I trimmed my printout down using this paper trimmer. I LOVE this handy tool. I didn’t realize how often I actually would use it till I bought it.

FREE PRIBTABLE family water tracker. Download this free water tracking print to use as a family. Help and encourage your kids to keep hydrated with the modern print to put in your home. Place in a picture frame and use a dry erase marker to check th…

I placed it in a picture frame I picked up on clearance at Walmart. I have a dry erase marker by it, one with a felted cap eraser, sitting by it so the girls can mark off the glasses they drink daily.

FREE PRIBTABLE family water tracker. Download this free water tracking print to use as a family. Help and encourage your kids to keep hydrated with the modern print to put in your home. Place in a picture frame and use a dry erase marker to check th…

I’m so hopeful this helps all of us make better choices to keep our bodies hydrated and I hope that I can keep some of my sanity by not reminding my girls to drink water instead of chocolate milk or tea on a daily basis.

I hope you enjoy this free printable. Let me know if you have any questions in the comments below.


A Christmas gift teens & tweens will LOVE!

DIY spa kits for teens. Great gift to give teens and tweens for Christmas is a DIY spa experiment recipe kit. Let them make their own lotions, bathbombs, essential oil sprays, soaps, face masks, and more.

DIY SPA KITS FOR TEENS

What does you preteen (tween), or teen want for Christmas? I don’t know about your kiddos but my girls are getting harder and harder to buy for the older they get.

I’m a momma of 4 girls, three of which are all with in 3 years of one another. They are stair steps and I love having them so close in age. One of the benefits is they are all kind of into the same things at the same time. But, this year the older 3 girls had just a few items on their Christmas wish lists, which isn’t a bad thing but it does make for more challenging shopping.

Affiliate Disclosure. Some of the links on this website are affiliate links, which means that I may earn a small commission if you click on the link or make a purchase using the link. If you make a purchase you will not be charged anything additional.

Anyway, I thought long and hard about what to get the girls for Christmas. I just know with 2020 being what it is, that we are going to have a TON of time at home.

So I decided we would gift them things they that would keep them busy over winter. On the list of items bought so far are lots of books, board games, art supplies and….. a SPA KIT! But not just any spa kit, this is like the ULTIMATE SPA KIT for teens!

I looked online and didn’t really find exactly what I was looking for so I thought I’d put together my own. So fitting for a frugal DIY momma.

So, how do you make a DIY SPA KIT you ask?

It might be easier than you think. If you are great at shopping online you can easily put one together too!

I started with this book, Girls' Home Spa Lab: All-Natural Recipes, Healthy Habits, and Feel-Good Activities to Make You Glow

It’s amazing! It has tons of recipes and other good for you activities. And since it’s written and illustrated for teen and tween girls they will extra love it. There’s no old fashioned old lady vibe with this DIY book. It has a fresh and modern look to it that’s super attractive and it makes me want to read all of it and make my own spa products.

Since this was just the book, no ingredients or anything, I read through it and picked out ingredients that were repetitive throughout the book. I didn’t want to buy every single ingredient in the book because that would be expensive and we keep several of the ingredients like olive oil and witch hazel on hand at home. I bought the main ones I kept seeing that we don’t usually have at home.

Here’s what I bought

1. ESSENTIAL OILS


Non ingredient items I ordered:

1. MORTAR & PESTLE

I have a fancy Kitchen Aid stand mixer but I really didn’t want it taken over. I opted for this handheld mixer AND I was sure to get the one that has attached storage for the beaters. That way there’s less chance they will loose them.

3. DOUBLE BOILER

Just like with the mixer I really didn’t want the girls to use my double boiler for bath and body ingredients. I looked on good ole Amazon for double boilers and found this gem! It was exactly what I wanted!

This pot is great because it will fit in any pot we have at home. We have a few different small sauce pans and this double boiler option will work perfectly with all three of them.


Of course the spa kit wouldn’t be complete without containers to put all their new spa products in. If you search on Amazon there’s a ton of different things to choose from. Here’s what I ordered for my girls. No judgements on the glass containers please ;) if you don’t feel comfortable with yours teens having glass there are other options out there. We typically will always choose glass over plastic, it’s just a personal preference.

4. SMALL PLASTIC CONTAINERS WITH SCREW ON LIDS


As I’m writing this it’s early November so I have not packaged any of the gifts yet to put under the Christmas tree.

The girls know that one of their gifts is one big gift to share. So I think I’m going to wrap all the spa ingredients individually then put everything in a big box that will be wrapped too. You know, make it more fun for them to open it.

This gift is going to be amazing for the girls this winter and I can’t wait for them to start experimenting in the kitchen making their own bath and body products.

I’d love to know, is this something your teens/tweens would love? Let me know in the comments.

How to make beeswax wraps, reusable cotton saran wrap

How to make resuable saran wrap. DIY beeswax cotton food wraps made with pine resin. Save money in the kitchen by making your own fabric food wraps.

Make your own reusable cotton food wraps

I gotta say I am impressed with these simple yet useful beeswax reusable cotton wraps. If you’ve never heard of these before you’re not alone, my husband had no idea what they were and I’m pretty sure he thought I was crazy when I told him what I wanted to make. You use these cloth wraps in your kitchen to replace saran wrap…genius I know! I had never used beeswax or pine resin before this DIY, I actually had no idea pine resin was a thing to buy until recently. But after seeing how easy this project was I am eager to try others that use these ingredients.

I read several different articles telling how to make them. They all basically used the same three ingredients: BEESWAX, PINE RESIN, JOJOBA OIL. Some however didn’t use the pine resin, or any resin at all, and what I read, and now agree with since I have made them myself, is that you won’t get that sticky saran wrap feel unless you use the pine resin. Technically you can just use beeswax but I wouldn’t recommend it.

If you enjoy this money saving tip be sure to check out these reusable oil bottles for the kitchen.

How to make resuable saran wrap. DIY beeswax cotton food wraps made with pine resin. Save money in the kitchen by making your own fabric food wraps.

DIY EASY BEESWAX & RESIN SARAN WRAP

Here’s what you'll need

This is the recipe I used

  • 1/2 c BEESWAX PELLETS

  • 2 t PINE RESIN

  • 1/2 t JOJOBA OIL

The first couple of wraps I made I only used 1 teaspoon of the pine resin and I did not like the way those wraps turned out. So I doubled the resin for the next batch and they turned out SO much better!

1.MELT THE INGREDIENTS

Preheat your oven to 215 degrees. Then mix 1/2 cup of beeswax pellets, 2 teaspoons of pine resin, and 1/2 teaspoon of jojoba oil. The BEST way to do this is to melt it all in a double boiler. I used an old sauce pan and a short mason jar for this. I put a small amount of water in the sauce pan because I didn’t want the jar to float and I knew since I was making a small batch it wouldn’t take much to heat of the jar to melt the beeswax. I used a thin chip brush to do all of the stirring.

How to make resuable saran wrap. DIY beeswax cotton food wraps made with pine resin. Save money in the kitchen by making your own fabric food wraps.

2. CUT YOUR FABRIC

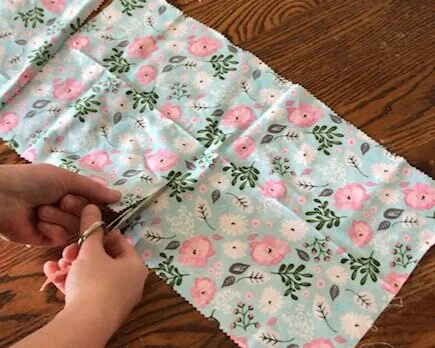
while my ingredients were melting I cut my fabric into pieces I thought would be good sizes for what I wanted to use them for. I cut a few small ones that would fit around the top of a jar. Several medium sized ones that would be good to wrap around food. And a couple of large ones that would fit around my larger sized mixing bowls. I used my grandma’s old pair of pinking shears on the edges of the fabric so that the edges wouldn’t fray once I start using the food wraps. Also, you want to be sure you are using 100% cotton.

How to make resuable saran wrap. DIY beeswax cotton food wraps made with pine resin. Save money in the kitchen by making your own fabric food wraps.

3. BRUSH ON & BAKE

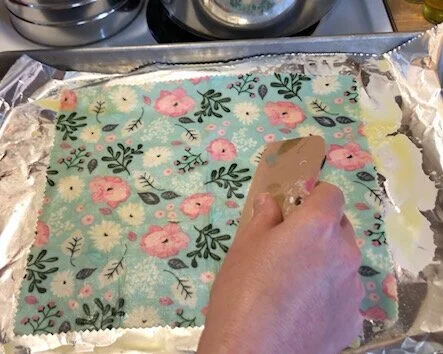
Line your cookie sheet with foil, shiny side down. Place a piece of your fabric on the cookie sheet. Use the chip brush to brush on the melted mixture. Then pop it in the oven for 5 minutes or so. Do not skip placing it in the over. If you just brush the wax mixture on your food wraps they will be stiff, the mixture won’t be on the fabric evenly and it will result in them not working quite right. Placing them in the oven allows the wax to melt completely into the fabric and giving you a nice even coat over the entire piece of fabric.

How to make resuable saran wrap. DIY beeswax cotton food wraps made with pine resin. Save money in the kitchen by making your own fabric food wraps.

4. REMOVE EXCESS WAX

Remove your cookie sheet from the oven. Use a squeegee, here's the kind I used, and squeegee the excess beeswax mixture off of the fabric. I didn’t do this for the first couple of wraps I made and I didn’t like how they turned out, for two reasons - there wasn’t enough resin AND they were WAY TOO stiff and waxy. None of the tutorials I read said to do this step though. So maybe they know something I don’t. But I do know when I went to use the first two to try them out before I made more they were kind of blah and I wasn’t impressed at all with them. After I squeegeed the excess off it made all the difference in the world! I didn’t let the excess go to waste either. I scooped it up and placed it back into the mason jar so it could melt back down.

How to make resuable saran wrap. DIY beeswax cotton food wraps made with pine resin. Save money in the kitchen by making your own fabric food wraps.

5. REMOVE & LET DRY

Immediately take them off of the baking sheet and place them somewhere to dry. I lined a cookie drying rack with a piece of foil and then placed the finished wax wraps on there to dry. It didn’t take very long at all for them to completely dry on the drying rack.

How to make resuable saran wrap. DIY beeswax cotton food wraps made with pine resin. Save money in the kitchen by making your own fabric food wraps.

6. USE

Once your food wraps are dry you can start using them immediately. I was so surprised at how well these turned out! I’m even thinking about making some to give as gifts to family and friends.

How to make resuable saran wrap. DIY beeswax cotton food wraps made with pine resin. Save money in the kitchen by making your own fabric food wraps.

Like with all of my DIY posts if you have any questions please feel free to ask. If you make these at home I’d love to hear how yours turn out!

Happy crafting!

DIY Dollar Tree work for hire chore chart

Dollar Tree pizza pan DIY work for hire chore chart. How to make a work for hire board for your kids. Easy Dollar Tree craft.

Easy work for hire board

I don’t know about you but in my house we don’t do allowance. Well, not the traditional allowance anyway. Instead, we have a work for hire board. And I so wish I would have made this sooner. For years my girls have been asking “what needs to be done” for them to earn money for the not so everyday chores around the house. Of course they would ask at the times when my brain was on anything but that and I would have to stop and think hard about what needs to be done and how much to pay for that chore.

Affiliate Disclosure. Some of the links on this website are affiliate links, which means that I may earn a small commission if you click on the link or make a purchase using the link. If you make a purchase you will not be charged anything additional.

Now my brain doesn’t have that extra stress (yes, it’s a stress when your sweet daughter is asking to do work around the house so she can make some cash and your brain just draws a blank :(! ) Having this work for hire board is WONDERFUL! I clip the money to the chore that needs to be done. Then they do the chore and take their earnings. This gives them so much independence and instills a good work ethic that they will carry with them through adulthood. Everyone is happy! They get paid and I didn’t have to wash the windows lol!

Now, I don’t pay the girls to do everyday things like washing dishes, picking up the living room, washing their clothes. Those are everyday kind of chores. The chores on the work for hire board are more like washing the windows, wiping down the baseboards, deep cleaning the bathroom, organizing the stockpile, etc.

And to make it even better was that I picked up the metal tin I used for the work for hire boar from the Dollar Tree! All together this DIY cost less than $5 for everything. See more of my DIY Dollar Tree crafts.

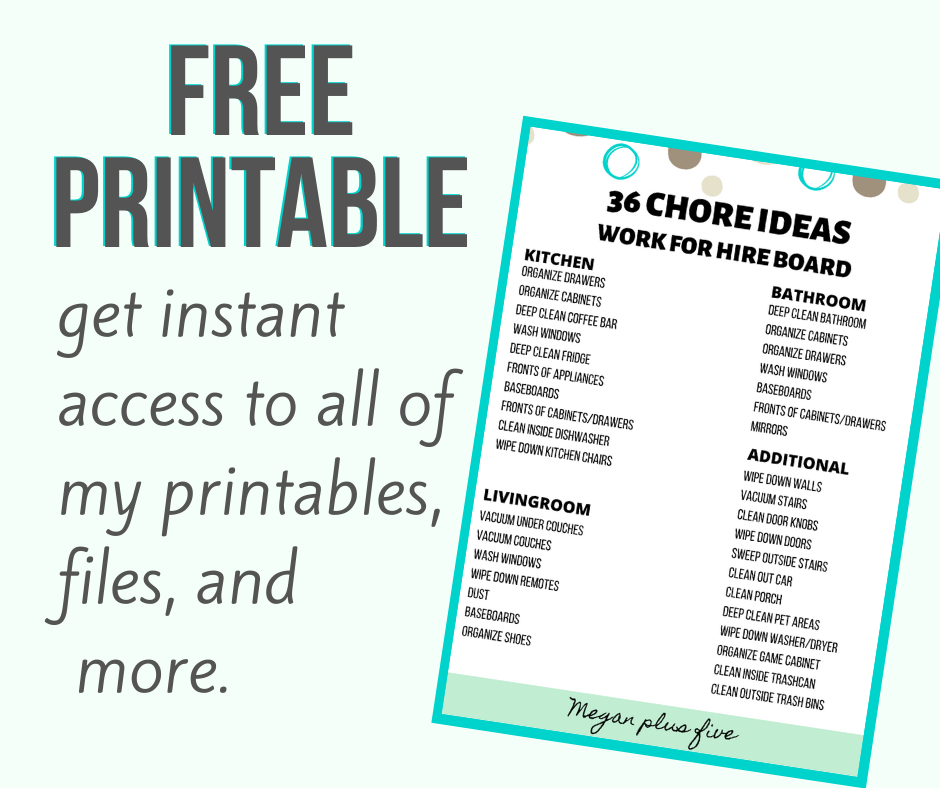
FREE PRINTABLE- 36 work for hire chore ideas for you to print off. Click the photo below to get the password for instant access to my free resource library.

How to make a kid’s work for hire board

Here’s what you’ll need

Helpful tools

ONE-

Use chalk paint and paint the entire front of your pizza pan. I painted two coats on mine, letting the first one dry completely before painting the second coat on. To add a little rustic feel I added some cream colored accent markings to mine. I did this while the second coat of paint was still wet and just liberally added in strokes of the cream colored chalk paint. Let your painted pizza pan dry. I let mine day for several days because I had other things to do before I could finish it up. After mine dried I gave it a quick spray with a clear sealant to give it a protective top coat.

Dollar Tree pizza pan DIY work for hire chore chart. How to make a work for hire board for your kids. Easy Dollar Tree craft.

TWO-

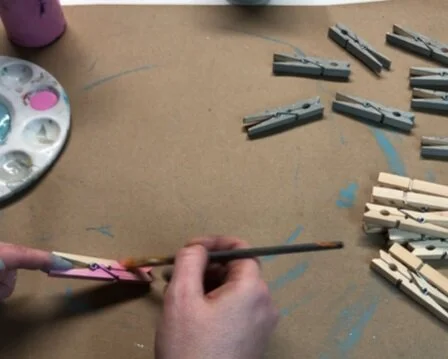
Paint your clothes pins. I just used two colors, pink and gray. I painted my clothespins with two coats of acrylic paint to get a good coverage on them. Let them dry.

Dollar Tree pizza pan DIY work for hire chore chart. How to make a work for hire board for your kids. Easy Dollar Tree craft.

THREE-

Add a vinyl decal to the top that says ‘ work for hire’. You can make your own or grab one similar to the one I used, get it in my FREE RESOURCE LIBRARY. I used gray oracal 651 vinyl for mine. Even though I allowed my painted pizza pan to dry for several days I wasn’t sure if the transfer tape would remove the paint so I applied my decal very gently. I tried not to push the transfer tape down too much and focused on just the decal. Thankfully none of the paint came off of my pizza pan when applying the work for hire decal.

Dollar Tree pizza pan DIY work for hire chore chart. How to make a work for hire board for your kids. Easy Dollar Tree craft.

FOUR-

Write the chores on your clothes pins. Ours don’t change too much, they are pretty much the same things that need to be done every month so I used a fine point sharpie to write on mine. When I made mine I wrote on the painted clothespins after I glued the magnets to them…big mistake. It would have been far easier to write on them first, glued magnets second. But now I know for next time AND I know the right way to tell you how to do it so you don’t make the mistake I did.

Dollar Tree pizza pan DIY work for hire chore chart. How to make a work for hire board for your kids. Easy Dollar Tree craft.

FIVE-

Use E6000 and glue a magnet to the backside of each of your clothespins. If you’ve never heard of E6000 it’s basically a really strong glue. It does take about 24 hours to fully dry though. Oh, and it does have a bit of a weird smell to it but it is good for crafts lol! Set your clothespins somewhere they won’t be disturbed so they can dry properly.

work for hire3.Dollar Tree pizza pan DIY work for hire chore chart. How to make a work for hire board for your kids. Easy Dollar Tree craft.

SIX-

Add a ribbon hanger to the back. Make sure it lines up with the front, you don’t want a lopsided chart hanging up after all this hard work. Use tape to hold the ribbon in place on the backside. Glue to the back side of the pizza pan using E6000. I used the discarded piece of backing from my vinyl to press the ribbon into the glue. I didn’t want all of that on my fingers. That worked great for me! Just like with the clothespins, set the pizza pan in a place it can fully dry without being disturbed.

Dollar Tree pizza pan DIY work for hire chore chart. How to make a work for hire board for your kids. Easy Dollar Tree craft.
work+for+hire9.jpgDollar Tree pizza pan DIY work for hire chore chart. How to make a work for hire board for your kids. Easy Dollar Tree craft.

SEVEN-

After everything is dry hang up and add your clothespins with the money attached to them.

Dollar Tree pizza pan DIY work for hire chore chart. How to make a work for hire board for your kids. Easy Dollar Tree craft.

I hope you enjoyed this crafty tutorial and that it helps and inspires you to create your own. As with all of my posts, if you have any questions please feel free to ask.

Happy crafting!

Want instant access to all of my freebies? Fill out the info below and you instantly get the password to get into my FREE RESOURCE LIBRARY. This is where I share all of my printable, files, more to share with anyone that wants them to use for non commercial use.

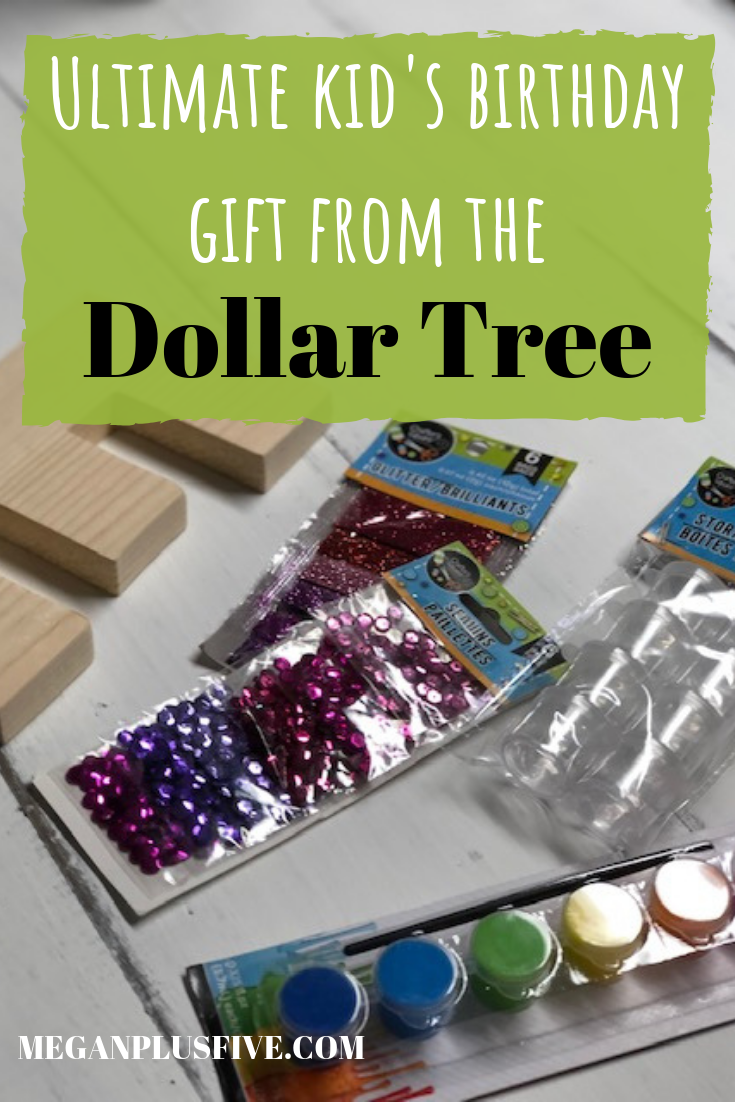
Ultimate Dollar Tree birthday gift idea

Ultimate kid's birthday gift from the Dollar Tree

The best kid’s birthday gift idea when you’re on a budget

It’s no secret that my girls and I LOVE the dollar tree. Seriously, we were just there today and when we got home my oldest couldn’t believe that we spent and entire HOUR in there and it literally felt like only 20 minutes had past lol! Yep…raising those girls right!

Our sole purpose of the trip was to find a couple gifts for the oldest daughter’s friends for their birthday parties. Raising a family of 6 isn’t a cheap task. So, things like friend’s birthday parties typically have a pretty small budget of $10 per kiddo. At Walmart $10 doesn’t get you much from the toy aisle or any aisle that a kid would be interested in anyway. But, I have to say over the years we have gotten really good at whipping up some amazing birthday gifts on the $10 budget. And I can’t wait to share the latest gift that comes in WAY under budget! Under budget meaning 70% lower than what we typically budget for friend’s birthdays.

Affiliate Disclosure. Some of the links on this website are affiliate links, which means that I may earn a small commission if you click on the link or make a purchase using the link. If you make a purchase you will not be charged anything additional.

How was I able to create two gifts for kids for under $6?

Well, first the Dollar Tree. It is FULL of really amazing things that on their own may not be all that amazing but when paired with something else, like let’s say a personalized wood letter cut out, can be one of the best gifts ever! And second, I just purchased a scroll saw last weekend with the money that comes in from my handmade business so I used that to create the customized gifts for her friends.

The ultimate Dollar Tree birthday gift idea for under $5

My only regret is not buying a scroll saw sooner. If you’re curious about the one I purchased you can see more about the Ryobi scroll saw here. And if you wanna know about the other tools I have in my shop I’ve written a break down of which tools every crafter needs.

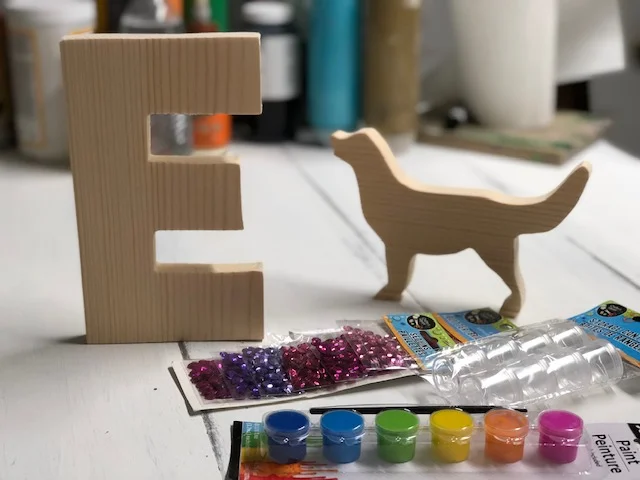
I used my Cricut Explore to cut out the letter E and the dog from cardstock. Then I outlined them with a pencil on a scrap piece of 1x8 that had been sitting on the wood shelf in the garage. Using my new handy scroll saw I cut out the shapes. Gave them a light sanding and they were ready to add to the items we picked up at the dollar tree.

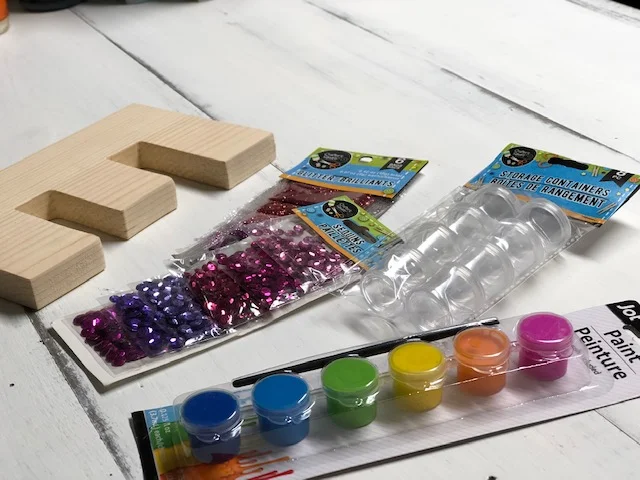
Here’s what we picked up from the dollar tree

  • 1 package of purple/pink 6 pk glitter

  • 1 package of blue/green 6 pk glitter

  • 1 package of purple/pink sequence

  • 1 package of small containers

  • 2 paint pots

We bought the small containers to fill with white paint and glue {which we have a TON of at home} . Since the paint pots don’t come with white paint and sequence doesn’t stick well to paint we thought those additions to the birthday gifts would be a good idea. I wrote on the outside of the containers which one was glue and which one was paint so there wasn’t any confusion when the birthday girl goes to use her new craft kit.

The glitters and sequence were individually wrapped so we pulled them off of the original packaging {they were just taped to the thin cardboard} and gave each birthday girl 4 glitters and 2 sequence.

The ultimate DOLLAR TREE birthday gift idea

To keep the birthday crafts looking somewhat professional I packaged the craft supplies in a clear goody bag {the party favor kind} that we already had left over at home.

I am so excited about this new DIY birthday craft idea! It’s absolutely perfect for the crafty kiddo in your life and it costs just a few dollars to create! I can honestly say that our girls loved this idea so much they each want their own.

———> Want more crafty gift giving ideas? Check out my post on these top selling kid approved DIY CRAFT KITS FOR KIDS

——> Also, you don’t want to miss this a great list of the PRE TEEN CRAFT IDEAS, because they can be so hard to buy for sometime

5 awesome craft kits your kids will love

5 awesome craft kits your kids will love. Totally kid approved

Craft kits kids will love

Kids love to create. They have creativity coming out their ears it seems like. Back when we had our brick and mortar craft studio we would sell these kits like crazy! And now we have them online so kids all across the world can enjoy them.

Don’t want to buy the kits but want to know how to make the craft? I’ve got ya covered! After the end of the descriptions I’ve included the link to the tutorial here on my blog.

Here are our top 5 craft kits that have been kid tested and APPROVED!

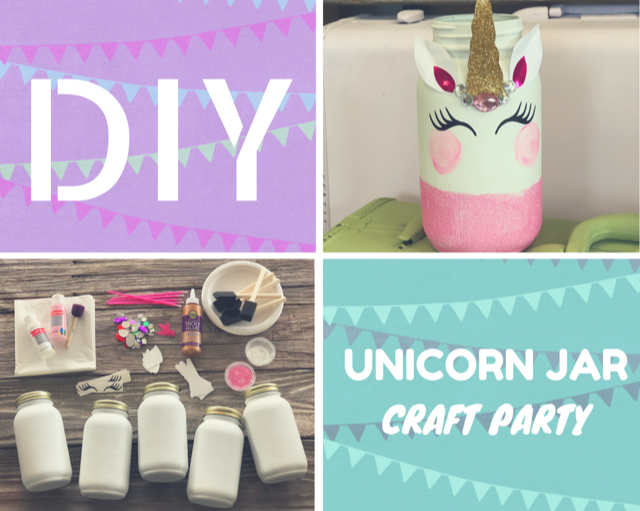
  1. DIY glittery unicorn mason jar

This unicorn mason jar craft kit is one of our top selling craft kits we ship. Each kit comes with a pre-painted mason jar so you don’t even have to worry about that step {painting mason jars can be a challenge due to curing times in between coats}. Upgrade to a unicorn mason jar craft party size

Check out the DIY glittery unicorn jar tutorial

2. CUSTOM name canvas art

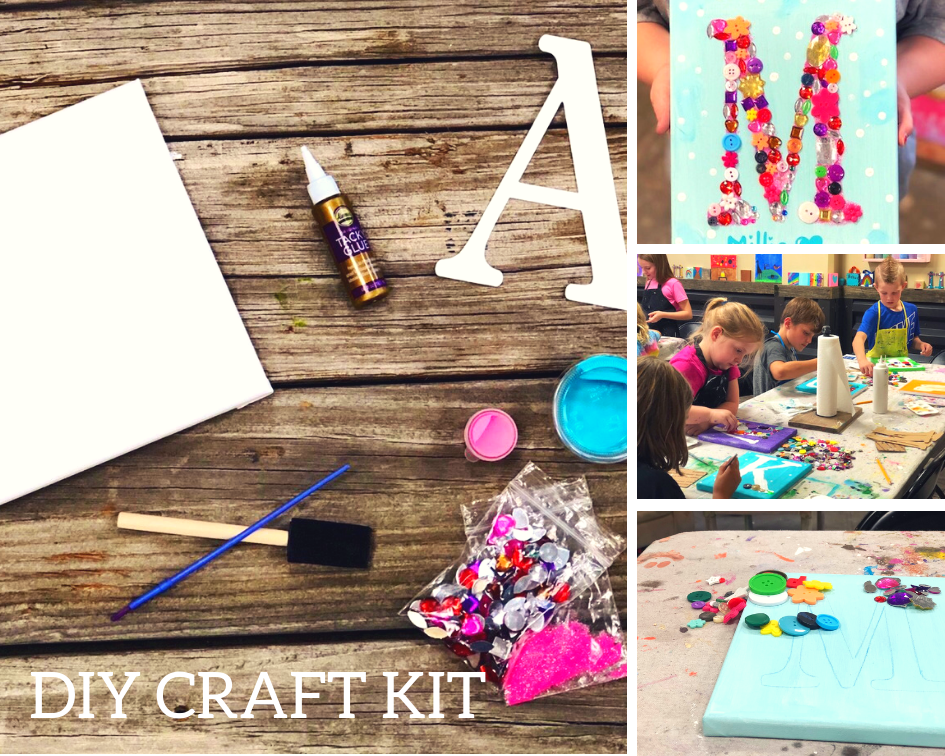
What kid doesn’t want their name on a beautiful canvas that they paint? This custom name art canvas craft kit comes with everything your kiddo needs to have a personalized canvas art. Your name of choice comes already attached to the canvas so it’s ready to go right out of the box. Once your kiddo paints their canvas you simply peel up the stencil to reveal the white lettering underneath. This custom name art craft is also available in party sized, actually this a great option for family get togethers to give the little ones something fun to do.

Check out the DIY custom canvas art tutorial

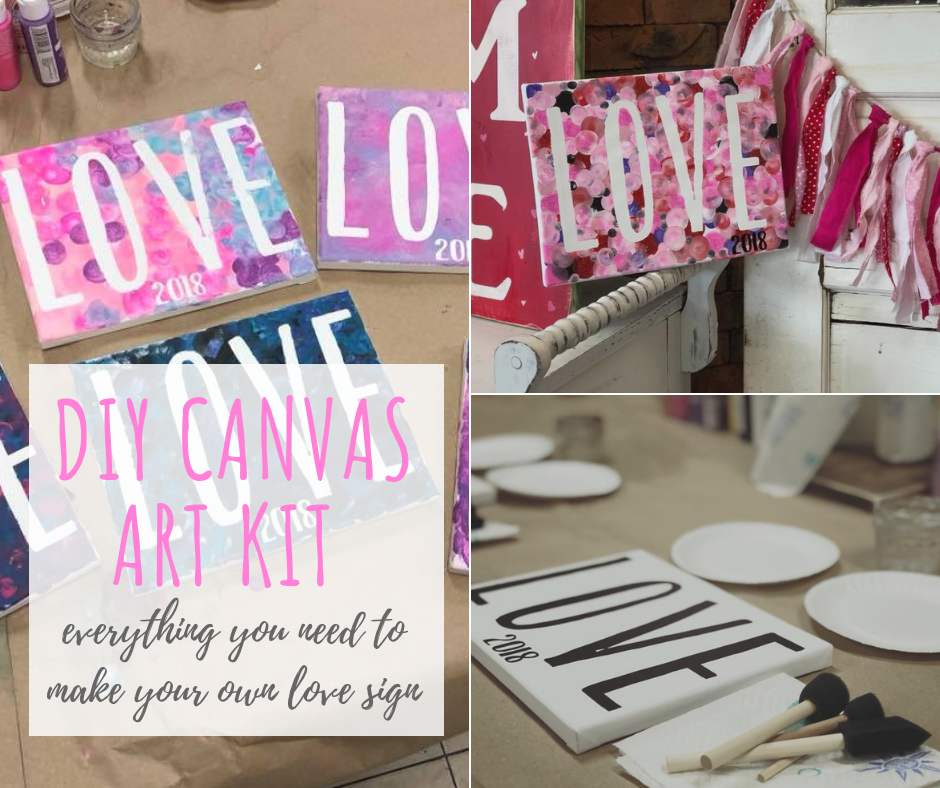
3. LOVE canvas art craft kit

Much like the craft kit above this canvas art come with the stencil already applied and ready to create right out of the box. This Valentine’s Day canvas art craft kit is always a big winner with moms and kids!

Check out the DIY canvas art tutorial

4. Mixed media canvas art craft kit

I can’t tell you enough how much kids LOVE this custom initial craft kit. The get to choose their own colors, buttons, rhinestones, and glitter and totally make it their own. This kit is so much fun and more!

Check out the DIY custom mixed media name canvas art tutorial

5. DIY light up fairy jar

Calling all whimsical fairy believers! This light up fairy jar craft kit will make a perfect gift for the fairy lover in your life. This kit includes a smooth mason jar, embellishments, cardstock fairy, glitter, twine, tissue paper, and a battery operated light. Full picture instructions are included.

Check out the DIY glittered light up fairy jar tutorial

There you have it our top 5 craft kits approved by kids! Each and every one of these kits was a top seller in our brick and mortar craft studio and they each continue to be top sellers in our online shop.

If you have any questions on the craft kits please feel free to reach out to me. Each one come will full picture instructions and materials to complete each craft. Please note tools such as a glue gun are not included inside our DIY kits.


DIY sensory activites your toddler will love

DIY sensory activities your toddler will love. How to make sensory bins for you tot.

What is sensory play for toddlers?

Sensory play is crucial for your child’s development. I’m not going to spout out all the scientific reasonings sensory play is huge for your toddler…because I am not a doctor or licensed in this field in any way. I am, however, a momma of 4 and have seen what it’s done for our own daughters. And since I’m super frugal and crafty I am going to share with you how you can make your own DIY sensory activities on a dime! If you’d like to read a little more science behind sensory importance read this article from Heather at Growing Hands-On Kids.

Sensory play touches on these five senses

  • sight

  • smell

  • touch

  • taste

  • hearing

When we let our kiddos explore the things around them they start to understand their bodies. They start to understand just how all these different things work. So when all you see is a mess what they “see” is so much more. They are learning through play. Just as you would learn through doing something, say a new craft technique, or a task at work. We learn when we do and our babies and toddlers are no different. So, don’t focus on the mess. Focus on the wonderful things that are happening inside your little one’s brain.

And a plus is that it’s SO easy to make your own sensory activities at home. More than likely you already have everything you need to create these too.

Affiliate Disclosure. Some of the links on this website are affiliate links, which means that I may earn a small commission if you click on the link or make a purchase using the link. If you make a purchase you will not be charged anything additional. This is just a way I can help add to our family finances to raise our four daughters. Please know I would never recommend a product or service I do not totally stand behind.

If you love this article you’ll also love my post on toddler apple stamping canvas art. This is sensory oriented and makes an adorable keepsake for you!

Here are my top sensory activities to do at home for toddlers

1. Colorful fluffy paint on foil

Here’s what you need

  • containers

  • paint brushes {or they can use their fingers}

  • pan

  • foil

  • food coloring

  • cool whip

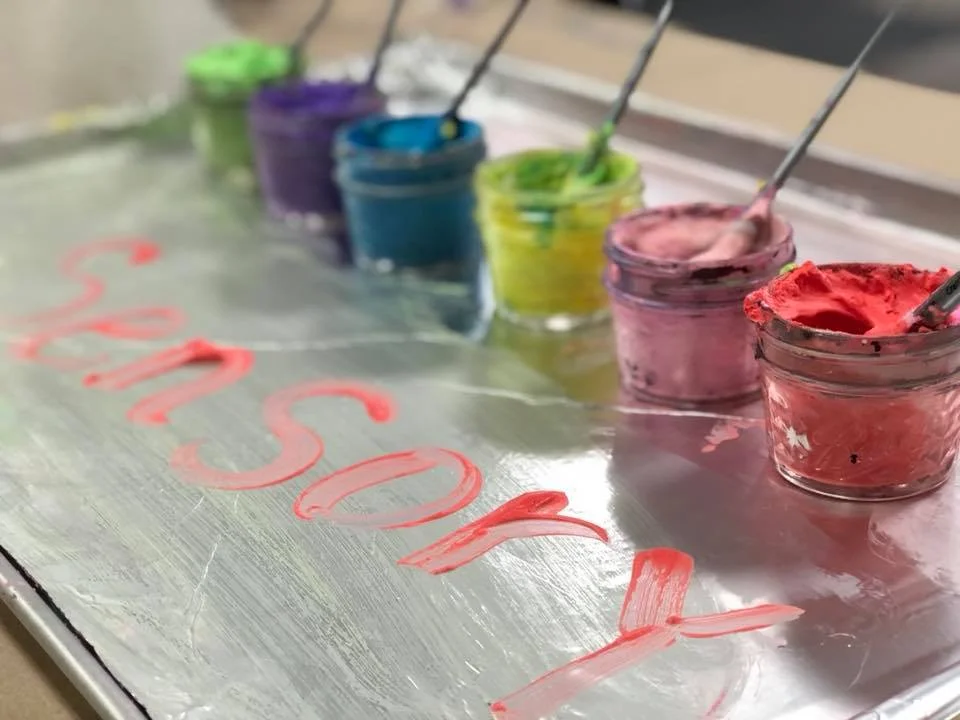
Cover a metal pan in foil. Fill containers half way with cool whip. Add a few drops of food coloring. Let them paint. You can wipe off the foil if there gets to be too much cool whip “paint” on it and let them do it all over again.

DIY sensory activites for your toddler that you can do at home

2. Color sorting with noodles

Here’s what you’ll need

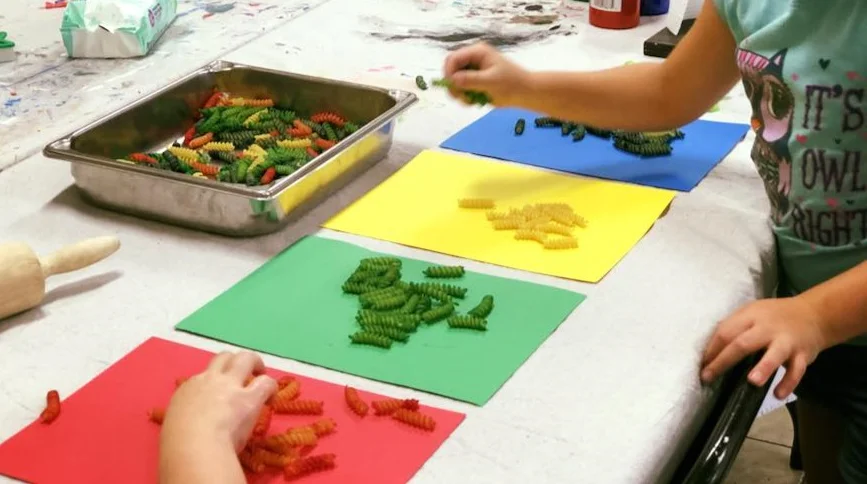
  • colored noodles. I made these by placing them in ziplock bags, adding food coloring and shaking. Allow them to dry overnight prior to using.

  • bin or bowl

  • colored paper to coordinate with the colors of noodles you have

This is a really fun game for kids. This would literally keep our youngest daughter busy for a solid hour! You can even add some drops of essential oil to the noodles when you color them to make it an even better experience for your tot.

DIY+sensory+activities+your+toddler+will+love%2C+how+to+make+sensory+games+for+toddlers

3. Racing cars in paint

Here’s what you’ll need

Cut the bottom off your trash bag and a slit in the side, so that the bag opens flat. Tape it to the floor, a solid ground not the carpet. Add some paint and let your kiddos explore what it looks and feels like to run wheeled things through it. Even better because they see what it looks like when they start mixing the different colors together. This is super fun!

DIY sensory activitiy for your toddler, how to make your own sensory fun at home

4. Scented Playdough

Here’s the recipe I used for DIY playdough. I did add food safe scented oils to mine. You can see this one is still a big hit with our older daughters. We bring out the cookie cutters, rolling pins when we play with our DIY playdough. Don’t worry if they mix all the colors together, it’s apart of the fun for them.

DIY sensory activities for your toddler, how to make sensory days at home for your kids

5. Water Play

Here’s what you’ll need

  • bins

  • water

  • measuring cups

  • floating balls

  • large kitchen ladles and anything else that looks like fun to use in the water

This one was HUGE with kids! They love playing in the water. Show them how they can pour a scoop of water from one thing to the other. There are so many senses that are used during water play.

DIY sensory activities for your toddler, how to make sensory bins at home

6. Rice Bin

Here’s what you’ll need

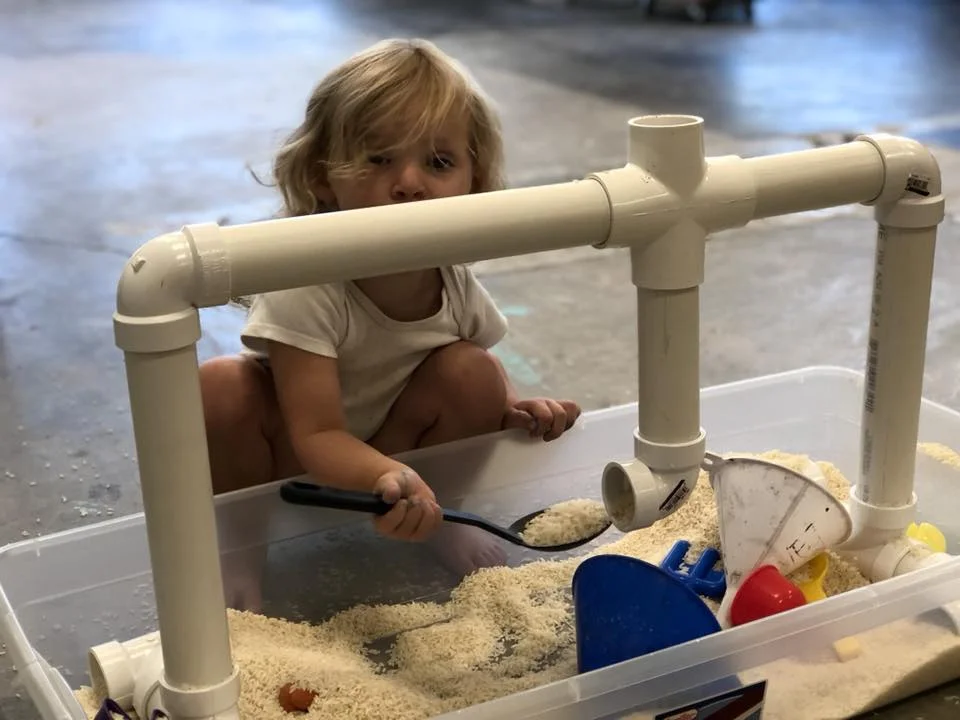
  • rice, LOTS of rice

  • pvc, solid pieces, elbows, and T’s

  • funnels

  • scoop spoons

  • large bin

I saved this one for last because is has been the ALL TIME FAVORITE with the girls! I don’t have exact plans for this DIY sensory rice bin but it didn’t take too much thinking to put together. I just cut pieces for sides, two pieces for the top bar, added some elbow’s, t’s and it was ready to go. I did not glue this together as I wanted to be able to take this apart to store away. You could even do something like this for water play!

DIY sensory activities your toddler will love and how you can make them at home

There you have it, my top 6 sensory play activities for toddlers from a mom’s point of view. Most of the materials for these activities you probably have around the house, talk about frugal toddler fun! Yes, they are messy but let them get messy. Let them learn. Let them explore. Let them be toddlers and enjoy this time you have with them.

Check out more kid friendly posts below

How to juggle it all during the summer when you're a WAHM

5 must have tips for WAHMs to survive the summer months

Is it possible to be a mompreneur during the summer months?

Yes, absolutely! Working from home during summertime with kiddos is, let’s just say a little crazy sometimes, but it’s still possible. I haven’t always been a WAHM so I’ve definitely had to adjust how we “summer” these days. And after a few years I think I finally found our happy middle. As long as I keep these 5 tips for how to juggle it all I can keep my sanity too.

Here are 5 tips to help you “summer” better as a work at home mom.

  1. Set a MOM IS WORKING schedule.

This does not have to be the same every single day. In fact, ours changes daily. I create handmade décor & craft kits so my days are really pretty flexible and this type of scheduling works well for our family. If your schedule can’t be as flexible decide what days you need to work and be sure the ENTIRE family is on board. And then implement the schedule all summer long. I personally have chosen to work 3 days a week and scheduled off 2 fun days per week.

2. Let them help

If your kiddos are old enough and your type of business allows for it let them help you. Take the time to show them what it is you do. They will have a much bigger appreciation for your work AND they will love that they got to be involved. Some things our girls help me with in our crafty business is organize invoices, write thank you notes to our customers, and help with packaging.

3. Plan a bucket list

Planning a summer bucket list will give them something to look forward to all summer long. Even better, plan it together. Here is the summer bucket list that our family planned. They are all FREE things to do so I don’t even have the stress about finding room in the budget for a ton of summer activities.

4. Take an hour a day to tidy up the house

Keeping a tidy house will help you keep your mind clear. It’s when the laundry starts to pile up, the toys are scattered everywhere, and the bathroom counter looks like an explosion…don’t judge lol we’ve all been there…that your mind starts focusing on those items instead of what’s on the calendar for the day, whether it’s a fun or a work day. I take 20 minutes each morning to do some light chores and 40 minutes before my husband gets home from work we do the rest of the chores that need to be done that day. This has really helped me from getting distracted and staying on task for the day. We are a chore family so all of our girls, even our 3 year old, get involved in the housework.

5.. Take the time to unwind

For the most part I stop working my crafty job when my husband gets home from work. Although I could craft and create all day everyday it’s so important for my sanity, my marriage, and my job as a mom to take time to just let my brain unwind and breath. Enjoy a drink with your husband on the patio talking about your day. Jump on the trampoline with your kids. Take a walk as a family around the block. No matter what it is, take the time to be present with them every day.

I hope this list of managing your summer as a work at home mom helps. Remember to enjoy those precious babies, work will always be there but they won’t be little forever.

12 tips to make your trip to the zoo even better and stress free

12 tips for a stress free trip to the zoo

I love watching my girl’s faces light up when they see all the animals at the zoo. But to tell you the truth, I haven’t always loved actually going. I know all moms everywhere can relate. It can be so much work and STRESS to take your kids places like this by yourself. But it can be fun for you too you just have to change a few things up. For more fun stress free adventures with the kids check out my backyard camping tips.

Here are my top 12 tips to make your zoo trip even better.

  1. Go to the zoo when it’s not crazy hot. When I’m hot I get grumpy, which really just means that I’m not enjoyable to be around lol! So we always go on days when this crazy Midwest weather isn’t scorching.

  2. If you’re taking multiples have them wear the same color. I have four girls so I bought larger pink shirts from Walmart, so they could grow in to them each year, and those were our zoo shirts. This way it’s super easy to pick them out in the crowd.

  3. Take a backpack. this is a must! Anytime we are going to be out walking around for extended periods I ALWAYS wear my backpack. I’m not a fashion forward kind of girl so this does not intrude on my style one bit. Comfort over fashion, that’s how I roll lol!

  4. Don’t over pack. I know you’ll want to take everything but the kitchen sink but the truth is you don’t need everything. I used to be that mom and I learned that I don’t need to be prepared for EVERYTHING. The zoo is equipped with Band-Aids if one of my precious girls falls and skins her knee. So keep the load light and if you absolutely need something you didn’t pack it’s not the end of the world, the zoo will likely have what you need.

  5. Pack the essentials. I’m talking wet wipes, ibuprofen for both you and the kids, Benadryl for the kids {this is a must with us because we’ve been in situations where we needed it asap for a yellow jacket sting and now I don’t go on trips like this without it}. These items are small and will fit easily and weightlessly in your backpack. Trust me, these are items you don’t want to buy once you get there. Talk about a convenience fee.

  6. Pack a lunch. I don’t think we’ve ever bought lunch at the zoo. The prices there are crazy high so we pack one. If you choose to pack a lunch keep it simple. We usually take a sandwich, cut up veggies, chips, and something sweet for everyone. I’ve found if I keep my kids busy they don’t want to snack all day. So keep pointing out those animals and talking about them, they’ll likely not ask for a snack.

  7. Take refillable water bottles. We usually take two and I keep them in the side pockets of my backpack. Our zoo has water refill stations everywhere there is a bathroom so we usually refill every time we stop to use the facilities. And with four kids we stop often.

  8. Everyone NEEDS to wear comfortable walking shoes. We don’t ever wear sandals or flipflops, always tennis shoes because again, comfort over fashion ;)! Not having your kiddos complain that their feet are hurting from wearing uncomfortable shoes is a glorious thing! You might have to stand your ground before you leave the house but you’ll be SO thankful at the end of the day bc the jelly shoes little Susie wanted to wear won’t be giving her blisters today 🙌!

  9. Pack sunscreen. Our family is full of fair skinned faces so we apply this a lot throughout the day. If your sunscreen bottle is a little too big to carry around all day get a small travel sized shampoo bottle from the Dollar Tree and fill that with your sunscreen.

  10. Bug spray. If you live in an area with little flying evil blood suckers, in other words mosquitos, you will probably need this. Even on days when it’s not typical prime mosquito weather we’ve still encountered them at the zoo. I always take this just to be on the safe side. For some reason they REALLY love us.

  11. Take quarters, enough for all your kiddos, to feed the animals. Our zoo has several areas that kids can feed the animals and sure enough the times when I forget quarters the change machine is down. So take enough for each of your children to get their own to feed for the animals.

  12. Don’t feel like you have to see everything. The times when my girls and I have had the most fun at the zoo is when we go in without a plan. These are the days when I’m not stressing over making it in time for them to watch the birds get fed, or rushing through the animals so fast so we can see them all and we end up not really SEEING them because we rushed. Take your time and enjoy it. And if your kids want to stop and play let them play. Granted you’re there to see the animals but you’re also there to enjoy the day with your kids and if stopping for 20 minutes will make them happy, let them play.

As a mom of four this list has helped me tremendously enjoy our trips to the zoo. The important thing to remember is tip #12. It’s all about enjoying the day with those precious little souls.


Drinking enough water when you're a busy momma, the #1 tip that really works

Drinking enough water when you're a busy momma, the #1 tip that really works

Affiliate Disclosure. Some of the links on this website are affiliate links, which means that I may earn a small commission if you click on the link or make a purchase using the link. If you make a purchase you will not be charged anything additional.

I am going to be seriously honest, I don’t drink enough water every single day. Well, I used to not anyway. I’m willing to bet that there are a lot of mommas that feel the same way I used to. Something about knowing I HAD to drink 8 full glasses, 90 OUNCES of water every single day was intimidating {but give me 8 glasses of Dr. Pepper or iced coffee and that’s a whole different story}. I for real struggled to drink enough water most days and I was really feeling the side effects of it.

Some of my side effects were

  • skin was looking extra dry and wrinkly

  • hungry ALL the time

  • urine was dark in color

  • feeling super fatigued a lot

  • getting a lot of headaches

It wasn’t till I picked up a package of stainless steel straws and used them that I realized it was a mind of matter kind of thing to get myself to guzzle down at least 8 glasses every day. I had every intention of trying these fancy straws out the last two years and just never got around to it {busy mom brain}. One day I finally added them to my cart and I am KICKING myself for not doing it sooner!

Using the straw works because we tend to drink more when we use a straw. And using a stainless steel straw works even better because it is reusable. Just wash and dry when you’re done using it and it’s ready for water drinking the next day!

But I still wasn’t drinking enough water. I was drinking more, but not as much as I needed to be to get adequate hydration. I still felt an overall blah. So I pulled out my stainless steel tumbler to see if maybe that would help.

Drinking enough water when you're a busy momma, the #1 tip that really works

Holy cow it did! After about a week of drinking from my Ozark 30 oz tumbler I noticed a HUGE difference in the way I felt. For the first time in a very long time I felt truly hydrated! My skin felt amazing. It wasn’t itchy and scaly {even using coconut oil daily wasn’t combating this}. My hair didn’t feel as yuck as it had been. My mind was even clearer! I had a better focus and I actually had energy to get things done AND wake up early!! This is huge for me since I’m not a morning person at all.

This has worked so well for me that I picked up an Ozark 20 oz tumbler for each of my girls. They are loving them and I’m loving that they don’t get all the glasses in the cabinet dirty anymore.

I picked my tumblers up at my local Walmart but here are the links to purchase similar ones on Amazon Prime

Being a busy momma it is hard to be sure to do all the things but we really do need to put our health and our family’s health at the top of the to do list. Start with drinking enough water. I promise you will be a much more productive momma and you will love your hydrated self!