DIY hot mess method for a wood sign

Hot mess painting method DIY craft tutorial. How to make a hot mess wood sign or canvas using a stencil and your Cricut cutting machine. Easy hot mess painting instructions.

MAKE YOUR OWN HOT MESS STENCILED SIGN

Have you seen the HOT MESS paint method? It’s not a look everyone loves but there are a lot of people out there who are in total love with this colorful way of stenciling.

A couple years ago my cousin got married and I was asked to make her a special personalized gift for her wedding shower. I had never done the hot mess canvas method before so this was totally new to me. But it worked great and I want to share with you how I stenciled her wood sign using that technique.

Hot mess painting method DIY craft tutorial. How to make a hot mess wood sign or canvas using a stencil and your Cricut cutting machine. Easy hot mess painting instructions.

I made this before I was a serious craft blogger so I don’t have step by step pictures but I will explain how to do the whole hot mess process below.

Affiliate Disclosure. Some of the links on this website are affiliate links, which means that I may earn a small commission if you click on the link or make a purchase using the link. If you make a purchase you will not be charged anything additional.

—-> New to Cricut? Read my post on the top 10 accessories and supplies you need to get started using your vinyl cutting machine<—-

If you want to save money on ORAMASK STENCIL FILM for you Cricut or other vinyl cutting machine be sure to check out this post on where I buy my stencil film in bulk. It saves me TONS of money on my hand painted wood signs.

DIY HOT MESS SIGN PAINT METHOD

Here’s what you’ll need

1. PAINT

The first thing you want to do is paint your base (whether that be a canvas or a piece of wood like I’m using) all different colors. You can get as creative as you want with this. My cousin is really into The Wizard of Oz so I used all the colors of the rainbow for her hot mess wood sign.

Hot mess painting method DIY craft tutorial. How to make a hot mess wood sign or canvas using a stencil and your Cricut cutting machine. Easy hot mess painting instructions.

Usually I like to use reusable brushes but for this I used sponge brushes because I had so many different colors to paint.

I randomly painted different colors of acrylic paint until my wood was completely covered in colorful brush strokes. The lighter colors I had to apply a couple of coats for them to be seen. Then I let it dry.

2. APPLY THE STENCIL

I used my Cricut cutting machine to cut out my stencil. This is a REVERSE STENCIL METHOD so I weeded out the background and left the letters. CLICK HERE to learn more about REVERSE STENCILING on wood signs.
How to apply the stencil: Place your transfer tape sticky side down onto your stencil. Rub out any air bubbles with your vinyl squeegee. Remove the paper backing. Then place your stencil onto your canvas/wood base. Rub again with your vinyl squeegee. Remove your transfer tape.

3. SEAL YOUR STENCIL

After I pushed out any air bubbles I sealed my stencil with matte finish mod podge. This is key to having zero paint bleed. I let that dry.

Hot mess painting method DIY craft tutorial. How to make a hot mess wood sign or canvas using a stencil and your Cricut cutting machine. Easy hot mess painting instructions.

4. PAINT

After my matte finish mod podge was dry I painted over the entire sign with white chalk paint.

You can use acrylic paint for this but in my opinion chalk paint is better for this particular project because it has great coverage.

I painted one really thing layer, you can still see the stencil and colors through my paint and that is exactly what you want for the first layer. Then I let that dry completely.

Hot mess painting method DIY craft tutorial. How to make a hot mess wood sign or canvas using a stencil and your Cricut cutting machine. Easy hot mess painting instructions.

Be sure you aren’t applying your chalk paint too thick. If chalk paint is applied in too thick of layers it will crack as it dries. For some projects that will look good but not typically on a painted wood sign like this hot mess method.

After the chalk paint dried I painted a second thin layer on top of that. Then I used an xacto knife to peel up my stencil.

Hot mess painting method DIY craft tutorial. How to make a hot mess wood sign or canvas using a stencil and your Cricut cutting machine. Easy hot mess painting instructions.

This isn’t a project I would typically hang in my own home but I do love how colorful it is! And how it looks kinda polished but also a hot mess at the same time which is a great description of my life with four daughters.

Hot mess painting method DIY craft tutorial. How to make a hot mess wood sign or canvas using a stencil and your Cricut cutting machine. Easy hot mess painting instructions.

I hope you enjoyed this sign painting tutorial. If you have any questions please ask them in the comments below.

Want to know all of my sign painting secrets? Get them here —-> SIGN PAINTING E-COURSE <——

Life is short lick the spoon wood sign + FREE SVG

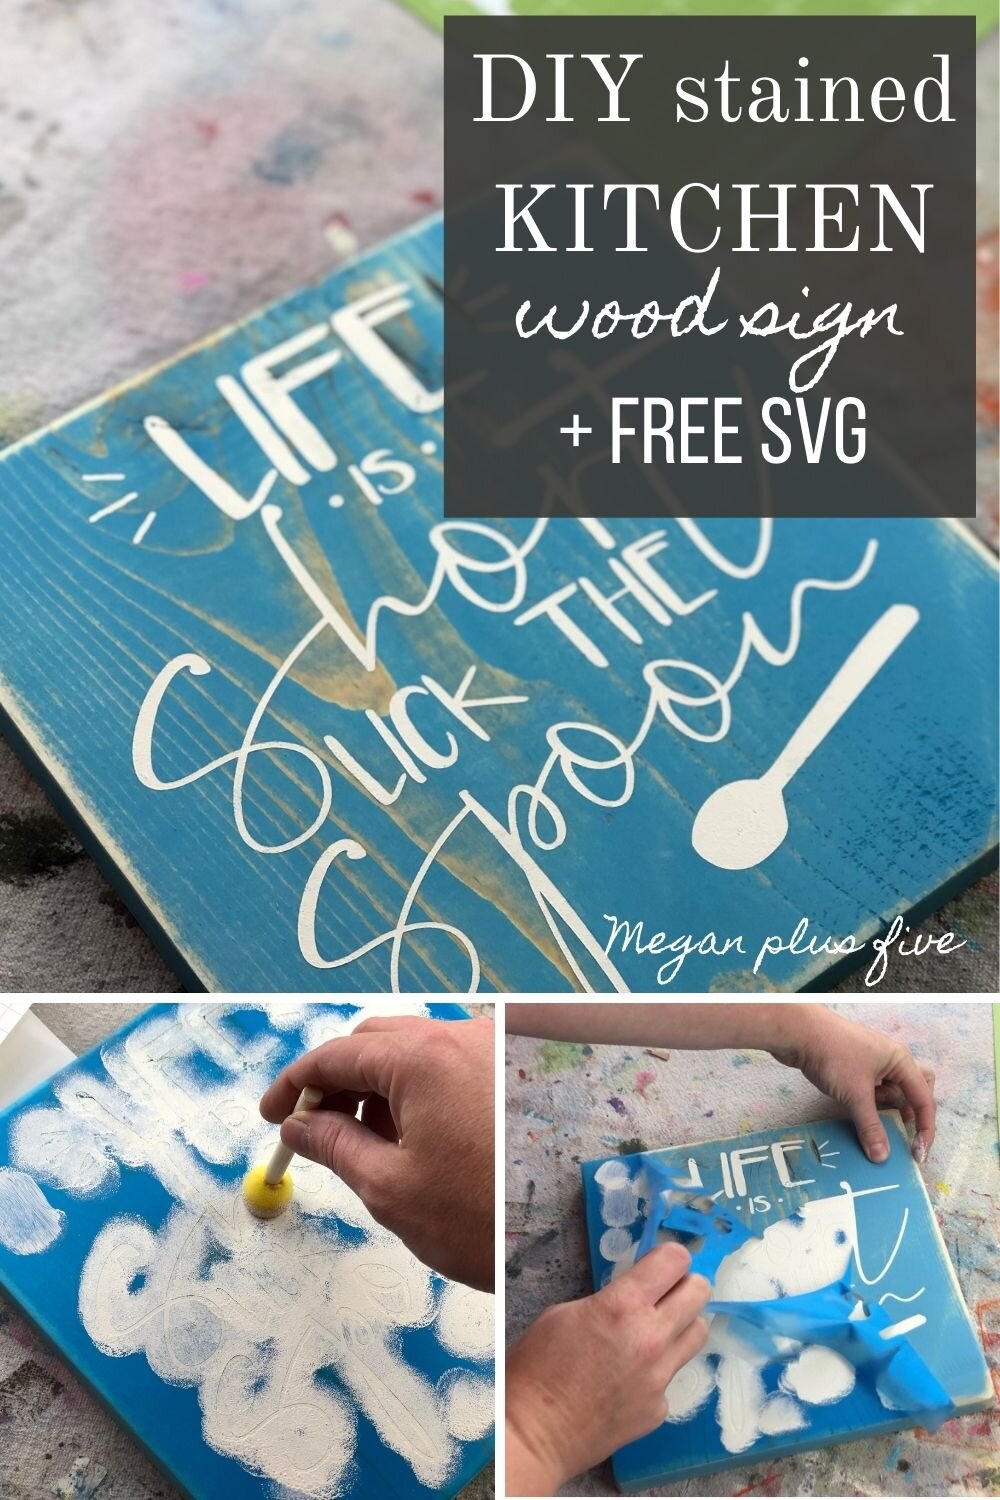
Life is short lick the spoon wood sign. How to paint a wooden kitchen sign with a humorous saying. Stained aqua sign with a white stenciled saying

Life is short lick the spoon wood sign + FREE SVG

Use this free life is short lick the spoon FREE SVG to make your own decal or painted wood sign.

Life is short lick the spoon wood sign. How to paint a wooden kitchen sign with a humorous saying. Stained aqua sign with a white stenciled saying

DIY HUMOROUS KITCHEN SIGN

I’m sure you’ve seen all those gorgeous gallery walls on Pinterest. You know the ones that have all the perfectly placed together farmhouse pieces. If you still aren’t sure what I’m talking about here are some awesome kitchen gallery walls on Pinterest.

Anyway, my friend is making one in her home…in her beautiful home that really probably was a true farmhouse in its day… and she asked me to make her a final piece to finish it up.

Affiliate Disclosure. Some of the links on this website are affiliate links, which means that I may earn a small commission if you click on the link or make a purchase using the link. If you make a purchase you will not be charged anything additional.

She sent me a pic of a sign that said “life is short don’t lick the spoon” and asked if I could make one like it. Of course I said yes!

I used the photo she sent me as inspiration and created my own SVG for the painted wood sign. You can get the same SVG I used here in my free resource library.

Life is short lick the spoon wood sign. How to paint a wooden kitchen sign with a humorous saying. Stained aqua sign with a white stenciled saying

DIY - LIFE IS SHORT LICK THE SPOON aqua stained wood kitchen sign

Here’s what you need

1.CUT THE WOOD & STAIN

I used a 1x10 and used my Ryobi miter saw to cut it square. If you aren’t familiar with lumber it actually doesn’t measure 1”x10” it’s more like .75”x9.25”. So, I cut my piece to measure 9.25”x9.25”. Then gave it a light sanding using 120 grit sand paper.

My friend asked for AQUA STAIN which is a gorgeous color! I had it on hand so I stained it up then let it dry. After it was completely dry I took my Ryobi sander and sanded around the edges and corners then lightly over the front. This gives it a more rustic farmhouse look.

Life is short lick the spoon wood sign. How to paint a wooden kitchen sign with a humorous saying. Stained aqua sign with a white stenciled saying

2.CUT OUT & WEED THE STENCIL

While your wood base is drying cut your stencil out. I used my older model Cricut Explore and it still works like a champ! If you don’t have a fancy cutting machine I highly recommend getting one, even if you can’t afford the Maker (there’s no shame in that I still don’t even have the Maker lol!). Be sure to read 10 must have supplies and accessories to get started using a Cricut. 

Life is short lick the spoon wood sign. How to paint a wooden kitchen sign with a humorous saying. Stained aqua sign with a white stenciled saying

I use Oramask stencil film for most all of my stenciled projects. If you plan to make LOTS of painted wood signs check out this post I wrote on where I buy my stencil film in bulk to save a ton of money.

3. APPLY THE STENCIL

Apply your clear transfer tape onto the front of your stencil. Remove the paper backing from your stencil. Place your stencil sticky side down onto your wood base.

Rub your stencil with your vinyl squeegee and slowly roll your transfer tape off of your stencil. FUN FACT: you CAN reuse your transfer tape over and over again.

Go over the stencil with your finger or your vinyl squeegee to make sure there aren’t any air bubbles. If there are smooth them out.

Click here to see how I made this gorgeous baby stat sign using plywood

Life is short lick the spoon wood sign. How to paint a wooden kitchen sign with a humorous saying. Stained aqua sign with a white stenciled saying

4. PAINT THE STENCIL

I used chalk paint to paint my stencil. If you want to use the same color it’s called SHEEPSKIN.

A dabber like this one is great for stenciling. For the best results and virtually no paint bleed lightly dip your dabber into your chalk paint then dab off the excess, you want very little paint left on the round sponge dabber. Using a pouncing motion paint the exposed areas of the stencil.

Life is short lick the spoon wood sign. How to paint a wooden kitchen sign with a humorous saying. Stained aqua sign with a white stenciled saying

Let dry, then repeat till you are satisfied with the coverage. Typically 2 coats is the perfect amount needed.

5. PEEL UP THE STENCIL

I will usually always peel my stencil up while the stencil paint is still wet. While this is my preferred method this may not work for everyone, and that’s totally ok.

Life is short lick the spoon wood sign. How to paint a wooden kitchen sign with a humorous saying. Stained aqua sign with a white stenciled saying

Start by peeling up one corner of the stencil and peel it off toward the opposite corner.

Use a sewing pin or xacto knife to peel up all the middle areas.

Let your painted areas dry then you are ready to display in your home.

Life is short lick the spoon wood sign. How to paint a wooden kitchen sign with a humorous saying. Stained aqua sign with a white stenciled saying

I hope you enjoyed this sign painting tutorial. Let me know if you have any questions in the comments below.

Check out more DIY SIGN PAINTING TUTORIALS

DIY painted snowman mason jar

DIY how to paint a snowman face on a mason jar. Easy winter craft using mason jars. How to paint snowmen on glass.

How to paint an adorable snowman face on a mason jar


I’ll be honest I’m not the best free hand painter. Most of my projects I use stencils for but I do have a handful of free hand pieces that I create {and creating more every year when I gain more and more confidence}. One of which are painted snowmen mason jars. They come in a set of three and are ADORABLE!

Affiliate Disclosure. Some of the links on this website are affiliate links, which means that I may earn a small commission if you click on the link or make a purchase using the link. If you make a purchase you will not be charged anything additional. This is just a way I can help add to our family finances to raise our four daughters. Please know I would never recommend a product or service I do not totally stand behind.

I paint lots of these every year and sell the completed snowman mason jar sets in my handmade Etsy shop

I love them even more because each set is slightly different. When you handmake nothing is going to be identical, no matter how hard you try, but that’s what makes it even more special and beautiful.

These snowmen mason jars are perfect for gift giving, centerpieces, candy cane holders, tea lights, sooooo many options with these winter crafts!

Here’s what you’ll need

Watch my YouTube video below or keep scrolling for detailed written instructions on how to paint a snowman face on a mason jar

First you need to start with a pre-painted mason jar. You can do this on non painted glass but I’ll be giving the steps to create this exact style pictured.

I don’ t have a post on how to paint solid color mason jars but I do have a few tips to share on how I paint my mason jars

Ok once you have your mason jar painted you are ready to paint an adorable snowman face on it!

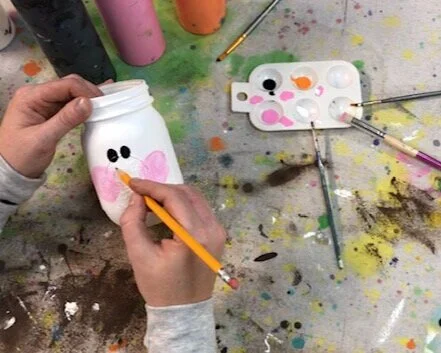
Paint the cheeks first. You do this first because they are behind the nose. This way you won’t have to go back and paint the cheeks and take chances on ruining the perfectly imperfect snowman nose. And the cheeks give you a guide to where the rest of the features will go. You can practice this on a piece of cardboard or scrap paper first. Use very little paint, you don’t want too much paint because once it’s on the jar it’s hard to take away without removing the base coat. Dip you brush in the pink paint, then add a little white, then swirl on the jar. Repeat this step till you’re happy with how they look.

How to paint snowmen faces on mason jars. DIY snowman on a ball mason jar. Rustic winter mason jar decorations and gifts

Using a small round tipped brush paint the eyes using black acrylic paint. I make mine fairly small and I basically make two “C’s” butted up together, so that they make a bean shape. Fill them in so they are solid black.

How to paint snowmen faces on mason jars. DIY snowman on a ball mason jar. Rustic winter mason jar decorations and gifts

Next use a pencil and sketch out the nose. You’re basically going to make a sideways curved triangle. To me this gives it a lot of character and makes it super cute! Then fill in the triangle with orange paint.

How to paint snowmen faces on mason jars. DIY snowman on a ball mason jar. Rustic winter mason jar decorations and gifts

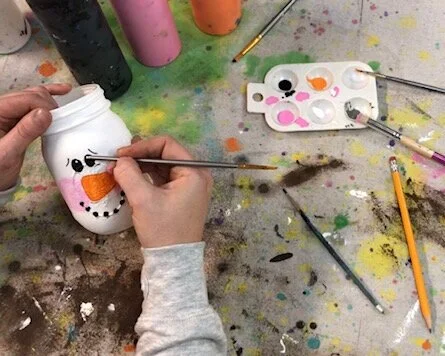
Now paint on the mouth with black paint using the same brush you used to make the eyes. I use the curved line on the mason jar as the guide for my snowman’s mouth. Just make little dots in the shape of a snowman mouth. My dots are never perfect, you want the to be lopsided like lumps of coal.

How to paint snowmen faces on mason jars. DIY snowman on a ball mason jar. Rustic winter mason jar decorations and gifts

Make all the little accent lines, like the eyebrows and dash marks, using a pointy flat brush and gray paint. The gray paint gives the snowman face more dimension and breaks up the color a bit. On each eye I make a curved up line above the eye and a curved down line below the eye. Then, for the nose, I make a curved line around the base of the nose. I add a little dash mark below each dot on the mouth.

How to paint snowmen faces on mason jars. DIY snowman on a ball mason jar. Rustic winter mason jar decorations and gifts

Using the wood end of the brush you used to paint the eyes, dip it in white paint and on each eye and mouth dot make a big and small dot. And on each eye make a dash line toward the bottom of the eye using the brush end of the paint brush.

How to paint snowmen faces on mason jars. DIY snowman on a ball mason jar. Rustic winter mason jar decorations and gifts

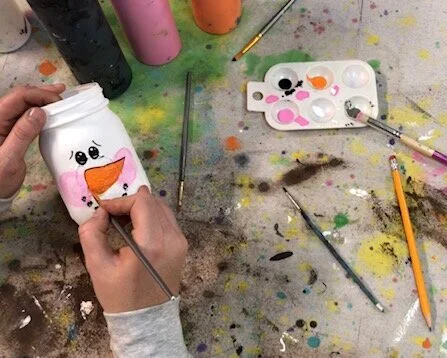
The snowman’s nose should be dry now, paint a second coat of orange on it. While the second coat is still wet add a little bit of black paint at the base of the nose to give the nose more dimension and a tiny bit of white toward the top. This will keep you snowman’s nose from looking too flat. Then outline the nose with a flat pointy tip brush with black paint.

How to paint snowmen faces on mason jars. DIY snowman on a ball mason jar. Rustic winter mason jar decorations and gifts

After the nose is dry add a little bit of “snow” to the top part of the nose. I used my stenciling brush for this step because the bristles are very stiff and give a good fluffy snow look. Use very little paint when doing this, if you use too much it will look like a fat blog and will be hard to fix without making a bigger mess.

How to paint snowmen faces on mason jars. DIY snowman on a ball mason jar. Rustic winter mason jar decorations and gifts

I hope I was able to break this craft down into easier to follow steps. Let me know what you think in the comments below.

Dollar Tree pumpkins, how to give them a RUSTIC makeover

Frugal fall decorating, how to give a Dollar Tree pumpkin a rustic makeover

Frugal fall decorating, how to give a Dollar Tree pumpkin a rustic makeover

We’ve all seen them the bright orange pumpkins on the shelves at the Dollar Tree. You think to yourself ‘I could paint that up and make it look soooo much better’. Then fall comes and the darn ugly pumpkin is still sitting there untouched by your creativity. Yep…that’s me. I am totally that kind of Dollar Tree shopper and I’m not ashamed to admit it.

After having several of these little pumpkins sit on my craft room shelf for almost a year I decided what better time to give them a makeover than now?! Fall is almost here and I have been working like a busy crafty bee trying to gear up for this season. Check out my latest DIY, 2x4 candy corn they turned out SO stinking cute! AND you don’t want to miss this frugal find, Walmart clearance shoes, that I gave a total makeover to for my 3 year old to wear this fall. She absolutely LOVES them!

How to turn your DOLLAR TREE pumpkins into rustic perfectly distressed pumpkins

Affiliate Disclosure. Some of the links on this website are affiliate links, which means that I may earn a small commission if you click on the link or make a purchase using the link. If you make a purchase you will not be charged anything additional.

I had everything I needed on hand, including the pumpkins, but here’s what I used to turn my pumpkin from bright orange into rustic farmhouse.

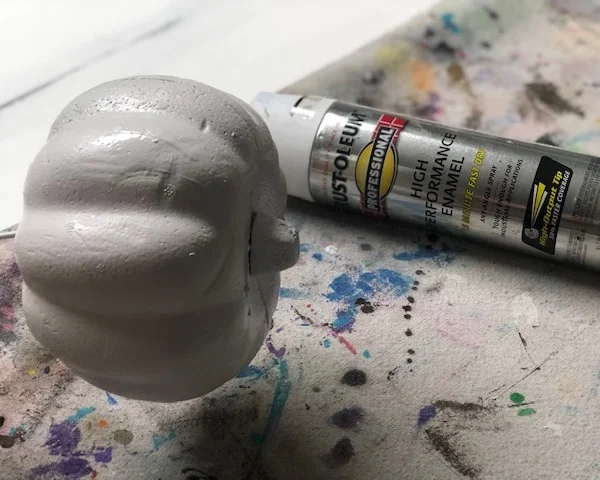
First you want to paint your pumpkin white. I used what I found in our garage but you can use any kind of white FLAT spray paint. Stick the skewer in the bottom of the pumpkin so you can hold the pumpkin and spray all around it. Let it dry before you put it down. I used a blow dryer to speed up this process.

Dollar Tree pumpkins, how to give them a rustic makeover

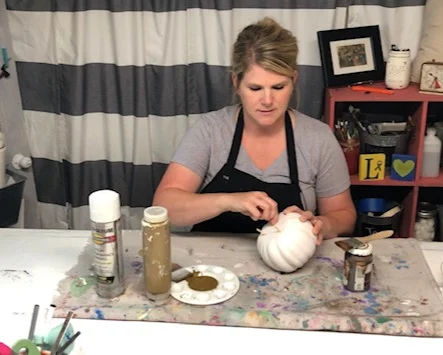
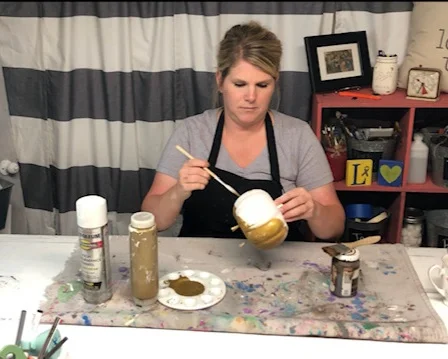
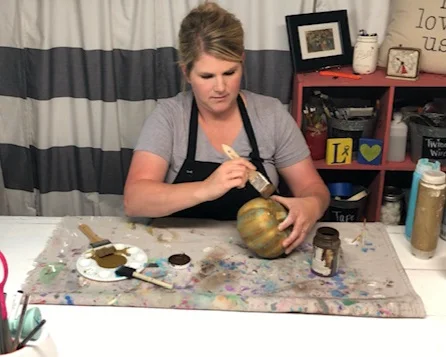
Next you want to paint your pumpkin with your gold chalk paint. I broke 3 small pieces off of the skewer and stuck them in the bottom of the pumpkin so that it would stand up and not touch the table while I was painting it. Let that dry completely before moving on to the next step.

Dollar Tree pumpkins, how to give them a rustic makeover

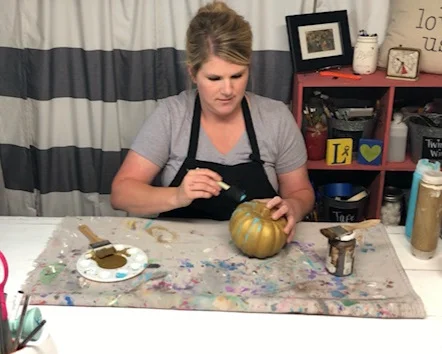
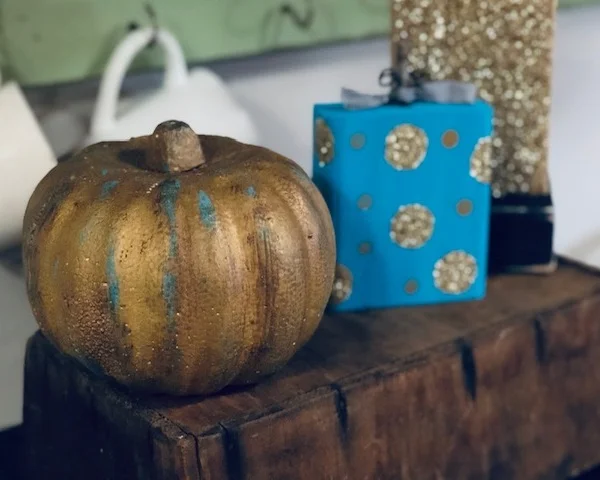
Once your gold chalk paint is dry you want to very lightly dip the tip of your brush into your teal/blue colored paint. I used a color called lagoon and on it’s own is VERY bright but when used as an accent color it is absolutely gorgeous! You don’t want to completely cover the gold paint but lightly brush over it leaving light streaks of the lagoon colored paint. This will dry pretty quick.

Dollar Tree pumpkins, how to give them a rustic makeover

Next you are going to repeat the previous step but instead you are going to use antiquing wax and your chip brush. I added a little more wax than I did the lagoon colored paint to give it a more rustic look. TIP: trim your chip brush down to about an 1” and it will work MUCH better.

Dollar Tree pumpkins, how to give them a rustic makeover

Once you’re satisfied with your coverage you are all done! I’m not totally loving the stem on this on so I might replace it with a stick from the yard but for now it will tie in perfectly with my fall décor! I paired it next to the glittery gold 2x4 pumpkins I made a while back.

Dollar Tree pumpkins, how to give them a rustic makeover

If you loved this tutorial you will love even more of my DIY fall craft tutorials

Check out the full video tutorial below